Panera Macaroni Cheese
Oh, friends, have I got something special for you today! You know those moments when you’re just craving pure, unadulterated comfort food? The kind that wraps you up like a warm hug and makes everything feel right in the world? For me, that craving almost always leads me straight to a steaming bowl of ridiculously creamy, cheesy goodness. And lately, my mind has been wandering back to that iconic Panera Macaroni Cheese. It’s just… perfect. Rich, smooth, with that distinct baked-on cheese crust that’s just heavenly. I’ve tried SO many mac and cheese recipes over the years, searching for that perfect balance of velvety sauce and cheesy flavor, and honestly, some of them were just… fine. They were okay, but they didn’t have that *oomph*, that je ne sais quoi that makes you close your eyes in delight. This Panera Macaroni Cheese copycat recipe, though? This one’s a keeper. It’s the one I whip up when the kids have had a long day, when I need a quick but impressive dinner, or honestly, just when the mood strikes. It tastes SO much like the real deal, you’ll be shocked, and the best part is, it’s surprisingly simple to make right in your own kitchen!
What is Panera Macaroni Cheese?
So, what exactly is Panera macaroni cheese? Think of it as the ultimate comfort food elevated. It’s not just your average boxed mac and cheese, and it’s certainly not a fancy, over-complicated gourmet dish. It’s that perfect middle ground. It’s made with a rich, velvety cheese sauce that coats every single noodle beautifully, and it’s typically baked to perfection, giving it a slightly browned, bubbly top layer of cheese that is just pure bliss. The magic really lies in the cheese blend they use, which creates this incredibly smooth texture without any graininess. It’s warm, it’s comforting, and it’s one of those dishes that just makes everyone in the family happy. It’s essentially the culinary equivalent of a cozy blanket on a chilly evening, and when you’re trying to replicate that kind of happiness at home, this recipe is your golden ticket. It’s familiar, it’s beloved, and it’s surprisingly achievable!
Why you’ll love this recipe?
Honestly, the list of reasons I adore this Panera Macaroni Cheese copycat recipe is practically endless, but let me try to narrow it down for you. First off, the FLAVOR. Oh my goodness, the flavor. It’s this deep, cheesy, savory deliciousness that just coats your tongue. It’s not overly sharp, but it has this wonderfully complex cheesy taste that keeps you going back for bite after bite. And the texture? It’s unbelievably creamy, smooth as silk, with just the right amount of pasta chewiness. No grainy cheese sauce here, I promise! Then there’s the SIMPLICITY. I know, I know, baking often sounds like a lot of work, but this recipe is surprisingly straightforward. We’re talking pantry staples and a few key dairy items that come together really quickly. I’ve made this on weeknights when I’ve only got about 30 minutes before the kids are demanding dinner, and it’s been a lifesaver. It’s also incredibly COST-EFFECTIVE. Compared to heading out to Panera, making this at home is SO much easier on the wallet, especially when you’re feeding a family. You get that restaurant-quality taste for a fraction of the price! And let’s talk VERSATILITY. While this recipe is pure perfection on its own, it’s also a fantastic base. You can totally jazz it up with some crispy bacon bits, some steamed broccoli, or even some pulled chicken. It’s also fantastic for leftovers, which, let’s be real, is a huge win in my book. What I love most about this Panera Macaroni Cheese is that it delivers on all those comfort food promises without being overly complicated or fussy. It’s my go-to when I need something reliably delicious and soul-satisfying. It truly is a winner every single time.
How do I make Panera Macaroni Cheese?
Quick Overview
Making this copycat Panera Macaroni Cheese is a delightful journey that’s way simpler than you might think! We’re talking about creating a luscious béchamel sauce, melting in a beautiful blend of cheeses, and then combining it all with perfectly cooked pasta before a quick bake to golden perfection. The key is in building the sauce properly and using good quality cheese for that signature creamy texture. It’s a process that’s incredibly forgiving, so don’t stress too much – the results are always spectacular. Trust me, the smell alone as it bakes will have everyone flocking to the kitchen!
Ingredients
For the main batter (Pasta & Sauce Base): For the main
Elbow Macaroni: 1 pound. This is classic for a reason! Make sure to get a good quality brand that holds its shape well. I usually opt for a medium elbow cut, but you can absolutely use shells or cavatappi if you prefer. Just aim for shapes that will hold onto that glorious sauce.
Unsalted Butter: 1/2 cup (1 stick). This is the foundation of our creamy béchamel. Using unsalted butter gives us better control over the final saltiness of the dish.
All-Purpose Flour: 1/2 cup. This, combined with the butter, creates our roux, which is the thickening agent for our cheese sauce. It’s crucial for that velvety smooth texture.
Whole Milk: 3 cups, warmed slightly. Warming the milk helps it incorporate more smoothly into the roux, preventing lumps. Whole milk is non-negotiable for that rich, creamy consistency Panera is known for.
Heavy Cream: 1 cup. This is where the real indulgence comes in! Heavy cream adds an extra layer of richness and contributes significantly to that luxurious, decadent texture. It’s what makes this mac and cheese truly special.
Sharp Cheddar Cheese: 2 cups, shredded. This is our primary cheese for flavor! I always grate my own cheese from a block. Pre-shredded cheese has anti-caking agents that can make your sauce a little less smooth. Go for a good quality sharp cheddar for that classic, tangy bite.
Mild Cheddar Cheese: 1 cup, shredded. This adds a milder cheesy flavor and helps with the overall meltiness and creaminess of the sauce.
Monterey Jack Cheese: 1 cup, shredded. Monterey Jack melts beautifully and adds a lovely, subtle creaminess without overpowering the other cheeses. It’s a key player in achieving that signature smooth Panera texture.
Salt: 1 teaspoon, or to taste. Don’t forget to season! Taste as you go, especially once the cheese is melted in.
Black Pepper: 1/2 teaspoon, or to taste. Freshly ground black pepper adds a subtle warmth.
For the Topping (Optional but Highly Recommended!):
More Shredded Cheese: 1/2 cup (a mix of cheddar and Monterey Jack works great). For that irresistible cheesy crust.
Breadcrumbs (Panko Preferred): 1/4 cup. For a little textural contrast and crunch. Panko gives a fantastic crispiness.
Melted Butter: 1 tablespoon. To help the breadcrumbs toast up nicely.
Step-by-Step Instructions
Step 1: Preheat & Prep Pan
First things first, let’s get our oven preheated to 375 degrees Fahrenheit (190 degrees Celsius). While that’s heating up, grab a good-sized baking dish – a 9×13 inch casserole dish is usually perfect for this amount. You don’t need to grease it heavily, but a little spray of cooking oil or a quick rub of butter will ensure nothing sticks. Set that aside for now.
Step 2: Mix Dry Ingredients
This step is super simple! In a medium bowl, whisk together your flour and your spices (salt and pepper). It might seem minor, but whisking them together now ensures they’re evenly distributed when you add them to the butter, which is going to be important for a smooth sauce later. Just a quick, gentle whisk is all it needs. It’s one of those little things that makes a difference!
Step 3: Mix Wet Ingredients
Here’s where we build the base of our creamy sauce. In a large saucepan or Dutch oven over medium heat, melt your unsalted butter. Once it’s fully melted and just starting to bubble gently, whisk in the flour mixture we just prepared. Keep whisking constantly for about 1-2 minutes. This is how we make a roux! It will look like a thick paste and smell wonderfully nutty. Don’t let it brown too much – we’re going for a pale blonde roux here. This step is crucial for thickening our sauce without any lumps. Then, gradually whisk in the warmed milk, a little at a time, ensuring each addition is fully incorporated before adding more. Keep whisking! Once all the milk is in, add the heavy cream. Continue to cook and whisk until the sauce has thickened enough to coat the back of a spoon – this usually takes about 5-7 minutes.
Step 4: Combine
Now for the fun part: the cheese! Remove the saucepan from the heat. This is important because we don’t want to scorch the cheese or make the sauce oily. Add your shredded sharp cheddar, mild cheddar, and Monterey Jack cheeses to the thickened sauce. Stir gently with a whisk or a wooden spoon until all the cheese is completely melted and the sauce is luxuriously smooth and creamy. Taste it! This is your chance to adjust the salt and pepper if needed. Remember, the cheese itself is salty, so start with a little and add more if necessary. You should have a beautiful, glossy, cheese sauce. It’s seriously addictive just to eat with a spoon!
Step 5: Prepare Filling
While we’re working on the sauce, it’s a good idea to get your pasta cooked. Bring a large pot of salted water to a rolling boil. Add your elbow macaroni and cook according to package directions, but be careful not to overcook it! You want it *al dente* – tender but with a slight bite. Overcooked pasta will turn mushy in the final dish. Once it’s cooked, drain it thoroughly. Make sure all the excess water is out, as this can water down our beautiful cheese sauce. We’re not rinsing it; we want that starchy coating to help the sauce cling. Add the drained pasta directly into the saucepan with the cheese sauce. Gently stir everything together until every single piece of pasta is coated in that glorious, creamy cheese sauce. It should look like a beautiful, cheesy dream!
Step 6: Layer & Swirl
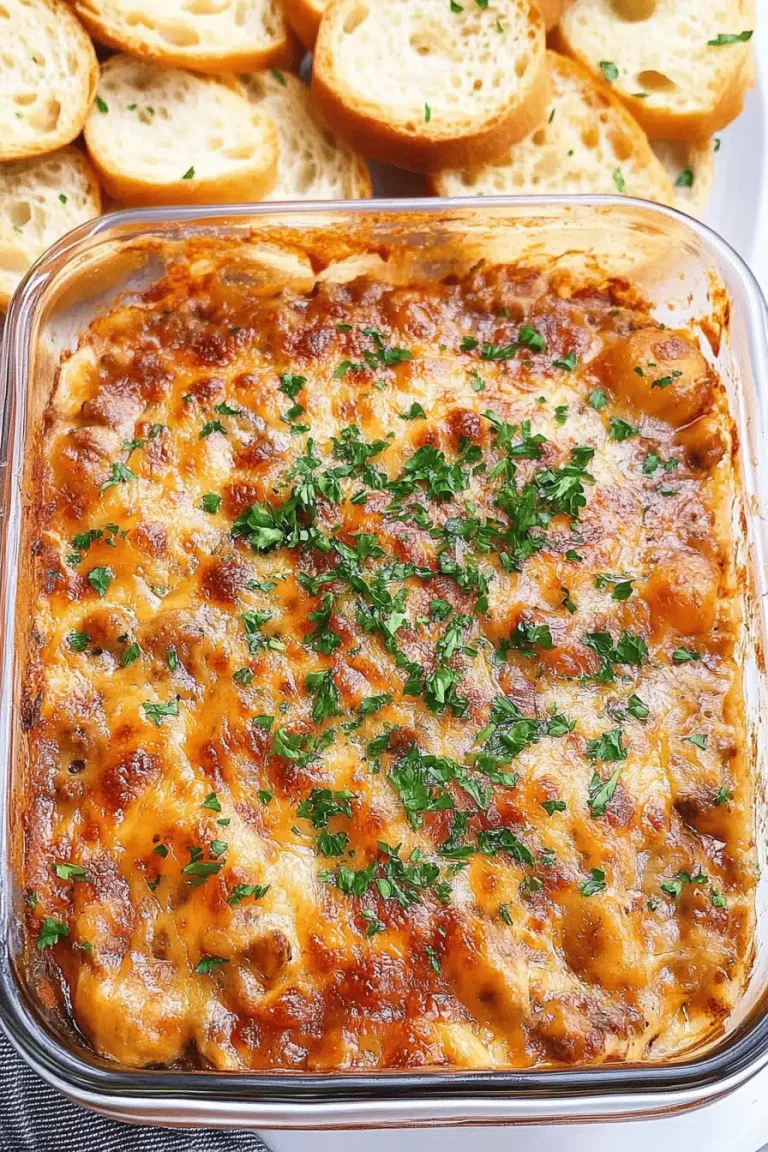
Pour the cheesy pasta mixture into your prepared baking dish. Spread it out evenly with your spoon. Now, for that extra special touch, let’s make our topping. In a small bowl, combine the breadcrumbs and the melted butter. Toss them together until the breadcrumbs are evenly coated. Sprinkle this mixture evenly over the top of the mac and cheese. Then, for that extra cheesy goodness, sprinkle the remaining 1/2 cup of shredded cheese over the breadcrumbs. This creates that iconic golden, bubbly crust that everyone loves!
Step 7: Bake
Pop the baking dish into your preheated oven. Bake for about 20-25 minutes, or until the topping is golden brown and the cheese sauce is bubbling around the edges. You want to see that beautiful, toasted crust and hear those happy little bubbles. The exact time can vary depending on your oven, so keep an eye on it after the 20-minute mark. If the top starts to get too brown before the inside is heated through, you can always loosely tent it with foil.
Step 8: Cool & Glaze
This is probably the hardest part: waiting! Once it’s out of the oven, let the Panera Macaroni Cheese rest for about 5-10 minutes before serving. This allows the sauce to set up just a little bit, so it doesn’t run everywhere when you cut into it. Honestly, the aroma filling your kitchen right now is probably intoxicating, but trust me, this short resting period makes all the difference in serving it up nicely. There’s no specific glaze to add here, the baked-on cheese is our glaze!
Step 9: Slice & Serve
Use a spatula or a large spoon to scoop generous portions onto plates. This mac and cheese is wonderfully rich, so a good-sized serving is usually plenty. The melted cheese on top will be perfectly golden and slightly crisp, giving you that delightful textural contrast. Serve it piping hot and watch the smiles appear. It’s truly a crowd-pleaser, and everyone will be asking for the recipe!
What to Serve It With
This Panera Macaroni Cheese is so wonderfully satisfying on its own, it really doesn’t *need* anything else. But if you’re looking to round out a meal or add a little something extra, here are some ideas that I’ve found work beautifully! For a simple, comforting BREAKFAST, believe it or not, a small portion with a fried egg on top is surprisingly delicious and decadent! The richness of the mac and cheese paired with the runny yolk is just divine. Or, simply serve it alongside some crispy bacon or breakfast sausage for a truly indulgent morning. When I’m planning for BRUNCH, I like to serve this as a side dish alongside some lighter fare. Think a fresh, crisp green salad with a light vinaigrette to cut through the richness, or maybe some roasted asparagus. Mini quiches or a fruit platter also pair wonderfully to offer a variety of textures and flavors. For a more elegant presentation, serve it in individual ramekins. As a main course for DESSERT? Okay, hear me out! A slightly smaller portion of this rich mac and cheese after a lighter main course can be a fun, unexpected treat for cheese lovers. It’s like a savory cheese course but in mac and cheese form! For a more traditional meal, it shines as a side dish. It’s the ultimate comfort pairing for pulled pork sandwiches or BBQ chicken. And when I’m just looking for COZY SNACKS, sometimes a smaller bowl of this is all I need. I’ll often pair it with some crunchy pickles or even some extra hot sauce on the side for a kick. My kids absolutely love it served with some simple steamed peas – it’s their favorite way to get a vegetable in!
Top Tips for Perfecting Your Panera Macaroni Cheese
Over the years of making this, I’ve picked up a few tricks that I think really elevate it from good to absolutely amazing. First, with the cheese prep: I cannot stress enough how much of a difference grating your own cheese makes. Pre-shredded cheese has cellulose and other anti-caking agents that prevent it from melting as smoothly, and can sometimes give your sauce a slightly grainy texture. So, grab a block, a grater, and get to it! It’s worth the extra couple of minutes. For mixing advice: when you’re making the roux and adding the milk, go low and slow with the heat and whisk constantly. This helps prevent lumps from forming. If you do end up with a few small lumps, don’t panic! You can often whisk them out, or if all else fails, carefully pass the sauce through a fine-mesh sieve before adding the cheese. When it comes to combining the sauce and pasta, make sure your pasta is cooked perfectly *al dente* – remember, it’s going to bake a bit longer, so you don’t want it to turn to mush. For ingredient swaps, I’ve experimented a bit. If you don’t have heavy cream, you *can* use an equal amount of milk, but the sauce won’t be quite as rich or creamy. I’ve also tried using different cheese combinations, and while it’s still good, the specific blend of sharp cheddar, mild cheddar, and Monterey Jack really hits that Panera flavor profile. For baking tips, know your oven. If your oven tends to run hot, you might want to reduce the temperature slightly or bake for a shorter time. Always use the middle rack for even cooking. If the top is browning too quickly, just loosely tent it with foil. For the breadcrumb topping, Panko breadcrumbs are superior for crunch, but regular breadcrumbs will work in a pinch. Make sure they’re evenly coated in butter so they toast up nicely rather than just drying out. And a little tip for glaze timing – while this recipe doesn’t use a traditional glaze, the baked-on cheese is our star. If you ever make a variation that *does* have a glaze, apply it after baking and cooling slightly, just before serving, to maintain its integrity. I’ve learned these lessons through trial and error, and I hope they help you achieve Panera perfection!
Storing and Reheating Tips
This Panera Macaroni Cheese is honestly fantastic the next day, though it’s always best fresh out of the oven! If you have leftovers, you can store them at ROOM TEMPERATURE for no more than two hours. After that, it’s best to get it into the refrigerator. For REFRIGERATOR STORAGE, make sure to let the mac and cheese cool down to room temperature first. Then, transfer it to an airtight container. It should stay good in the fridge for about 3-4 days. When it comes to FREEZER INSTRUCTIONS, this dish freezes surprisingly well! Let it cool completely, then portion it into freezer-safe containers or a heavy-duty freezer bag. It can be stored in the freezer for up to 2-3 months. For THAWING METHODS, the best way is to move it from the freezer to the refrigerator the night before you plan to reheat it. This allows it to thaw slowly and evenly. When it comes to reheating, you have a few options. For a single serving, the microwave works well; just heat on medium power in 30-second intervals, stirring in between, until heated through. For a larger portion or to get that lovely crust back, reheating in the oven is best. Transfer the mac and cheese to an oven-safe dish, cover it loosely with foil, and bake at 350°F (175°C) for about 15-20 minutes, or until heated through. You can remove the foil for the last 5 minutes to help crisp up the top. For GLAZE TIMING advice (if your version has one), if you’re planning to reheat from chilled or frozen, you’ll likely want to add any glaze or topping *after* reheating to maintain its texture and appearance.
Frequently Asked Questions
Final Thoughts
There you have it, my friends! A copycat recipe for Panera Macaroni Cheese that I truly believe rivals the original, and maybe even surpasses it, because you made it with your own two hands! This dish embodies everything I love about comfort food: incredible flavor, a wonderfully creamy texture, and that satisfying warmth that makes any meal feel like a special occasion. It’s the perfect thing to have up your sleeve for busy weeknights, impromptu gatherings, or just those days when you need a little culinary hug. I really hope you give this Panera Macaroni Cheese a try. It’s a recipe that’s brought so much joy to my table, and I’m confident it will do the same for yours. If you loved this recipe, you might also enjoy my [link to another cheesy recipe here] or my [link to another comfort food recipe here]! They’re both winners in my kitchen. Don’t be shy about leaving a comment below to let me know how yours turned out, or if you have any special variations you like to add. I absolutely love hearing from you all and seeing your culinary creations! Happy baking!