Honey Sesame Chicken
You know those nights when dinner feels like a marathon? You’re tired, the kids are asking “What’s for dinner?” for the tenth time, and the idea of cooking anything complicated makes you want to order pizza. Well, I’ve got your back! This Honey Sesame Chicken recipe is my absolute, hands-down, no-fail lifesaver for those evenings. It’s got that irresistible sweet and savory glaze that coats perfectly crispy chicken, and it honestly tastes like it came from your favorite takeout spot, but it’s so much better because you made it yourself! Seriously, the smell alone as it bakes fills the whole house with pure deliciousness. It’s one of those dishes my family requests over and over, and honestly, it’s so simple to whip up, I don’t even mind. Think of it as a hug in a meal – warm, comforting, and always a crowd-pleaser. If you’ve ever tried making a restaurant-style chicken at home and ended up with soggy bits or a sauce that’s too thin, this is the recipe that will change your mind forever. It’s my secret weapon, and I’m so excited to share it with you!
What is honey sesame chicken?
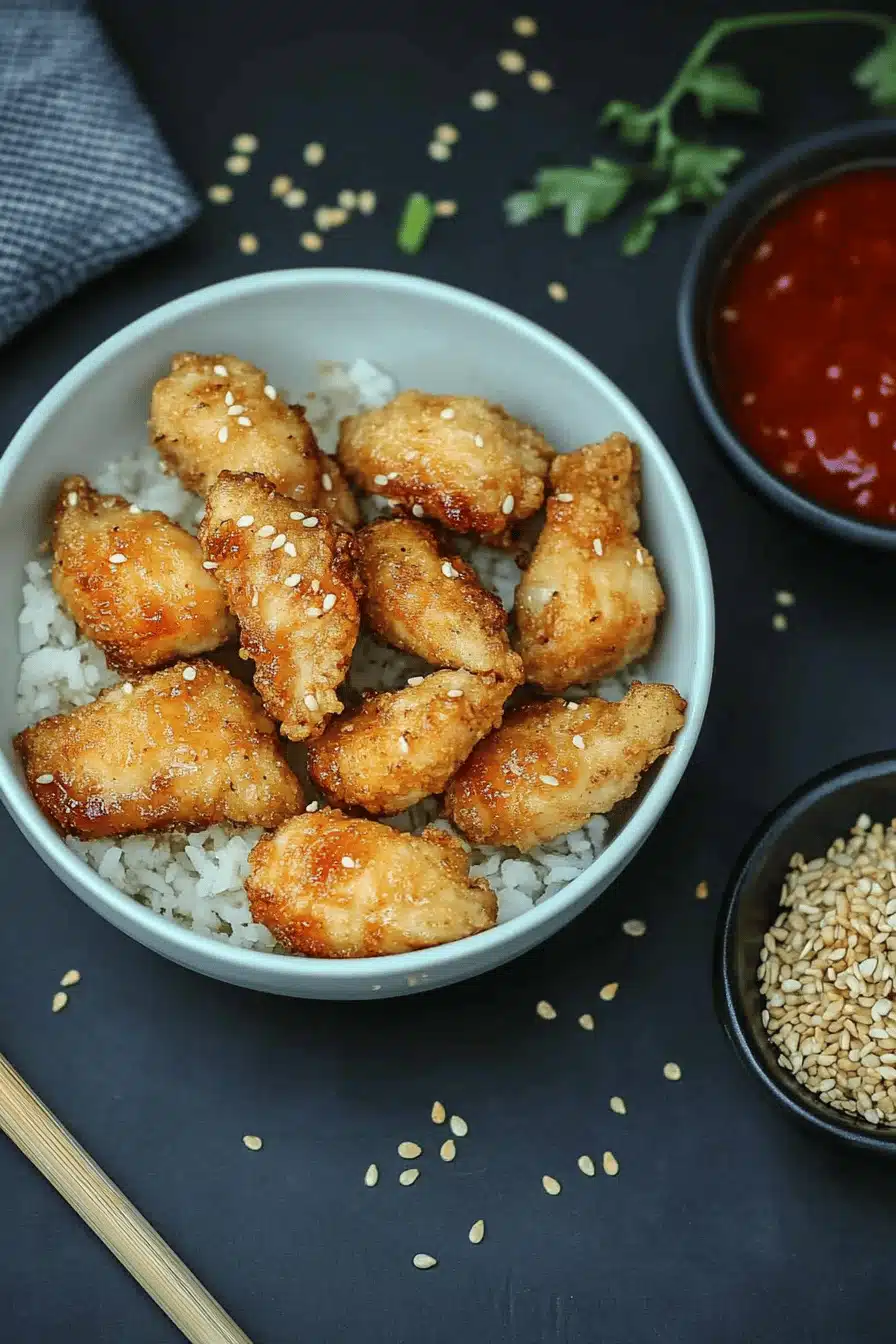
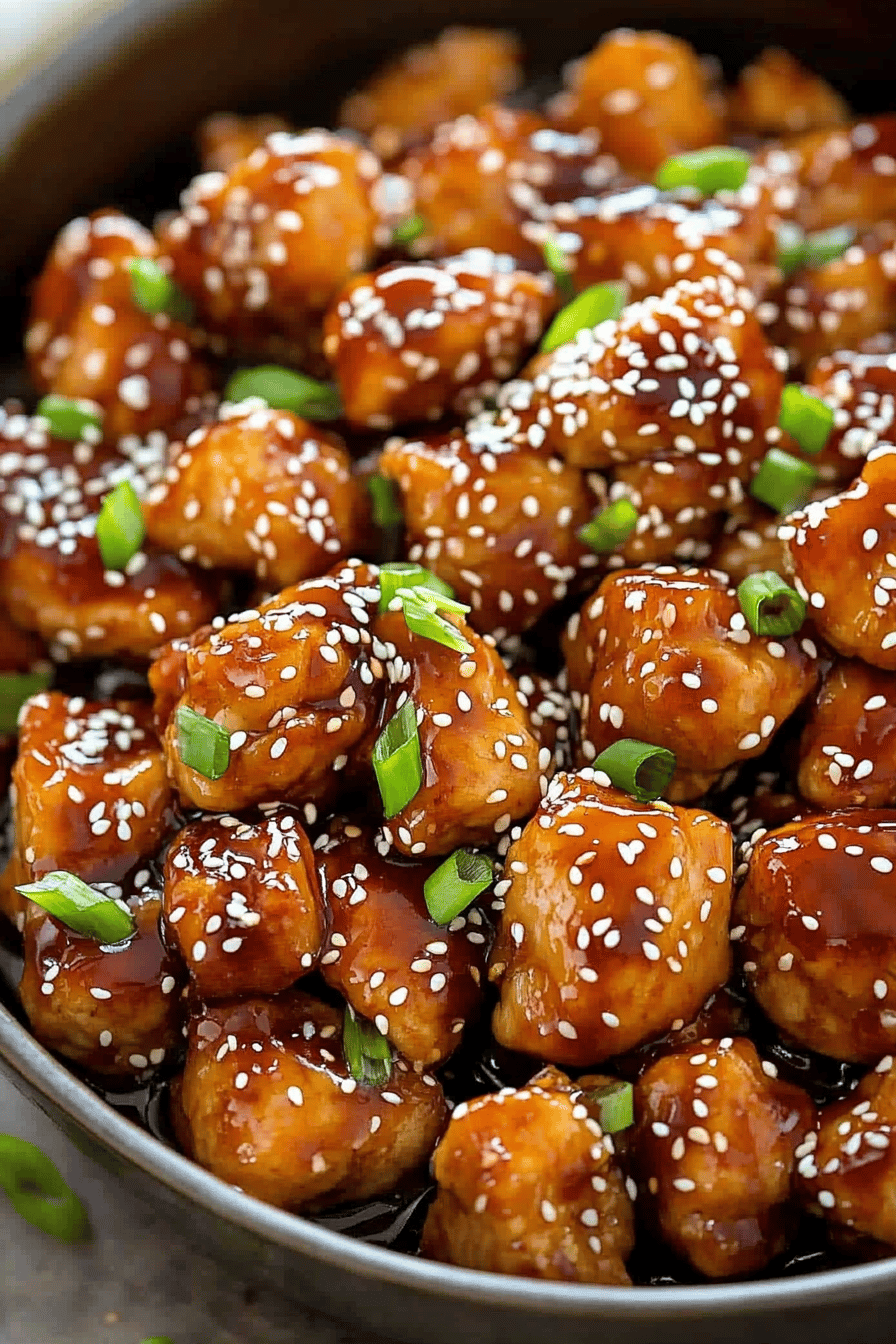
So, what exactly *is* this magical dish we call Honey Sesame Chicken? At its heart, it’s a fantastic fusion of classic Chinese-American flavors that just works. Imagine tender pieces of chicken, usually cut into bite-sized chunks, that are lightly coated and then baked (or sometimes fried, but I prefer baking for ease!) until they’re wonderfully crispy on the outside. Then, they’re tossed in this glorious, sticky, sweet, and slightly tangy glaze made from honey, soy sauce, sesame oil, and a few other flavor boosters. A generous sprinkle of toasted sesame seeds and some fresh green onions finish it off, adding texture and a pop of freshness. It’s not just chicken; it’s an experience! It’s the kind of dish that makes you close your eyes with the first bite because the flavors are just that good. It’s essentially a delightful playground for your taste buds, balancing the richness of the chicken with the vibrant sweetness of the glaze and the nutty aroma of sesame. Easy to make, even easier to devour!
Why you’ll love this recipe?
There are so many reasons why this Honey Sesame Chicken Recipe has earned a permanent spot in my recipe rotation, and I just know you’re going to feel the same way. First off, the flavor! Oh my goodness, the flavor. It hits all the right notes: it’s wonderfully sweet from the honey, savory from the soy sauce, with that unmistakable nutty depth from the sesame oil. The hint of ginger and garlic in the glaze adds an aromatic complexity that just makes it sing. It’s like a flavor party in your mouth! Then there’s the simplicity. Seriously, this recipe is a lifesaver on busy weeknights. You can have dinner on the table in under an hour, and most of that is hands-off baking time. No complicated marinades, no deep-frying disasters (unless you want to, but trust me, baking works wonders!). It’s also incredibly budget-friendly. Chicken breast, pantry staples like honey, soy sauce, and cornstarch – these are all pretty affordable ingredients, making this a great meal option that doesn’t break the bank. And the versatility! You can serve this over fluffy rice, with a side of steamed veggies, or even tucked into wraps. My kids absolutely adore it served over plain white rice, and I love pairing it with some sautéed broccoli or snap peas for a complete meal. What I love most about this specific recipe is how consistently perfect it turns out. The chicken stays tender, the glaze coats beautifully without being too thick or too thin, and the sesame seeds add that perfect little crunch. It’s truly a winner!
How do I make honey sesame chicken?
Quick Overview
The beauty of this Honey Sesame Chicken Recipe lies in its straightforward approach. We’ll coat the chicken in a light batter for crispiness, bake it to golden perfection, and then toss it in a luscious, homemade honey-sesame glaze. It’s a simple assembly line of deliciousness: prep the chicken, make the glaze, bake, then coat. The oven does most of the heavy lifting, ensuring you get that perfect crispy texture without the mess of frying. This method is fantastic because it minimizes cleanup and maximizes flavor, making it ideal for any night of the week.
Ingredients
What are the tools you need to create this masterpiece: a t-shirt, a hat, a hat, a
For the Chicken:
1.5 lbs boneless, skinless chicken breast or thighs, cut into 1-inch pieces
1/2 cup cornstarch (this is key for that amazing crispy coating!)
1/4 teaspoon salt
1/8 teaspoon Black Pepper
1 large egg, lightly beaten
1 tablespoon vegetable oil (or any neutral oil you have on hand)
For the Glaze:
1/3 cup honey (good quality honey makes a difference here!)
1/4 cup soy sauce (low-sodium is great if you prefer, but I usually use regular and it’s perfect)
2 tablespoons rice vinegar (adds a nice tang, but APPLE CIDER vinegar works in a pinch)
1 tablespoon sesame oil (toasted sesame oil is best for that authentic aroma)
1 clove garlic, minced (fresh is always better, but garlic powder works too!)
1 teaspoon grated fresh ginger (or 1/2 teaspoon ground ginger)
For Garnish:
2 tablespoons toasted sesame seeds (toast them yourself in a dry skillet for a few minutes until fragrant – it’s worth it!)
2 green onions, thinly sliced
Step-by-Step Instructions
Step 1: Preheat & Prep Pan
First things first, let’s get the oven ready. Preheat it to a nice hot 400°F (200°C). Line a large baking sheet with parchment paper. This is a crucial step for easy cleanup – trust me on this one! If you don’t have parchment, a lightly greased baking sheet will do, but parchment paper makes life so much simpler. I always find lining the pan before I start prepping anything else saves me a potential mess later.
Step 2: Mix Dry Ingredients
In a medium bowl, whisk together the cornstarch, salt, and pepper. This is going to form our crispy coating. Make sure it’s well combined so every piece of chicken gets that lovely crunch. The cornstarch is what gives us that slightly chewy, crispy exterior that holds up so well to the glaze. If you’re out of cornstarch, a mix of all-purpose flour and a bit of baking powder can work, but cornstarch is truly the gold standard for this kind of crispiness.
Step 3: Mix Wet Ingredients
In a separate shallow bowl or pie plate, lightly beat the egg. This is our binding agent. Once the egg is whisked, add the vegetable oil and give it another quick stir. The oil helps to tenderize the chicken slightly and ensures the coating adheres beautifully. Some people skip the oil, but I find it adds an extra layer of tenderness and helps the coating crisp up a bit more.
Step 4: Combine
Now, let’s coat the chicken! Add the cut chicken pieces to the bowl with the egg and oil mixture. Toss them around until they are all nicely coated. Then, using a slotted spoon or tongs, transfer the wet chicken pieces into the bowl with the cornstarch mixture. Toss them gently to coat each piece thoroughly. Don’t worry if some of the coating seems a little thick or clumpy – that’s actually good! It creates little pockets of crispiness when it bakes. Try not to overwork it; we want a nice, even coating.
Step 5: Prepare Filling
While the chicken is getting ready to bake, let’s whip up that delicious glaze. In a small saucepan, combine the honey, soy sauce, rice vinegar, sesame oil, minced garlic, and grated ginger. Place the saucepan over medium heat. Stir everything together and bring it to a gentle simmer. Let it bubble away for about 2-3 minutes, stirring occasionally, until it thickens slightly. You’re looking for a consistency that’s syrupy but still pourable. It should coat the back of a spoon. This glaze is the heart and soul of the dish, so don’t rush this step!
Step 6: Layer & Swirl
Arrange the coated chicken pieces in a single layer on your prepared baking sheet. Make sure they aren’t overlapping too much, otherwise, they’ll steam instead of crisping up. Give them a little breathing room. Some folks like to spray them with a bit of cooking spray at this point for extra crispiness, and I sometimes do that too if I’m feeling fancy. It’s not strictly necessary, but it can help achieve that restaurant-level crunch.
Step 7: Bake
Pop that baking sheet into your preheated oven. Bake for 20-25 minutes, or until the chicken is cooked through and the coating is golden brown and crispy. The exact time will depend on your oven and the size of your chicken pieces, so keep an eye on it. You’re looking for that beautiful golden color and a firm texture. If they seem to be browning too quickly, you can always lower the oven temperature a touch. I usually give them a gentle toss or flip halfway through baking to ensure even crisping, but it’s not always essential.
Step 8: Cool & Glaze
Once the chicken is perfectly baked and crispy, remove it from the oven. Let it cool for just a minute or two – this is important so the glaze doesn’t make the crispy coating instantly soggy. Pour the warm glaze over the hot chicken right on the baking sheet or transfer the chicken to a large bowl and pour the glaze over it. Toss gently until all the chicken pieces are beautifully coated in that sticky, luscious glaze. The warmth of the chicken helps the glaze adhere perfectly. If the glaze seems too thick, you can warm it up for a few extra seconds. If it seems too thin, simmer it a bit longer.
Step 9: Slice & Serve
Now for the grand finale! Sprinkle the toasted sesame seeds and sliced green onions generously over the glazed chicken. This adds a beautiful visual appeal and a lovely burst of fresh flavor and texture. Serve immediately while it’s hot and crispy! This Honey Sesame Chicken is fantastic served over fluffy white or brown rice, quinoa, or even alongside some stir-fried vegetables. You can slice it or serve the pieces whole. The aroma is incredible, and the taste is even better.
What to Serve It With
This Honey Sesame Chicken is so versatile, you can truly serve it with almost anything! For a classic weeknight meal, it’s absolutely perfect alongside a steaming bowl of fluffy white rice or brown rice. The rice soaks up any extra glaze beautifully, which is always a good thing in my book! If you want to add some greens, a side of simple steamed broccoli, sautéed bok choy, or crisp snap peas makes for a well-rounded and healthy meal. My kids also love when I serve this with a side of homemade fried rice – it feels like a real treat then! For a lighter option, try serving it over a bed of mixed greens with a drizzle of your favorite light vinaigrette; the sweet and savory chicken acts almost like a salad topping. If you’re feeling adventurous, you can even tuck the chicken into warm tortillas or lettuce wraps for a fun, deconstructed meal. I’ve also tried it with cauliflower rice for a low-carb option, and it was surprisingly delicious! Really, the possibilities are endless, and it always tastes fantastic.
Top Tips for Perfecting Your Honey Sesame Chicken
I’ve made this Honey Sesame Chicken more times than I can count, and over the years, I’ve picked up a few tricks that I think really elevate it. Here are my top tips to ensure your chicken turns out absolutely perfect every single time:
Chicken Prep is Key: Make sure your chicken pieces are roughly the same size, about 1-inch cubes. This ensures they cook evenly. If you’re using chicken thighs, they tend to stay a bit more tender and juicy than breasts, but both work wonderfully. Just trim any excess fat.
Don’t Skimp on the Cornstarch: This is the magic ingredient for crispiness! Make sure each piece of chicken is thoroughly coated in the cornstarch mixture. A good, even coating is what separates good chicken from great, crispy chicken. Don’t be afraid to toss it well in the bowl.
Don’t Overcrowd the Pan: This is a big one! When you lay the chicken on the baking sheet, give each piece some breathing room. If they’re piled on top of each other, they’ll steam instead of bake to a crisp. If you have a lot of chicken, it’s better to use two baking sheets than to overcrowd one.
Baking Temperature Matters: A hot oven is crucial for crisping. 400°F (200°C) is the sweet spot. If your oven tends to run hot, you might want to dial it back just a smidge. I always recommend an oven thermometer to ensure accuracy!
Glaze Consistency is Crucial: When you make the glaze, simmer it just long enough for it to thicken slightly. You want it syrupy enough to coat the chicken beautifully but not so thick that it becomes hard to toss or too heavy. If it gets too thick while it’s sitting, you can always warm it up for a few seconds in the microwave or on the stovetop.
Toast Your Sesame Seeds: Seriously, this makes such a difference! Just a few minutes in a dry skillet over medium heat until they’re golden brown and fragrant is all it takes. They add a much richer, nuttier flavor than untoasted seeds.
Fresh Ginger and Garlic: While dried versions can work in a pinch, using fresh minced garlic and grated ginger in the glaze provides a brighter, more vibrant flavor that really makes the dish sing. It’s a small step that has a big impact.
Don’t Let it Sit Too Long: This dish is best served immediately after glazing. The longer it sits, the more the glaze can soften the crispy coating. So, try to time it so the chicken is ready to be glazed and served right away.
Ingredient Swaps: If you’re out of rice vinegar, a splash of white wine vinegar or even apple cider vinegar can work. For a touch of heat, add a pinch of red pepper flakes to the glaze. It’s a little tweak that adds a delightful kick!
Storing and Reheating Tips
Honestly, this Honey Sesame Chicken rarely lasts long enough in my house to require extensive storing, but when it does, here’s how I handle it. For best results, especially if you want to maintain that crispy coating, I recommend eating it fresh. However, if you do have leftovers, here’s what you can do:
Refrigerator Storage: Let the chicken cool completely before storing it in an airtight container in the refrigerator. It should keep well for about 2-3 days. I usually place a piece of parchment paper on top of the chicken inside the container to help prevent the coating from getting too soggy.
Reheating: This is where it gets a little tricky to recapture that original crispiness, but it’s not impossible! The best method for reheating is in the oven or an air fryer. Spread the cooled chicken in a single layer on a baking sheet and reheat at around 350°F (175°C) for about 8-10 minutes, or until heated through. This helps to crisp up the coating again. Microwaving is the quickest way, but it will definitely make the chicken softer and less crispy. If you must use the microwave, reheat in short bursts, checking frequently.
Freezer Instructions: I don’t typically recommend freezing this dish because the crispy coating doesn’t hold up particularly well to freezing and thawing. However, if you absolutely must, let the chicken cool completely. You can freeze the unglazed chicken pieces first on a baking sheet until firm, then transfer them to a freezer-safe bag or container. This helps prevent them from clumping together. It should last for about 1-2 months. Thaw overnight in the refrigerator, then reheat using the oven or air fryer method, and then toss with the glaze. You might need to adjust the glaze consistency if it seems too thick after thawing.
Glaze Timing Advice: For leftovers, if the glaze has already been applied, it will continue to soften the chicken. If you know you’ll have leftovers and want to try and preserve some crispiness, you could potentially store the glaze separately and reheat the chicken, then toss with the glaze just before serving again. It’s a bit more work, but it helps maintain texture.
Frequently Asked Questions
Final Thoughts

There you have it – my ultimate Honey Sesame Chicken recipe! It’s one of those dishes that brings so much joy to my table, and I really hope it does the same for yours. It’s proof that you don’t need to be a gourmet chef to create incredibly flavorful and satisfying meals at home. The combination of crispy chicken and that sweet, savory glaze is just pure comfort food magic. If you love this recipe, you might also enjoy my Sticky Orange Chicken or my Crispy General Tso’s Chicken, which are also fantastic weeknight options that deliver on flavor and ease. I can’t wait for you to try this Honey Sesame Chicken, and I’d absolutely love to hear what you think! Leave a comment below, tell me how it turned out, or share your own little twists and tips. Happy cooking, everyone!