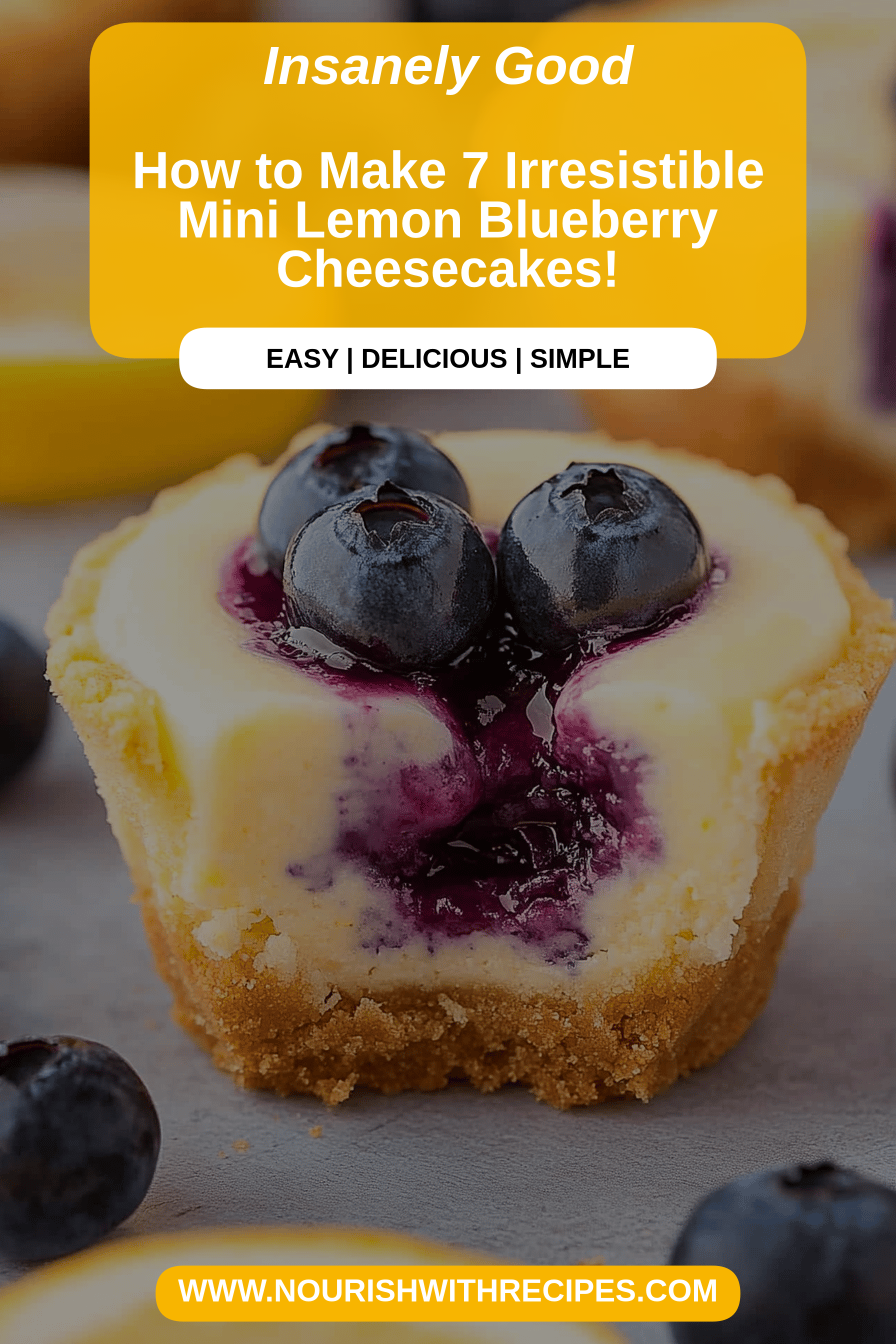
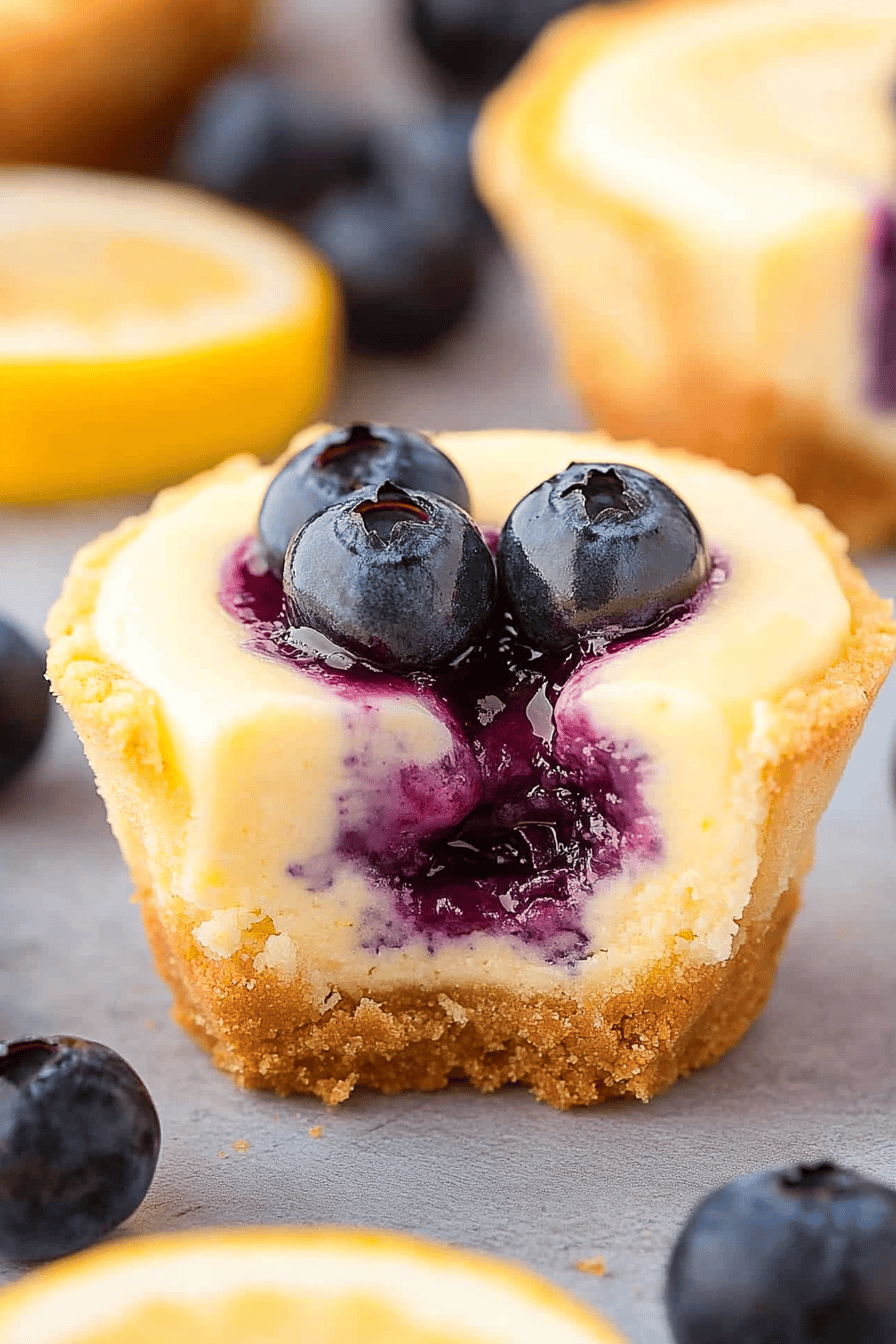
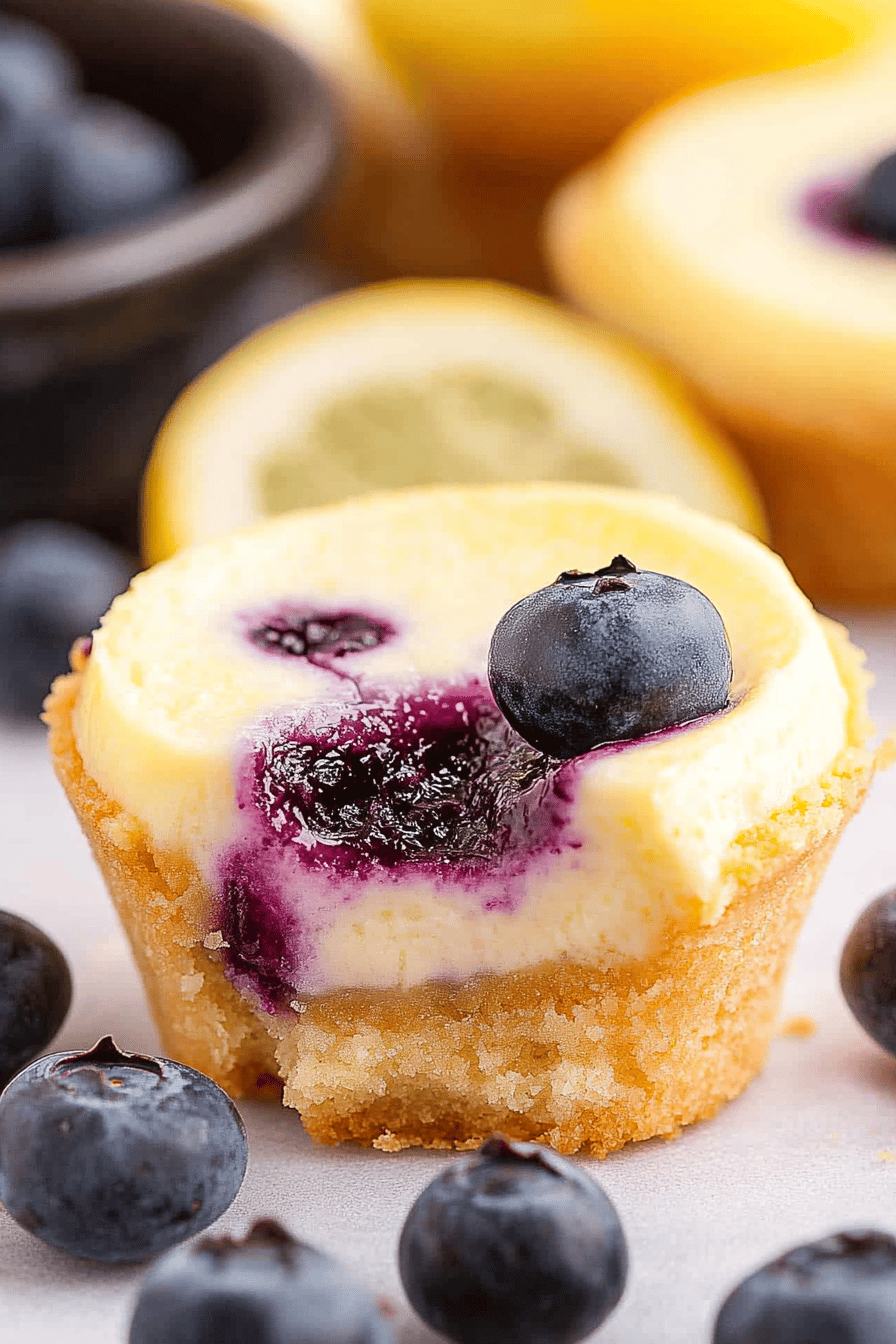
Mini Lemon Blueberry Cheesecakes
Oh, these Mini Lemon Blueberry Cheesecakes! They’re just one of those recipes that feels like a warm hug. You know those days when you just *need* something sweet, but the thought of baking a whole giant cheesecake feels like too much? Yeah, me too. This is my absolute lifesaver for those moments. They’re like little bursts of sunshine, perfectly tangy from the lemon and bursting with juicy blueberries, all nestled in a creamy, dreamy cheesecake filling. Honestly, they remind me so much of the little cheesecakes my grandma used to make for special occasions, but I’ve managed to make them way easier for us busy folks! If you’ve ever loved those fancy bakery cheesecakes, get ready, because these are even better when made with love right in your own kitchen. I’ve been making these Mini Lemon Blueberry Cheesecakes for years, and they’re always the first thing to disappear from any gathering.
What are the best mini blueberry cheesecakes?
So, what exactly are these little wonders? Think of them as the most delightful, perfectly portioned version of a classic cheesecake, elevated with the vibrant flavors of fresh lemon and sweet blueberries. They’re essentially individual-sized cheesecakes, baked in muffin tins (or even ramekins if you’re feeling fancy!), making them super easy to serve and enjoy. The “mini” part is key – it means no awkward slicing, no fighting over the last piece, and they’re just the right size for a satisfying treat without being overwhelming. The name itself, Mini Lemon Blueberry Cheesecakes, tells you exactly what you’re getting: a delightful combination of bright citrus, plump berries, and that signature rich, creamy cheesecake texture, all in a cute, manageable package. It’s cheesecake, but make it portable and incredibly charming!
Why you’ll love this recipe?
Let me tell you why this Mini Lemon Blueberry Cheesecake recipe has become such a staple in my home. First off, the flavor. Oh, the flavor! It’s this perfect dance between tart lemon zest and juice that cuts through the richness of the Cream Cheese, and those sweet little pops of blueberries that explode in your mouth. It’s not too sweet, not too tart – it’s just *right*. And the texture? It’s so incredibly smooth and creamy; you’d never guess how simple it is to achieve. Speaking of simple, that’s my second reason: ease. Seriously, this recipe is surprisingly straightforward. You don’t need a water bath or any fancy tricks. You just mix, bake, and chill, and you’re rewarded with these stunning little desserts. It’s the kind of recipe that makes you look like a baking superstar with minimal effort, which, let’s be honest, is a win-win in my book!
And let’s talk about cost-efficiency. Cream Cheese, eggs, sugar, a few berries and a lemon – these are all pretty standard pantry and fridge staples, and they don’t break the bank. You get so much deliciousness for relatively little cost, especially when you compare it to buying individual cheesecakes from a bakery. Plus, the versatility! You can whip these up for a special occasion brunch, a sweet afternoon pick-me-up, or even as a light dessert after dinner. They’re also fantastic for potlucks because they travel so well. What I truly adore about this recipe is that it always feels special, even though it’s something I can whip up on a whim. It’s a guaranteed crowd-pleaser, and it’s just so darn satisfying to create something so beautiful and delicious from scratch. It truly stands out among other mini desserts because of that perfect balance of bright, fresh flavors and classic, comforting cheesecake goodness.
How do I make blueberry cheesecakes?
Quick Overview
The process for these delightful Mini Lemon Blueberry Cheesecakes is wonderfully straightforward. We’re talking about making a simple crust, then whipping up a luscious cheesecake batter infused with lemon, folding in those beautiful blueberries, and baking them until they’re just set. The key is minimal fuss for maximum flavor and a gorgeously creamy result. It’s a method designed for home cooks who want impressive results without the stress. You’ll find yourself reaching for this recipe again and again because it’s just that easy and that delicious!
Ingredients
For the Crust:
* 2 cups graham cracker crumbs (about 14-16 full crackers) – I love using graham crackers because they have that perfect hint of honey sweetness that complements the cheesecake so well. If you can’t find them, digestive biscuits or even Shortbread Cookies work too! Just make sure they’re finely crushed; a food processor is your best friend here, or you can pop them in a zip-top bag and bash them with a rolling pin.
* 6 tablespoons unsalted butter, melted – Unsalted butter gives you more control over the saltiness, and melting it ensures the crumbs come together beautifully. Make sure it’s fully melted, not just warm.
* 2 tablespoons granulated sugar – Just a touch to add a little sweetness and help them crisp up.
For the Filling:
* 24 ounces cream cheese, softened to room temperature – This is CRUCIAL for a smooth batter. If your cream cheese is cold, you’ll end up with lumps, and nobody wants lumpy cheesecake! Leave it out on the counter for at least an hour, or gently warm it in the microwave for about 30 seconds (stirring halfway through).
* 3/4 cup granulated sugar – We need enough to balance the tartness of the lemon and cream cheese.
* 2 large eggs, at room temperature – Room temperature eggs incorporate much better into the batter, preventing a dense or eggy texture.
* 1/4 cup heavy cream or sour cream – This adds an extra layer of creaminess and a slight tang. Sour cream is my secret weapon for an extra luxurious texture!
* 1 tablespoon fresh lemon zest – This is where the magic starts! Use a microplane to get the finest zest, as the oils are concentrated in the outer layer. Don’t get too much of the white pith; it can be bitter.
* 2 tablespoons fresh lemon juice – For that bright, zesty punch. Freshly squeezed is always best; bottled just doesn’t have the same vibrancy.
* 1 teaspoon vanilla extract – A classic flavor enhancer that rounds out the sweetness.
For the Blueberries:
* 1 cup fresh or frozen blueberries – Fresh are wonderful when in season, but frozen work just as well! If using frozen, don’t thaw them completely; just a quick rinse under cold water is enough. This helps prevent them from bleeding *too* much into the batter. You can also toss them with a tablespoon of flour to help them stay suspended.
* 1 tablespoon all-purpose flour (optional, but recommended for frozen berries) – This helps prevent the blueberries from sinking to the bottom.
For the Lemon Glaze:
* 1 cup powdered sugar, sifted – Sifting is key to a super smooth glaze. No one likes little lumps in their glaze!
* 2-3 tablespoons fresh lemon juice – Start with 2 tablespoons and add more until you reach your desired drizzling consistency.
* 1 teaspoon lemon zest (optional, for extra zing and visual appeal)
Step-by-Step Instructions
Step 1: Preheat & Prep Pan
First things first, let’s get our oven fired up to 325°F (160°C). This lower temperature is important for ensuring the cheesecakes bake evenly and don’t get overcooked or crack. Now, grab a standard 12-cup muffin tin. I always line mine with paper liners. It makes for the easiest cleanup, and it also helps keep the edges of the cheesecakes perfectly formed. So, just pop a liner into each cup. If you don’t have liners, you can lightly grease and flour the muffin tin cups, but the liners are definitely my preference for these mini delights.
Step 2: Mix Dry Ingredients (Crust Base)
In a medium bowl, combine your graham cracker crumbs, the 2 tablespoons of granulated sugar, and a pinch of salt if you like (I usually skip it since the crackers have some salt). Give it a good stir to make sure everything is evenly distributed. This simple mix forms the base of our delicious crust.
Step 3: Mix Wet Ingredients (Crust Base)
Pour the melted butter over the crumb mixture. Now, you want to mix this until all the crumbs are evenly moistened. It should look and feel like damp sand. I usually use a fork or my hands for this – just keep mixing until there are no dry pockets left. This ensures your crust holds together nicely.
Step 4: Form the Crusts
Divide the crumb mixture evenly among the prepared muffin cups. I usually use about 1.5 to 2 tablespoons of the mixture per cup. Then, using the bottom of a small glass, a shot glass, or even just your fingers, press the crumbs down firmly into the bottom of each liner. You want a nice, compact layer. You can also bring the crumbs up the sides just a tiny bit to create a sort of mini crust wall, but I usually just do the base. Pop the muffin tin into the preheated oven for about 8-10 minutes, just until the crust is lightly golden and fragrant. This pre-baking step helps prevent a soggy bottom, which is something we definitely want to avoid!
Step 5: Prepare Filling
While the crusts are baking, let’s make the star of the show: the cheesecake filling! In a large bowl, beat the softened cream cheese with an electric mixer (a stand mixer or hand mixer works perfectly) until it’s completely smooth and creamy. Seriously, no lumps allowed! This is the most important step for a velvety texture. Gradually add the 3/4 cup of granulated sugar and beat again until smooth and well combined. Now, add the eggs, one at a time, beating just until each is incorporated. Don’t overmix at this stage; overbeating can incorporate too much air, leading to cracks. Next, gently stir in the heavy cream (or sour cream!), lemon zest, lemon juice, and vanilla extract. Mix on low speed until just combined. Scrape down the sides and bottom of the bowl to ensure everything is thoroughly blended. The batter should be smooth, thick, and wonderfully fragrant from the lemon.
Step 6: Fold in Blueberries
If you’re using frozen blueberries and decided to toss them with flour (which I highly recommend for frozen ones to prevent them from sinking!), you can add them now. Gently fold the blueberries into the cheesecake batter using a spatula. You want to distribute them evenly without mashing them or overmixing the batter. If you’re using fresh blueberries, you can fold them in gently as well. A few might sink, and that’s perfectly okay!
Step 7: Fill & Swirl (Optional)
Carefully spoon the cheesecake batter over the pre-baked crusts, filling each liner about two-thirds to three-quarters full. Don’t overfill, as they will puff up slightly as they bake. If you want a pretty swirl effect, you can reserve a little bit of plain batter (without blueberries) and dollop it on top of the blueberry batter in each cup, then use a toothpick to gently swirl them together. Or, you can reserve a small portion of the blueberry batter and swirl some plain batter into that for contrast. Honestly, though, even without swirling, these are beautiful!
Step 8: Bake
Place the muffin tin onto a baking sheet (this makes it easier to get in and out of the oven and catches any potential drips). Bake for 20-25 minutes, or until the edges are set and slightly puffed, but the center still has a slight jiggle when you gently shake the pan. They shouldn’t look wet, but they shouldn’t be completely firm either. Overbaking is the enemy of creamy cheesecake!
Step 9: Cool & Glaze
Once baked, turn off the oven and prop the oven door open slightly with a wooden spoon. Let the cheesecakes cool in the oven for about 1 hour. This gradual cooling helps prevent cracking. After an hour, remove the muffin tin from the oven and let them cool completely on a wire rack. Once they’ve cooled to room temperature, you can gently remove them from the tin. For the glaze, whisk together the sifted powdered sugar and 2 tablespoons of lemon juice in a small bowl. Add more lemon juice, a teaspoon at a time, until you reach a drizzling consistency. Stir in the extra lemon zest if using. Drizzle the glaze generously over the cooled cheesecakes. Let the glaze set for about 15-20 minutes before serving.
Step 10: Chill & Serve
For the best texture and flavor, it’s ideal to chill these Mini Lemon Blueberry Cheesecakes in the refrigerator for at least 2-3 hours, or preferably overnight, before serving. This allows them to fully set and develop that signature creamy cheesecake texture. Serve them chilled and enjoy!
What to Serve It With
These Mini Lemon Blueberry Cheesecakes are so wonderfully versatile, they fit into almost any meal or occasion! For breakfast, they’re a decadent treat. Imagine pairing one with a hot cup of coffee or a refreshing glass of iced tea. They feel special enough for a weekend brunch, especially when plated with some fresh berries on the side and perhaps a dollop of whipped cream. My kids absolutely love them on a Saturday morning; it’s like a little celebration before the day even really begins! For a more formal brunch, you could arrange them on a tiered stand with other pastries and fruits for a truly elegant spread. The bright lemon flavor also pairs beautifully with a mimosa or a sparkling elderflower cordial.
As a dessert, they’re simply divine. They’re the perfect light yet satisfying end to any meal. I often serve them after a nice dinner with friends. They’re not too heavy, and the lemon zest really cleanses the palate. If you want to go all out, a small scoop of vanilla bean ice cream or a drizzle of raspberry coulis on the side is heavenly. And for those moments when you just need a little something sweet to get you through the afternoon or evening, these mini cheesecakes are perfect. They’re a step up from a cookie but way less effort than a full cake. My personal family tradition is to have one (or maybe two!) with a mug of chamomile tea before bed on a Friday night. It’s our way of unwinding and celebrating the start of the weekend. Honestly, they’re good enough to eat straight from the fridge with no accompaniments needed, but a little extra flair never hurt anyone!
Top Tips for Perfecting Your Mini Lemon Blueberry Cheesecakes
Over the years, I’ve picked up a few tricks that I think make all the difference when making these Mini Lemon Blueberry Cheesecakes. Trust me, these little nuggets of wisdom come from experience (and maybe a few oops moments!).
Cream Cheese Perfection: I can’t stress enough how important it is for your cream cheese to be *fully* softened. If it’s even a little bit cold, you’re going to have lumps, and that’s the number one enemy of a smooth cheesecake. I usually leave my cream cheese blocks out on the counter for a good hour or two. If I’m really in a pinch, I’ll take the foil wrappers off and microwave them on 50% power for about 20-30 seconds, stirring halfway. You want it soft and spreadable, not melted. This step alone ensures that gorgeous, velvety texture that makes these mini cheesecakes so irresistible.
Gentle Mixing is Key: When you’re adding the eggs and mixing the batter, be gentle. Overmixing at this stage can whip too much air into the batter, which can cause the cheesecakes to puff up too much in the oven and then crack as they cool. So, beat just until the eggs are incorporated, and then do the same for the cream and lemon mixture. It’s better to have a few tiny streaks of color from the lemon juice than to overmix and risk cracks. Remember, we’re aiming for creamy and dense, not light and airy like a soufflé!
The Power of the Preheat Bake: Don’t skip pre-baking the crust! I know it feels like an extra step, but it’s a game-changer for preventing a soggy bottom. It toasts the crumbs slightly and melts the butter, helping them bind together and create a sturdy foundation for the creamy filling. It takes just 8-10 minutes, and it’s so worth it for that perfect texture contrast.
Blueberry Best Practices: If you’re using frozen blueberries, tossing them with a tablespoon of flour is a trick I learned after a few batches where all the berries sank. The flour acts as a bit of a binder, helping them suspend more evenly throughout the batter instead of all settling at the bottom. If using fresh, a gentle fold is all you need. You can even reserve a few to press into the top of each cheesecake right before baking for an extra pretty touch!
The Gradual Cool-Down Secret: Cheesecakes, even mini ones, are prone to cracking if they cool too quickly. That’s why the “oven off, door ajar” method is my go-to. It’s a gentle, slow cool-down that minimizes temperature shock. I leave them in there for about an hour, and then let them finish cooling on a wire rack at room temperature before they hit the fridge. Patience here really pays off in appearance!
Glaze Consistency is Everything: For the glaze, start with the lower amount of lemon juice and add more gradually. It’s much easier to thin out a glaze than to thicken it up! You want it thin enough to drizzle but not so thin that it just runs off. A good test is to see if it coats the back of a spoon and drizzles off in a steady stream. For an extra pop of flavor and visual appeal, adding a bit of lemon zest to the glaze is fantastic.
Ingredient Swaps I’ve Tested: While this recipe is fantastic as is, I’ve played around a bit! For the crust, I’ve successfully used crushed digestive biscuits and even almond flour mixed with a little coconut oil for a gluten-free option (though I haven’t fully perfected a GF crust recipe yet, this is a good starting point!). For the dairy in the filling, I’ve found that a good quality full-fat Greek yogurt can substitute for some of the cream cheese in a pinch, but it will yield a slightly tangier, denser result. For the berries, raspberries or even finely diced strawberries can be lovely, though they might change the color a bit!
Storing and Reheating Tips
Storing these Mini Lemon Blueberry Cheesecakes properly is key to keeping them tasting just as delicious as when you first made them. Honestly, they’re usually gone so fast in my house that storage isn’t a huge issue, but when I do have leftovers, here’s what I do.
Room Temperature: Generally, I don’t recommend leaving these out at room temperature for more than a couple of hours, especially if your kitchen is warm. Because of the dairy and eggs, they’re best kept chilled for food safety. If you’ve just made them and want to serve them later the same day, and your kitchen isn’t too warm, you can leave them covered on the counter for a few hours. But for anything longer, the fridge is your friend.
Refrigerator Storage: This is where they truly shine and last the longest. Once they’ve cooled completely and the glaze has set, place them in an airtight container. You can stack them carefully, perhaps with a layer of parchment paper in between if you’re worried about them sticking. In the refrigerator, they’ll stay wonderfully fresh for up to 3-4 days. They actually get even better on the second day as the flavors meld and the texture becomes perfectly dense and creamy. Just make sure the container is sealed well to prevent them from absorbing other odors from your fridge.
Freezer Instructions: If you know you won’t get through them within a few days, freezing is a great option! For the best results, freeze them *before* glazing. Place the cooled, un-glazed cheesecakes on a baking sheet and freeze until firm (this usually takes about 1-2 hours). Once frozen solid, transfer them to a freezer-safe airtight container or heavy-duty freezer bags. You can freeze them like this for up to 1-2 months. To thaw, transfer them from the freezer to the refrigerator and let them thaw overnight. Once thawed, you can add the glaze.
Glaze Timing Advice: If you’re planning to store them in the fridge for a day or two, I usually add the glaze just before serving or a few hours beforehand. If you’re freezing them, definitely wait until they are fully thawed and ready to be served before drizzling with the glaze. Applying the glaze to a frozen or partially thawed cheesecake can make it a bit messy. For cheesecakes stored at room temperature for a short period, the glaze should be fine, but again, I prefer to glaze them closer to serving time for optimal freshness.
Frequently Asked Questions
Final Thoughts
I really hope you give these Mini Lemon Blueberry Cheesecakes a try. They are so much more than just a dessert to me; they’re little moments of joy that I love sharing. The way the bright lemon zest and juicy blueberries cut through the creamy richness of the cheesecake is just pure magic. They’re easy enough for a weeknight craving but special enough for company. They’re the perfect size, the perfect flavor balance, and honestly, they just make people happy. I’ve found that whenever I bring these to a gathering, they’re the first to go, and I always get asked for the recipe! If you love this recipe, you might also enjoy my other fruity desserts like my Classic Berry Crumble or my Zesty Orange Pound Cake. They capture that same fresh, vibrant flavor profile.
So, go on, gather your ingredients, put on your favorite music, and get baking! I can’t wait to hear how yours turn out. Please leave a comment below and let me know what you think, or share your own variations and tips. Happy baking, everyone!
Mini Lemon Blueberry Cheesecakes
Ingredients
Graham Cracker Crust
- 1.5 cups graham cracker crumbs
- 0.25 cup granulated sugar
- 6 tablespoons unsalted butter, melted
Cheesecake Filling
- 16 ounces cream cheese, softened
- 0.5 cup granulated sugar
- 0.25 cup sour cream
- 1 tablespoon lemon zest
- 2 tablespoons fresh lemon juice
- 0.5 teaspoon vanilla extract
- 0.5 cup fresh blueberries
Instructions
Preparation Steps
- For the crust: In a medium bowl, combine graham cracker crumbs and sugar. Pour in melted butter and stir until well combined. Press the mixture evenly into the bottoms of 12 muffin cups lined with paper liners.
- For the filling: In a large bowl, beat the softened cream cheese and sugar with an electric mixer until smooth and creamy. Beat in the sour cream, lemon zest, lemon juice, and vanilla extract until just combined.
- Gently fold in the fresh blueberries.
- Spoon the cheesecake filling evenly over the crust in the prepared muffin cups.
- Refrigerate for at least 4 hours, or until firm. Once set, carefully remove the mini cheesecakes from the muffin cups.
- Garnish with additional blueberries and a sprinkle of lemon zest, if desired, before serving.