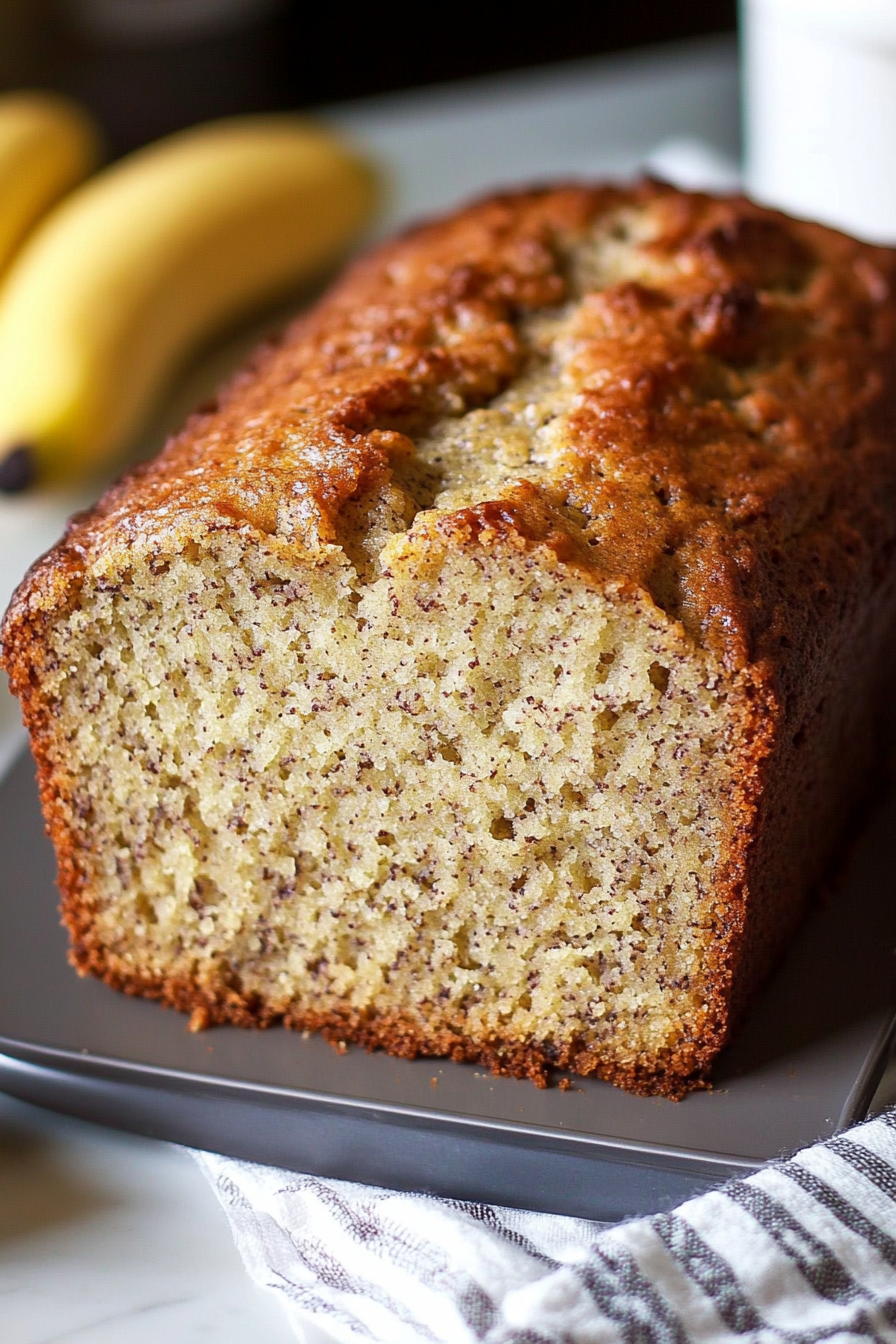
banana bread
There’s something almost magical about the way the smell of banana bread fills the house, isn’t there? I still remember the first time I baked this recipe—my kitchen felt like a cozy café, and my kids practically camped out by the oven, waiting for their slice. This banana bread has that perfect balance of tender crumb and just enough sweetness, with little pockets of caramelized banana that somehow make it taste richer than your typical loaf. If you’re used to plain old quick breads or the classic chocolate chip cookie, give this banana bread a try—it’s a little less sweet but so much more comforting. I promise, once you’ve made it just once, it’ll become your go-to for leftover bananas and those lazy afternoons when you want something homemade but not fussy.
What is banana bread?
Think of banana bread as the ultimate cozy treat—you take overripe bananas, which might be about to go to waste, and turn them into a loaf of deliciousness. It’s essentially a quick bread, meaning no yeast or complicated rising needed, just a simple batter that bakes into a soft, moist cake-like bread. The name is straightforward: it’s bread made with bananas, but it’s far from boring. Some versions are dense and cake-like, others light and fluffy, loaded with nuts or chocolate, making it endlessly customizable. For me, banana bread is that nostalgic hug in food form—it’s what my grandma used to pull out of the oven, and it’s still a family favorite for birthdays, school snacks, or Sunday breakfasts.
Why you’ll love this recipe?
What I love most about this banana bread is how it hits that sweet spot between rich and simple. The bananas give it natural sweetness and moisture, making it tender without needing a ton of oil or sugar—so it doesn’t feel heavy or greasy. Honestly, it’s one of those recipes you can throw together in a pinch because the ingredients are probably already in your pantry and fridge. I always have bananas turning brown on the counter, and this banana bread transforms them into something delicious. Plus, there’s so much room to make it your own—add a handful of walnuts for crunch, swirl in some peanut butter, or toss in chocolate chips if you’re feeling indulgent. If you’re a fan of zucchini bread or pumpkin bread, this one’s a lifesaver because it’s just as easy but a little sweeter and more kid-friendly. You can slice it up for breakfast, serve it as an afternoon snack, or even dress it up with a cream cheese glaze for dessert. Every time I make this loaf, it disappears in minutes—and my kids ask for seconds without fail. Whether you’re new to banana bread or a seasoned baker, this recipe feels like an old friend.
How do you make banana bread?
Quick Overview
Here’s the gist: you mash those ripe bananas, mix them with a few pantry staples, stir the batter gently so it stays light, and then bake it until golden and fragrant. No fancy equipment needed, no crazy steps—just a little love in your mixing bowl. The best part is you don’t have to obsess about overmixing; a few lumps in the bananas actually make it more moist and tender. This banana bread recipe has been my lifesaver on rushed mornings or when I’m craving something sweet at 10pm but don’t want to bake a whole cake. Trust me, once you’ve got the hang of it, this will be your ultimate comfort loaf.
Ingredients
For the Main Batter:
- 3 ripe bananas (the blacker, the better for sweetness and moisture)
- 1/3 cup melted butter (use unsalted for better control on salt)
- 3/4 cup granulated sugar (feel free to adjust to taste)
- 1 large egg (room temperature helps it blend better)
- 1 teaspoon vanilla extract (the little detail that makes a big difference!)
- 1 teaspoon baking soda (helps get that perfect rise)
- Pinch of salt (balances all the sweetness)
- 1 1/2 cups all-purpose flour (sifted if you want airier bread)
For the Filling:
- 1/2 cup chopped walnuts or pecans (toasted if you like extra crunch)
- Optional: 1/2 cup chocolate chips or a sprinkle of cinnamon for warmth
For the Glaze:
- 1 cup powdered sugar
- 2-3 tablespoons milk or almond milk (adjust for your preferred drizzle thickness)
- 1/2 teaspoon vanilla or a squeeze of lemon juice for brightness
Step-by-Step Instructions
Step 1: Preheat & Prep Pan
Set your oven to 350°F (175°C) and grease a 9×5-inch loaf pan with butter or non-stick spray. I always line mine with parchment paper, leaving overhangs on the sides—it makes lifting the banana bread out so much easier and keeps those edges perfectly soft. Preheating your oven is key here because you want a snug, consistent temperature for that slow, even bake that cooks the banana bread through without drying out.
Step 2: Mix Dry Ingredients
In a medium bowl, whisk together the flour, baking soda, and salt. This step makes sure that every little crumb of your banana bread rises just right. It’s tempting to just dump everything in one bowl, but taking a moment here helps the loaf have a consistent texture and avoid any bitter baking soda bits.
Step 3: Mix Wet Ingredients
In a larger bowl, mash your bananas with a fork—don’t worry if it’s chunky; I actually prefer a few lumps for extra moisture. Pour in the melted butter, sugar, egg, and vanilla extract. Whisk everything until it’s blended but not overdone. I like to use a wooden spoon here to keep it feeling rustic—reminds me of cooking with my grandma!
Step 4: Combine
Pour the dry mix into the wet mix and fold gently just until the dry ingredients disappear. Resist the urge to stir or beat too much—you want tender bread, not tough. The batter will be thick and slightly lumpy, which is exactly what you want for that cozy texture.
Step 5: Prepare Filling
Stir in your chopped nuts and chocolate chips if you’re adding them. If you want a cinnamon swirl, sprinkle a bit over the batter once it’s in the pan and use a knife to create the swirl. This little touch adds a warm aroma and flavor that makes the bread even more irresistible.
Step 6: Layer & Swirl
Pour half the batter into your prepared pan, then sprinkle a few more nuts or chocolate chips. Pour the remaining batter on top and use a butter knife to swirl gently—this creates beautiful marbling and pockets of flavor. You’ll see the batter shift and become almost hypnotic to watch, I swear this is my favorite part.
Step 7: Bake
Pop it in the oven and bake for 55-60 minutes. Start checking for doneness around 50 minutes; if a toothpick comes out mostly clean with just a few moist crumbs, it’s ready. If it’s still wet batter, bake another 5-10 minutes, but keep a close eye. I’ve learned that ovens can vary, so keeping this flexible is key. If the top browns too fast, lightly tent with foil.
Step 8: Cool & Glaze
Let your banana bread cool in the pan for about 15 minutes to set—it’s tough to wait, but cutting into it too hot leads to crumbling. Afterward, transfer it to a wire rack. Once it’s just warm, drizzle on your glaze made by mixing powdered sugar with milk and flavoring—let it drip down those golden edges. The glaze isn’t just for looks; it adds a gentle sweetness and slight crunch that contrasts beautifully with the soft crumb.
Step 9: Slice & Serve
Slice using a serrated knife to get clean cuts without squishing the bread. Serve warm with a pat of butter or just as it is, maybe with a cup of your favorite morning coffee or afternoon tea. My kids love it with a smear of cream cheese, which is a game changer for turning this into a little treat-me moment.
What to Serve It With
For Breakfast: There’s nothing like this banana bread toasted lightly with a smear of creamy butter or peanut butter alongside your morning cup of coffee. I like to plate a few slices with fresh fruit and a drizzle of honey to start the day on a bright, cozy note.
For Brunch: Elevate this loaf by serving it with whipped cream and a berry compote, plus a sparkling mimosa or creamy latte. It’s surprisingly easy to dress up and makes for a lovely centerpiece that sparks compliments from guests.
As Dessert: Warm up a slice and serve alongside vanilla ice cream or a scoop of Greek yogurt with a sprinkle of toasted nuts and a drizzle of maple syrup. The richness plays off the natural sweetness of the banana bread beautifully.
For Cozy Snacks: Afternoon snack attacks are tamed with banana bread and a cup of warm chai or hot chocolate. This pairing feels like wrapping yourself in a warm blanket—simple, nostalgic, and utterly satisfying. I often slice a thick wedge for my daughter after school, and it’s become our little ritual.
Top Tips for Perfecting Your Banana Bread
Banana Prep: Use bananas that are speckled or even mostly black—those are the sweetest and most flavorful. Don’t peel and refrigerate your bananas for ripening; instead, leave them at room temperature for a day or two for the best texture and color.
Mixing Advice: Folding gently is king here. I’ve made the mistake of overmixing repeatedly and ended up with dense, rubbery bread. Once the flour’s just incorporated, stop stirring. A few lumps in the batter promise a moist crumb once baked.
Swirl Customization: When swirling the filling (nuts, chocolate, cinnamon), use a gentle swirling motion with the tip of a knife or skewer—not too deep—so your batter layers don’t fully blend, preserving those pretty marble effects everyone notices.
Ingredient Swaps: For a dairy-free version, swap the butter for coconut oil or a mild-flavored oil. Almond milk or oat milk work beautifully in the glaze and even in the batter if you want a creamier result. I’ve done this many times and the texture stays wonderful. If you want less sugar, cut back by a quarter cup and add a touch of maple syrup or honey for natural sweetness.
Baking Tips: Oven temps can be sneaky. I always keep an eye around 50 minutes to avoid a crust that’s too dark. Bake in the middle rack for even heat, and if your top is browning too fast, don’t hesitate to tent with foil. Testing with a toothpick is the best way to know when to pull it.
Glaze Variations: You can swap the vanilla for lemon juice or orange zest to brighten the flavor. For a richer note, add a splash of bourbon or coffee to the glaze. If you prefer no glaze, a dusting of powdered sugar or a smear of cream cheese frosting also works like magic.
Storing and Reheating Tips
Room Temperature: This banana bread stays fresh covered on the counter in a cake dome or wrapped loosely in foil for up to 2 days. It’s best eaten within this time frame to enjoy that perfect softness and flavor.
Refrigerator Storage: Store banana bread in an airtight container or tightly wrapped in plastic wrap, which extends its life up to 5 days. I personally prefer to bring it to room temp before serving so it’s soft and fragrant again.
Freezer Instructions: Banana bread freezes beautifully! Wrap the cooled loaf tightly in plastic wrap and then foil to prevent freezer burn. It keeps well for up to 3 months. Thaw overnight in the fridge or at room temperature, then warm slightly in the oven or toaster for that fresh-baked feel.
Glaze Timing Advice: If you’re freezing, it’s best to skip glazing until after thawing. Glazing before freezing can cause cracking or sogginess. Apply the glaze just before serving for the best texture and presentation.
Frequently Asked Questions
Final Thoughts
Honestly, this banana bread has become one of those recipes I hold close, the kind you come back to again and again. It’s forgiving, comforting, and always delivers that warm, homemade feeling. Every time I slice into a fresh loaf, it smells like a mix of nostalgia and love—like sitting around a kitchen table with family sharing stories. I hope it becomes a staple in your home too. If you enjoyed this, why not try swapping in pumpkin or zucchini next time to mix things up? And don’t be shy—leave a comment or share your own twists. I can’t wait to hear how your banana bread turns out! Happy baking and even happier eating.
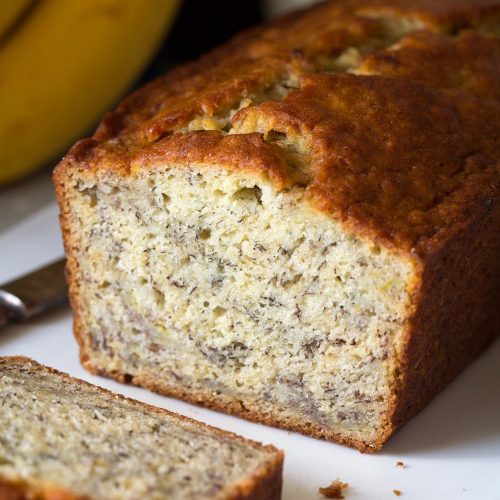
Golden Banana Loaf How to Bake It Best
Ingredients
Main Ingredients
- 1.67 cups all-purpose flour (scoop and level to measure)
- 1 tsp baking powder
- 0.5 tsp baking soda
- 0.5 tsp salt
- 8 Tbsp unsalted butter melted*
- 0.75 cups granulated sugar *
- 2 large eggs
- 1.33 cups well mashed overripe bananas about 3 1/2 medium bananas, be sure to measure
- 0.25 cups sour cream
- 0.5 tsp vanilla extract
Instructions
Preparation Steps
- Preheat oven to 350°F (180°C). Grease a 9 by 5-inch or 8 1/2 by 4 1/2-inch loaf pan.
- In a mixing bowl whisk together flour, baking powder, baking soda and salt. Make a well in the center of flour mixture and set aside.
- In a separate medium mixing bowl whisk together melted butter and granulated sugar.
- Whisk in eggs, then whisk in bananas, sour cream and vanilla extract.
- Pour banana mixture into flour mixture and fold with a rubber spatula just until combined. Pour batter into prepared loaf pan.
- Bake in preheated oven until a toothpick inserted into the center comes out clean or with a few moist crumbs, about 50 to 58 minutes.
- Cool in pan for 10 to 15 minutes. Run a knife around edges to loosen, then invert onto a wire rack.
- Let cool on wire rack about 30 minutes then transfer to an airtight container to finish cooling. Store at room temperature or refrigerate for longer shelf life.