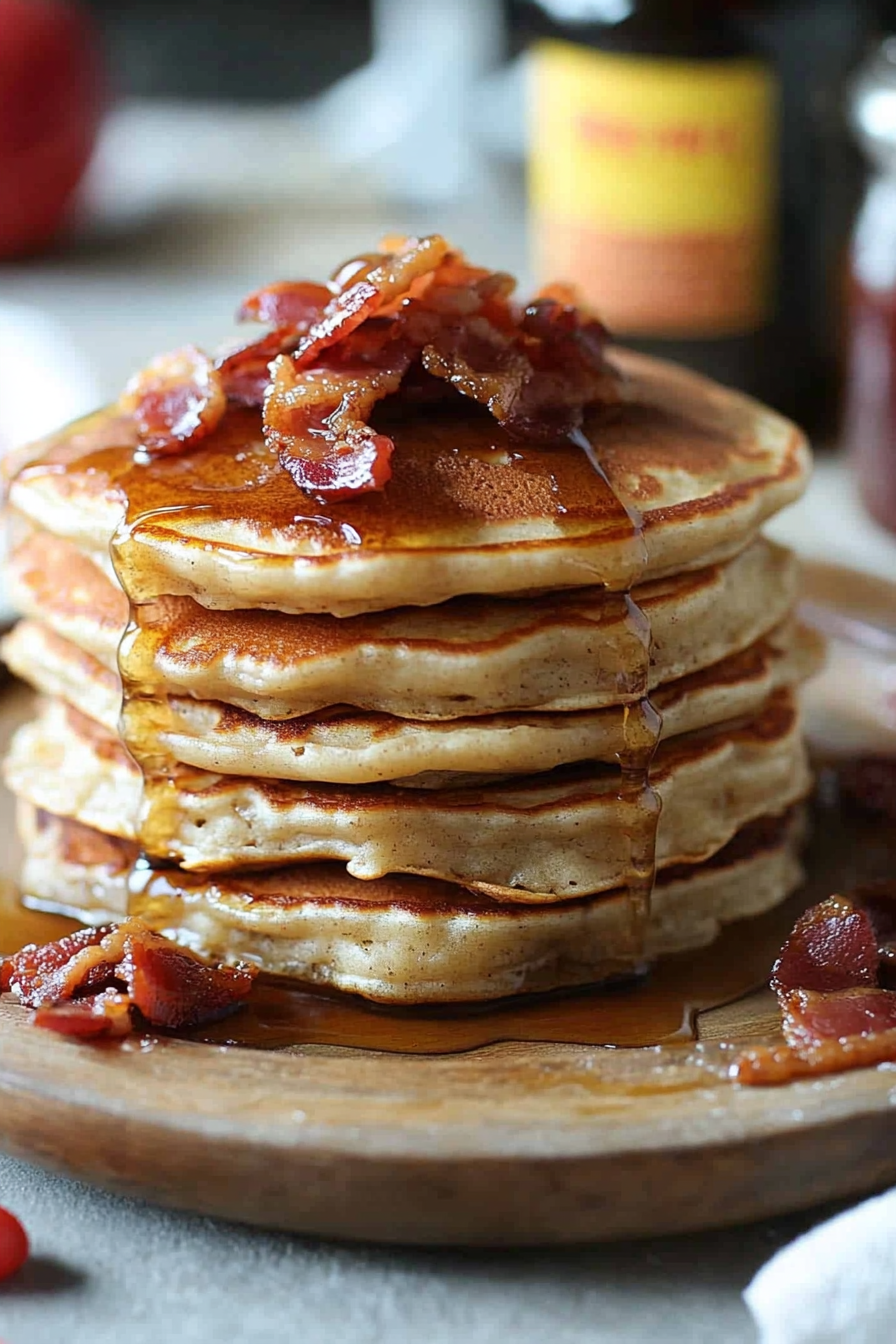
maple bacon pancakes
There’s something about waking up to the smell of sizzling bacon mingled with sweet maple syrup wafting through the air that feels like a warm hug first thing in the morning. I remember Sunday mornings at my grandma’s house — she’d always whip up a stack of fluffy pancakes, but the moment she started cooking bacon alongside them, the whole kitchen would hum with excitement. Those crispy, smoky strips folded into each bite of pancake? Pure magic. This recipe for maple bacon pancakes has been a staple in my family ever since, and believe me, it’s an irresistible upgrade to your usual pancakes. Whether you’re feeding a hungry crowd or sneaking a midnight snack (don’t worry, I won’t tell), these pancakes hit that perfect sweet-and-savory note that just can’t be beat.
What is maple bacon pancake?
Think of maple bacon pancakes as the best breakfast duet—tender pancakes infused with bits of crispy bacon, then topped with that golden, drizzly maple syrup. It’s essentially your classic fluffy pancake recipe with a fun twist that brings together the smoky, salty goodness of bacon and the rich, sweet warmth of maple. The name’s pretty straightforward, but what really makes these pancakes stand out is the balance of flavors and textures in every bite. If you’re imagining a syrup-soaked mess, don’t worry—that syrup acts more like a caramel glaze tucked right on top or swirled in. It’s a charming combo that’s friendly enough for kids but sophisticated enough for brunch guests. Plus, who says you can’t enjoy a little indulgence any day of the week?
Why you’ll love this recipe?
What I love most about these maple bacon pancakes is how effortlessly they bring joy to the breakfast table. The flavor combination is a dream: crispy, smoky bacon chunks peek out from warm, tender pancakes kissed with a maple syrup swirl. It’s a little sweet, a little salty, and wildly comforting. I’ve made these countless times, and no matter who tries them—kids, friends, or picky eaters—they disappear in minutes. Seriously, the smell alone brings everyone running to the kitchen.
Another thing to love? The simplicity. Honestly, if you’re used to spending time flipping pancakes and cooking bacon separately, this method saves time and cleanup by combining the magic early in the batter. It’s budget-friendly too—basic pantry ingredients and just a handful of splurges on good-quality maple syrup and thick-cut bacon. I’ve also found this recipe is crazy versatile; swap out the bacon for turkey bacon or even a smoky sausage crumble, and it still turns out stellar. Want to get fancy? Toss in some fresh blueberries or chopped pecans with the batter for a seasonal twist. This is my go-to when I want something a bit different but don’t want to reinvent the wheel.
How do you make maple bacon pancakes?
Quick Overview
Making these pancakes is straightforward and fun. You start by cooking your bacon crisp and chop it up. Then, you mix the dry ingredients separately from your wet ones—because that’s how you get that perfect fluffy texture without a dense, tough pancake. Fold the crispy bacon into the batter, cook on a hot griddle until golden, and finally, drizzle with warm maple syrup that’s just thick enough to coat but not overpower. It’s a simple process that feels fancy, and the payoff is that mouthwatering smell and taste that fills your kitchen—and your heart—with comfort.
Ingredients
For the Main Batter:
- 1 ½ cups all-purpose flour – I prefer bleached for fluffiness
- 3 ½ tsp baking powder – this elevates them nicely
- 1 tsp salt – balances the sweetness
- 1 tbsp granulated sugar – just enough to enhance flavor
- 1 ¼ cups whole milk – because it makes batter smooth and creamy, though almond milk works well too
- 1 large egg – gives structure
- 3 tbsp unsalted butter, melted – for richness
For the Filling:
- 6 strips thick-cut bacon – cooked crisp, then chopped
- Optional: ½ cup chopped walnuts or pecans for crunch
For the Glaze:
- ½ cup pure maple syrup – I always splurge for the real deal
- 1 tbsp unsalted butter – whisked in for a glossy finish
- Optional: a pinch of cinnamon or vanilla extract for warmth
Step-by-Step Instructions
Step 1: Preheat & Prep Pan
Start by heating your griddle or a large non-stick skillet over medium heat. I always let it warm for about 5 minutes until it’s evenly hot but not smoking. Meanwhile, cook your bacon on a separate pan over medium heat until really crispy—don’t rush this part because that perfect crunch is what gives the batter texture. Drain the bacon on paper towels and chop into bite-sized pieces. Set everything aside. Before cooking pancakes, lightly grease your griddle with a bit of butter or oil to ensure golden edges without sticking.
Step 2: Mix Dry Ingredients
In a large bowl, sift together the flour, baking powder, salt, and sugar. Sifting is key here—it incorporates air and prevents lumps which can turn pancakes tough. Use a whisk to give everything a nice even mix. This step sets up a fluffy pillar for the batter, so don’t skip the sifting even if you’re in a hurry. I always mix these dry ingredients first so I can grab them quickly when the wet ingredients are ready.
Step 3: Mix Wet Ingredients
In a separate bowl, whisk together the milk, egg, and melted butter. I like to pour the melted butter in slowly while whisking so it blends seamlessly without cooking the eggs. The batter will look glossy and smooth when you’re done—no lumps here! If your milk is cold, let it come to room temperature first; cold milk can slow rising and affect fluffiness.
Step 4: Combine
Pour the wet ingredients into the dry and gently fold them together with a spatula. The key here is to stir just until combined—you’ll see some lumps, and that’s perfectly fine. Overmixing develops gluten which makes pancakes rubbery, and nobody wants that. Think of it as a light hug between dry and wet, not a wrestling match. Now gently fold in your chopped bacon pieces and nuts if using—this spreads that crispy goodness evenly through every bite.
Step 5: Prepare Filling
You already prepped your bacon earlier, which is the star filling here. If you want to customize, try swapping half the bacon with small chunks of smoked sausage or even diced apple for a sweet-savory twist. Just make sure anything you add blends well texture-wise to keep these pancakes fluffy and not heavy.
Step 6: Layer & Swirl
If you’re feeling fancy, pour a ladle of pancake batter onto the hot griddle, then sprinkle some extra chopped bacon right on top before flipping. This creates a lovely caramelized bacon crust on one side. Another personal favorite is swirling a tiny splash of maple syrup onto the batter just before it sets—it melts right in and creates those dreamy ribbons of flavor. Watch for bubbles forming on the surface—that’s your sign to get ready to flip.
Step 7: Bake
Pancakes actually cook faster than you’d think when the pan is at the right temperature. Cook each side for about 2-3 minutes, or until edges look dry and golden brown. Don’t press down on them with your spatula—that’ll squish out the fluffiness. Use a thin, wide spatula for an easy flip; it takes practice, but once you get the hang of it, you’ll feel like a pro. If your griddle cools, just turn the heat up a bit and let it warm back before continuing.
Step 8: Cool & Glaze
Once your stack is ready, transfer the pancakes to a warm plate or even an oven-safe dish in a 200°F oven to keep warm. For the glaze, gently heat maple syrup with butter (and cinnamon if you like) in a small pan until butter melts and mixture is smooth. Drizzle this luscious glaze over your pancakes just before serving to keep their edges crisp but infuse that signature maple sweetness.
Step 9: Slice & Serve
Serve your pile of maple bacon pancakes warm, ideally right off the griddle. I love stacking them high, then slicing through the layers so the bacon peeks out in every slice. Add a pat of butter on top and drizzle with extra maple syrup if you’re feeling indulgent. A handful of fresh berries or a dusting of powdered sugar never hurts either. Best enjoyed with a strong cup of coffee or a glass of cold milk to balance all that richness.
What to Serve It With
For Breakfast: Pair these pancakes with a robust, freshly brewed coffee or a creamy latte. Fresh fruit like orange slices or strawberries adds a bright contrast, and a side of scrambled eggs keeps it all balanced and filling. I often serve with a dollop of Greek yogurt sweetened lightly with honey—my kids love it.
For Brunch: These pancakes turn brunch into a celebration. Serve with a sparkling mimosa or freshly squeezed orange juice. Add sides like roasted potatoes or grilled asparagus for a savory complement. I’ve hosted brunches where guests rave about this combo—something about the bacon and maple makes it feel a little fancy yet totally comfy.
As Dessert: On those nights when the kids are asleep and sugar calls, I toss a scoop of vanilla ice cream or a drizzle of chocolate sauce on these pancakes for a cozy after-dinner treat. A sprinkle of chopped nuts or a dash of cinnamon sugar amps up the decadence without much effort.
For Cozy Snacks: On slow Sunday afternoons, I fold a warm pancake around fresh cream cheese mixed with a little maple syrup. It’s like a sweet, smoky hug that’s perfect with a cup of tea. My family always requests this version during our weekend movie marathons.
Top Tips for Perfecting Your Maple Bacon Pancakes
Bacon Prep: Cook your bacon until really crisp to avoid soggy pancake bites. You want that satisfying crunch. Drain well on paper towels to reduce grease which can weigh down the batter. If you’re prepping ahead, reheat briefly before folding into the batter.
Mixing Advice: Resist the urge to overmix your batter. Lumps? Totally fine! They help keep the pancakes tender. Use a folding motion with a spatula rather than vigorous stirring—this is the trick I learned that transformed my pancakes from tough to fluffy.
Swirl Customization: For visual drama, swirl softened maple syrup or even a cinnamon cinnamon-honey butter into the batter just before cooking. Use a toothpick or skewer to create marbled patterns. It’s easier than it looks and always impresses guests.
Ingredient Swaps: Tried and tested: swap half the all-purpose flour for whole wheat pastry flour for a heartier bite without losing fluff. You can also replace milk with almond or oat milk—the batter thickens slightly, but the flavor deepens in a lovely way. If you need it dairy-free, coconut oil replaces butter nicely.
Baking Tips: Keep your griddle at medium heat; too hot burns the outsides and leaves the inside raw, too cool makes pancakes pale and dense. Test your pan with a small drop of batter first. Flip pancakes once bubbles form on the surface and edges start drying. Trust that instinct!
Glaze Variations: Feel free to jazz up your maple butter glaze with a pinch of nutmeg, a splash of bourbon, or vanilla extract. If you find the glaze too thin, simmer a bit longer to thicken or add a tiny sprinkle of cornstarch slurry. Pour it warm over your stack and watch it glisten irresistibly.
Storing and Reheating Tips
Room Temperature: Pancakes are best enjoyed fresh but can sit covered on the counter for a couple of hours without issue if you’re making several batches. Cover loosely with foil or a clean kitchen towel to keep them moist but not soggy.
Refrigerator Storage: Store cooled pancakes in an airtight container or wrapped tightly with plastic wrap. They keep fresh for up to 3 days. When reheating, I pop them in the microwave with a damp paper towel to revive softness or toast them for a crisp edge.
Freezer Instructions: This recipe freezes beautifully. Layer pancakes between parchment paper in a freezer-safe container or bag to prevent sticking. Freeze up to 2 months. For thawing, leave at room temperature for 15–20 minutes and then warm in the oven or toaster. Adding glaze right before serving keeps them from getting soggy.
Glaze Timing Advice: If storing for later, hold off glazing pancakes until just before serving. Warm glaze applied fresh delivers the best shine and flavor. You can reheat glaze gently if needed. Avoid glazing before freezing to prevent sugary stickiness.
Frequently Asked Questions
Final Thoughts
Maple bacon pancakes are the kind of recipe that make mornings feel like an event—comforting, a little indulgent, and endlessly comforting. Whether you’re feeding a crowd or cooking for yourself, it’s a special treat that’s easy enough to pull off on a busy day but still delivers that homemade charm. I think it’s the balance of smoky bacon and sweet maple that keeps everyone coming back for more. If you love these, I recommend trying my cinnamon swirl pancakes or pumpkin spice pancakes next—equally cozy and made with love. Can’t wait to hear how yours turn out! Leave a comment, share your own twists, and don’t forget to savor every delicious bite. Happy cooking!
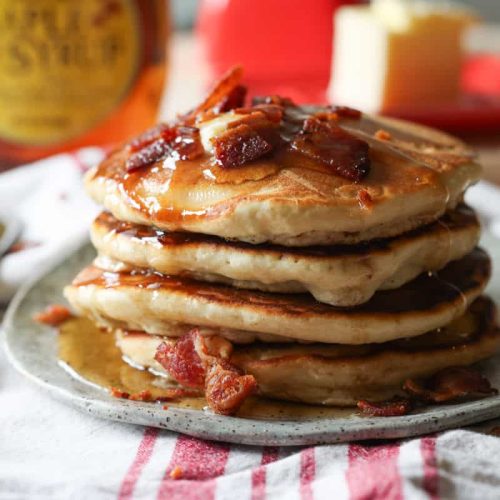
Savory Pancakes How Maple Bacon Elevates Breakfast
Ingredients
Main Ingredients
- 1 pound Maple Bacon cooked until crisp
- 3 cups all purpose flour *see note
- 4 teaspoons baking powder
- 1 teaspoon kosher salt
- 0.25 cup dark brown sugar
- 0.25 cup maple syrup plus more for serving
- 3 large eggs
- 1.5 cups milk 2% or whole
- 1 teaspoon vanilla extract
- 0.33 cup canola oil
- Butter to fry and serve
Instructions
Preparation Steps
- Dice up the cooked maple bacon and set aside.
- In a large bowl, whisk together the flour, baking powder, salt, and brown sugar.
- In a medium bowl, whisk together maple syrup, eggs, milk, vanilla extract, and canola oil.
- Add the wet ingredients into the dry ingredients and whisk until smooth.
- Reserve 1/4 cup of the diced bacon to garnish the cooked pancakes, then stir the remaining bacon into the batter.
- Melt a tablespoon of butter on a large skillet or griddle over low heat. Pour 1/4-cup portions of batter onto the skillet. Cook until bubbles form and edges set, flip, and cook until golden brown.
- Serve immediately with butter, more maple syrup, and reserved diced bacon on top.