chocolate cupcakes
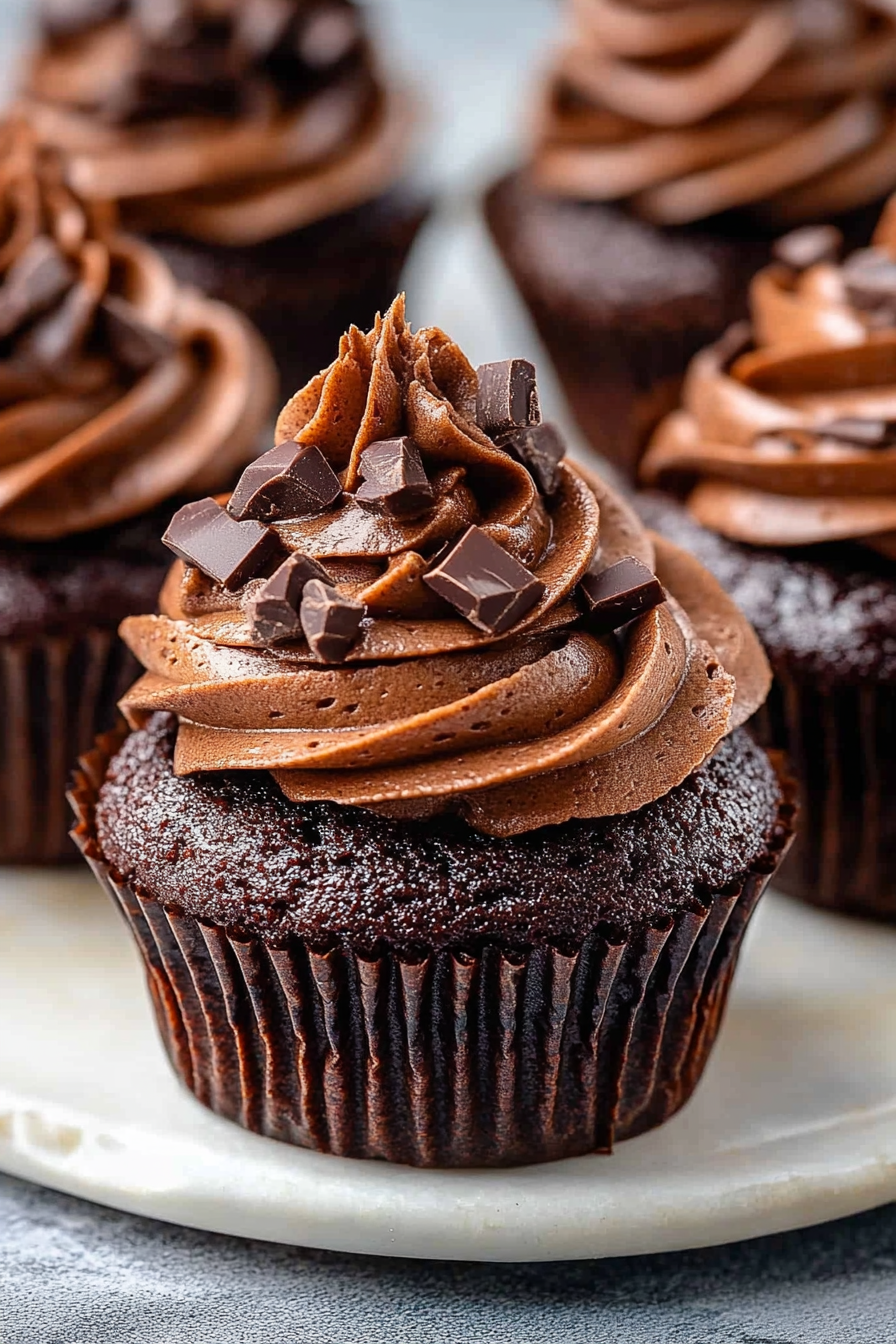
Oh, my goodness, where do I even begin with these chocolate cupcakes? If you’ve been searching for *that* perfect chocolate cupcake recipe – the kind that’s impossibly moist, intensely chocolatey, and just melts in your mouth – then stop right here, because you’ve found it. These aren’t just any chocolate cupcakes; these are the ones I whip up when I need a guaranteed win, whether it’s for a birthday party, a potluck, or just a Tuesday night when only chocolate will do. I remember the first time I perfected this recipe. It was after a rather disastrous attempt where my cupcakes came out all crumbly and sad. My little one took one look and asked, “Mommy, why are they broken?” That’s when I knew I had to find the secret to truly spectacular chocolate cupcakes. Forget dry, bland cakes; these are pure indulgence. They’re like a warm hug in cupcake form, and honestly, they rival any bakery version I’ve ever tried, even the fancy ones that cost a small fortune. If you love a good classic chocolate cake, you’re going to adore these. They’re simple enough for a weeknight craving but impressive enough for any celebration.
What are chocolate cupcakes?
So, what makes these particular chocolate cupcakes so special? Think of them as your ultimate go-to. They’re essentially a perfectly balanced, deeply flavored chocolate cake baked into individual, delightful portions. The name is straightforward because the recipe itself is, thankfully, straightforward! There’s no fussy technique involved, just good old-fashioned baking with incredible results. What sets them apart, in my humble opinion, is that incredible, tender crumb that stays moist for days (if they even last that long!). They’re not overly sweet, letting the rich chocolate flavor really shine through. It’s that classic, comforting taste of chocolate cake, but in the most convenient and adorable little packages. They’re the kind of treat that makes you close your eyes and sigh with happiness after the first bite. They’re just… pure chocolate joy, baked with love, and ready to make your day a whole lot better.
Why you’ll love this recipe?
Let me tell you why this recipe has earned a permanent spot in my recipe binder, and why I just know you’re going to fall head over heels for it too. First and foremost, the **flavor**. It’s an intense, rich chocolate explosion without being bitter. We’re talking deep, dark cocoa notes that just sing. It’s the kind of chocolate flavor that makes you feel like you’re indulging in something truly decadent. Then there’s the **simplicity**. Seriously, I can whip these up when I have a sudden craving and a busy schedule. It’s a one-bowl wonder for the batter, which always makes me happy because fewer dishes mean more time for actually eating them! The ingredients are all pantry staples, nothing fancy or hard to find, which makes them incredibly **cost-efficient**. You don’t need to break the bank to make something this delicious. And the **versatility**! You can frost them with buttercream, a simple ganache, or even just a dusting of powdered sugar. They’re fantastic plain, too, if you’re not a frosting person (though I highly recommend it!). What I love most about this recipe is that it’s incredibly forgiving. Even if you’re a beginner baker, you’re practically guaranteed success. Unlike some other recipes I’ve tried that require a specific temperature for butter or a delicate folding technique, this one just works. It’s reliable, consistent, and always produces those perfectly domed, moist chocolate cupcakes that disappear faster than you can say “more, please!”
How do I make chocolate cupcakes?
Quick Overview
Whipping up these amazing chocolate cupcakes is surprisingly simple. We’ll start by whisking together our dry ingredients, then combine our wet ingredients, and finally, bring them all together for a batter that’s rich and smooth. A quick pour into prepared cupcake liners, a bake in a moderately hot oven, and voilà – perfect chocolate cupcakes! The magic lies in the careful balance of ingredients that ensures ultimate moisture and flavor. It’s a straightforward process that takes the guesswork out of baking, giving you a beautiful, delicious result every single time. Trust me, you’ll be amazed at how easy it is.
Ingredients
For the Main Batter:
2 cups all-purpose flour: I always use unbleached all-purpose flour for the best texture. If you’re feeling adventurous and want to try a gluten-free version, I’ve had success using a good 1:1 gluten-free baking blend, though you might notice a slight change in crumb. Just make sure it contains xanthan gum.
1 ¾ cups granulated sugar: This amount gives us that lovely sweetness without being overpowering, allowing the chocolate flavor to really come through. You can try reducing it by a quarter cup if you prefer less sweetness, but I find this balance to be just right.
¾ cup unsweetened cocoa powder: This is where the deep chocolate flavor comes from! I swear by natural unsweetened cocoa powder – it gives the richest, most intense chocolate taste. Dutch-processed can work too, but it tends to make things a bit darker and less tangy. Make sure it’s good quality; it makes a difference!
1 ½ teaspoons baking soda: This is crucial for that beautiful rise and tender texture. Make sure yours isn’t expired; I’ve learned the hard way that old baking soda leads to flat cupcakes!
1 teaspoon baking powder: A little extra lift never hurt anyone. This works with the baking soda for maximum fluffiness.
1 teaspoon salt: Salt is a flavor enhancer! It balances the sweetness and brings out the chocolate notes. Don’t skip it!
2 large eggs: Room temperature eggs incorporate better into the batter, giving you a smoother mix and a more even bake. Just pop them out of the fridge about 30 minutes before you start.
1 cup milk: Whole milk makes for the creamiest batter, but I’ve tested this with 2% milk and even almond milk (unsweetened) and it turned out wonderfully moist. Use what you have!
½ cup vegetable oil: This is key to our incredible moistness. Oil makes cakes tender and keeps them from drying out, which is why these cupcakes stay soft for days. You can also use canola oil or a light-flavored olive oil.
2 teaspoons vanilla extract: Pure vanilla extract adds depth and warmth. It complements the chocolate beautifully. Don’t use imitation if you can help it!
1 cup boiling water: This is the secret weapon for super moist chocolate cake! It blooms the cocoa powder, intensifying its flavor, and creates an incredibly tender crumb. Be careful when handling boiling water!
For the Filling (Optional, but Recommended!):
4 ounces cream cheese, softened: For that tangy, creamy contrast. Make sure it’s truly softened, not just slightly warm.
¼ cup unsalted butter, softened: Adds richness and stability to the filling.
1 ½ cups powdered sugar, sifted: Sifting prevents lumps and ensures a smooth filling.
1 teaspoon vanilla extract: For that classic flavor boost.
2 tablespoons milk or heavy cream: To get the perfect creamy consistency.
Pinch of salt: To balance the sweetness.
For the Glaze (Simple Chocolate Buttercream):
½ cup unsalted butter, softened: The base for our delicious frosting.
2 cups powdered sugar, sifted: Again, sifting is your friend here for a smooth finish.
⅓ cup unsweetened cocoa powder, sifted: For that intense chocolate glaze.
¼ cup milk or heavy cream: To reach your desired consistency.
1 teaspoon vanilla extract: Enhances the chocolate flavor.
Pinch of salt: To balance the sweetness.
Step-by-Step Instructions
Step 1: Preheat & Prep Pan
First things first, preheat your oven to 350°F (175°C). I like to get it going right away so it’s nice and ready by the time my batter is mixed. Then, line your standard muffin tins with cupcake liners. I usually fill 24 cups, so I grab two pans. Make sure the liners are pretty, or plain, whatever you prefer – they’re going to hold something delicious!
Step 2: Mix Dry Ingredients
Grab a large mixing bowl. Add your flour, sugar, cocoa powder, baking soda, baking powder, and salt. Give it a good whisk with a separate whisk, or even a fork, until everything is thoroughly combined and there are no clumps of cocoa powder left. This step ensures everything is evenly distributed, which means no pockets of baking soda or salt in your finished cupcakes!
Step 3: Mix Wet Ingredients
In a separate medium bowl or large liquid measuring cup, whisk together your eggs, milk, vegetable oil, and vanilla extract until they are well combined and the mixture is uniform in color. It should look smooth and creamy.
Step 4: Combine
Now, pour the wet ingredients into the bowl with the dry ingredients. Mix on low speed with an electric mixer (or by hand with a whisk) just until the ingredients are *almost* combined. Don’t overmix! It’s okay if there are still a few streaks of flour. This is where the magic happens: carefully pour in the cup of boiling water. The batter will become quite thin, and that’s exactly what you want! Mix on low speed until the batter is smooth and homogenous, about 30-60 seconds. Scrape down the sides and bottom of the bowl to make sure everything is incorporated. The batter will be thin, almost like a thick soup, but don’t worry, that’s the secret to their incredible moistness!
Step 5: Prepare Filling
If you’re adding a filling, now’s the time to make it. In a medium bowl, beat the softened cream cheese and butter together until light and fluffy. Gradually beat in the sifted powdered sugar until well combined. Stir in the vanilla, milk/cream, and salt. Beat until smooth and creamy. If it seems too thin, add a little more powdered sugar; if too thick, add a tiny bit more milk. You want it to be scoopable but not runny.
Step 6: Layer & Swirl (for Filling)**
If you’re using the filling, I like to scoop about 1-2 tablespoons of batter into each cupcake liner. Then, I dollop about a teaspoon of the cream cheese filling into the center of the batter. Top with another tablespoon or so of batter, making sure to cover the filling. You can use a toothpick to gently swirl the filling into the batter if you like, but it’s not essential as it will naturally ooze up a bit during baking.
Step 7: Bake
Fill the cupcake liners about two-thirds full. Bake for 18-22 minutes, or until a wooden skewer or toothpick inserted into the center of a cupcake comes out clean or with a few moist crumbs attached (not wet batter). My oven tends to run a little hot, so I usually check around 18 minutes. If you’re using the filling, the center might take a minute or two longer to be fully cooked, so check there.
Step 8: Cool & Glaze
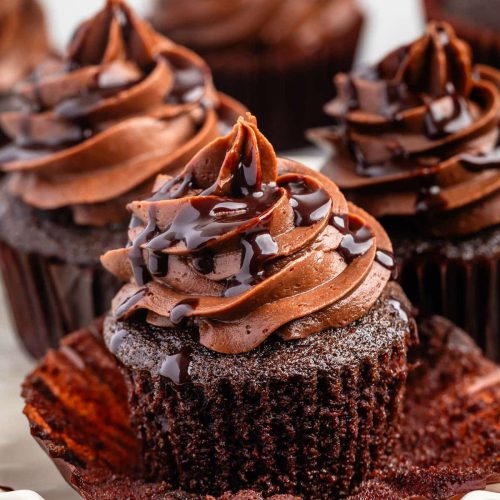
Let the cupcakes cool in the muffin tins for about 5-10 minutes before transferring them to a wire rack to cool completely. This is important! Trying to frost warm cupcakes is a recipe for disaster (and a melty mess). Once they are totally cool, it’s time for the glaze! In a medium bowl, beat the softened butter until creamy. Gradually beat in the sifted powdered sugar and cocoa powder alternately with the milk/cream, starting and ending with the dry ingredients. Stir in the vanilla and salt. Beat until smooth and fluffy. If the frosting is too thick, add a little more milk; if too thin, add more powdered sugar. Once cool, frost your cupcakes!
Step 9: Slice & Serve
These are best served at room temperature. The frosting will be at its creamiest, and the cake will be incredibly moist. You can serve them as is, or with a tall glass of cold milk – my favorite way! They are perfect for parties, picnics, or just a sweet treat any time of day. Enjoy every single bite!
What to Serve It With
These chocolate cupcakes are so versatile, they truly fit any occasion you can dream up! For **breakfast**, while perhaps a bit indulgent, they are surprisingly good with a strong cup of coffee. Imagine a little pick-me-up on a Saturday morning; they add a touch of sweetness without being overwhelming if you have them plain or with just a light dusting of powdered sugar. For **brunch**, they’re absolutely divine as part of a dessert spread. Plate them beautifully on a tiered stand with some fresh berries on the side – the tartness of the berries cuts through the richness of the chocolate so perfectly. A mimosa or a sparkling cider would be a lovely beverage pairing. As **dessert**, well, they’re already dessert, but you can elevate them further! Serve them warm with a scoop of vanilla bean ice cream or a dollop of whipped cream. A drizzle of raspberry coulis or some caramel sauce takes them to another level. And for **cozy snacks**, this is where they truly shine for me. After the kids are in bed, or on a rainy afternoon, these are pure comfort. Pair them with a hot chocolate or a cup of herbal tea. My family has a tradition of having one after a family movie night, and it’s become such a special little ritual. They are also fantastic shared with neighbors or brought to a friend’s house – a homemade treat always makes people feel special!
Top Tips for Perfecting Your Chocolate Cupcakes
Over the years, I’ve learned a few little tricks that have helped me achieve chocolate cupcake perfection every single time. One of the most important is about the **cocoa powder**. Make sure you’re using a good quality, natural, unsweetened cocoa powder. It’s the backbone of that deep chocolate flavor. If you only have Dutch-processed, it will still be delicious, but the flavor profile will be slightly different – a bit milder and less tangy, which is still great, but natural is my preference for that intense chocolate hit.
When it comes to **mixing the batter**, remember that less is often more. Overmixing can develop the gluten in the flour too much, leading to tougher cupcakes. Mix just until the ingredients are combined, especially after adding the wet ingredients to the dry. That thin batter with the boiling water is supposed to be thin – don’t be tempted to add more flour! It’s precisely what makes them so incredibly moist.
For the optional **filling**, make sure your cream cheese and butter are truly softened to room temperature. This makes them so much easier to beat until light and fluffy, preventing a lumpy filling. If your filling seems a little too soft to pipe or dollop, you can pop it in the fridge for about 15-20 minutes to firm up slightly before using it.
When it comes to **ingredient swaps**, I’ve tinkered with this recipe quite a bit! For the milk, I’ve used everything from whole milk to skim, and even non-dairy milks like almond or oat milk. Almond milk actually made them even creamier for me! The oil is key for moisture, so I wouldn’t swap that for butter unless you’re prepared for a slightly different texture. If you don’t have vegetable oil, a neutral-flavored canola oil works perfectly.
For **baking**, always preheat your oven properly. I find that baking them in the center rack gives the most even heat distribution. And remember that ovens can vary, so the baking time is just a guideline. The toothpick test is your best friend here. A few moist crumbs attached to the toothpick are ideal; if it comes out clean, they might be slightly overbaked, and if there’s wet batter, they need more time.
When it comes to the **glaze**, consistency is key. If it’s too thick, add milk a teaspoon at a time until it’s spreadable. If it’s too thin, add sifted powdered sugar a tablespoon at a time. For a richer flavor, you can even add a teaspoon of instant espresso powder to the glaze – it enhances the chocolate without making it taste like coffee.
Storing and Reheating Tips
Storing these chocolate cupcakes is pretty straightforward, and thankfully, they tend to stay moist quite well thanks to that oil in the batter. For **room temperature storage**, I usually keep them in an airtight container for up to 2-3 days. If you frost them, make sure the frosting has set a bit first. They’re usually at their best within the first two days. If it’s very warm where you are, or if your frosting is particularly delicate, you might want to refrigerate them, but I find they lose a tiny bit of their ultra-moist texture when chilled for too long.
For **refrigerator storage**, they’ll keep well for up to 5 days. Again, an airtight container is your best bet. If you want to serve them cold, that’s perfectly fine! However, if you prefer them at room temperature, just take them out of the fridge about 30-60 minutes before serving to allow them to come up to temperature. This helps revive their soft texture.
When it comes to **freezer instructions**, these cupcakes freeze beautifully! Once they’re completely cooled and frosted (or unfrosted, if you prefer), I like to wrap each one individually and tightly in plastic wrap, then place them in a freezer-safe bag or container. They can last for up to 2-3 months. To thaw, unwrap them and let them sit at room temperature for a few hours, or thaw them in the refrigerator overnight. They thaw remarkably well!
My advice on **glaze timing** is to wait until the cupcakes are completely cool before applying it. If you glaze warm cupcakes, the glaze will melt and slide right off, making a sticky mess. For cupcakes stored at room temperature or in the fridge, the glaze should hold up perfectly. If you’re freezing them unfrosted, you can add the glaze after they’ve thawed and are back at room temperature.
Frequently Asked Questions
Final Thoughts
So there you have it – my absolute favorite recipe for chocolate cupcakes. I really hope you’ll give these a try. They’re the kind of recipe that makes you feel like a baking rockstar, even if you’re new to the kitchen. The moistness, the deep chocolate flavor, the ease of making them – it all adds up to a truly wonderful treat that’s perfect for sharing (or keeping all to yourself, I won’t judge!). If you love these, you might also enjoy my recipe for fudgy brownies or my classic chocolate chip cookies – they’re made with a similar philosophy of being incredibly delicious and satisfying. I can’t wait to hear what you think of these chocolate cupcakes! Please leave a comment below and let me know how yours turned out, or if you tried any fun variations. Happy baking!
Rich Chocolate Cupcakes A Simple Delight
Ingredients
Main Ingredients
- 3 cups all-purpose flour
- 2 cups granulated sugar
- 0.5 cup unsweetened cocoa powder
- 2 teaspoons baking soda
- 1 teaspoon salt regular table salt
- 2 cups hot water
- 0.75 cup vegetable oil
- 2 tablespoons white vinegar distilled or white vinegar
- 1 tablespoon instant coffee granules optional
- 1 teaspoon vanilla extract
- Chocolate Buttercream Frosting or use your favorite frosting
Instructions
Preparation Steps
- Preheat oven to 350°F. Line cupcake pans with liners (about 30).
- In a large bowl, whisk together flour, sugar, cocoa powder, baking soda, and salt until combined.
- In another large mixing cup, combine hot water, vegetable oil, vinegar, instant coffee (if using), and vanilla extract.
- Pour the wet ingredients into the dry ingredients and whisk until the batter is smooth with a few lumps.
- Fill cupcake liners about two-thirds full and bake for 12 to 15 minutes, or until a toothpick inserted in the center comes out clean.
- Allow cupcakes to cool completely before frosting.
- Prepare chocolate buttercream frosting as desired and frost the cooled cupcakes.