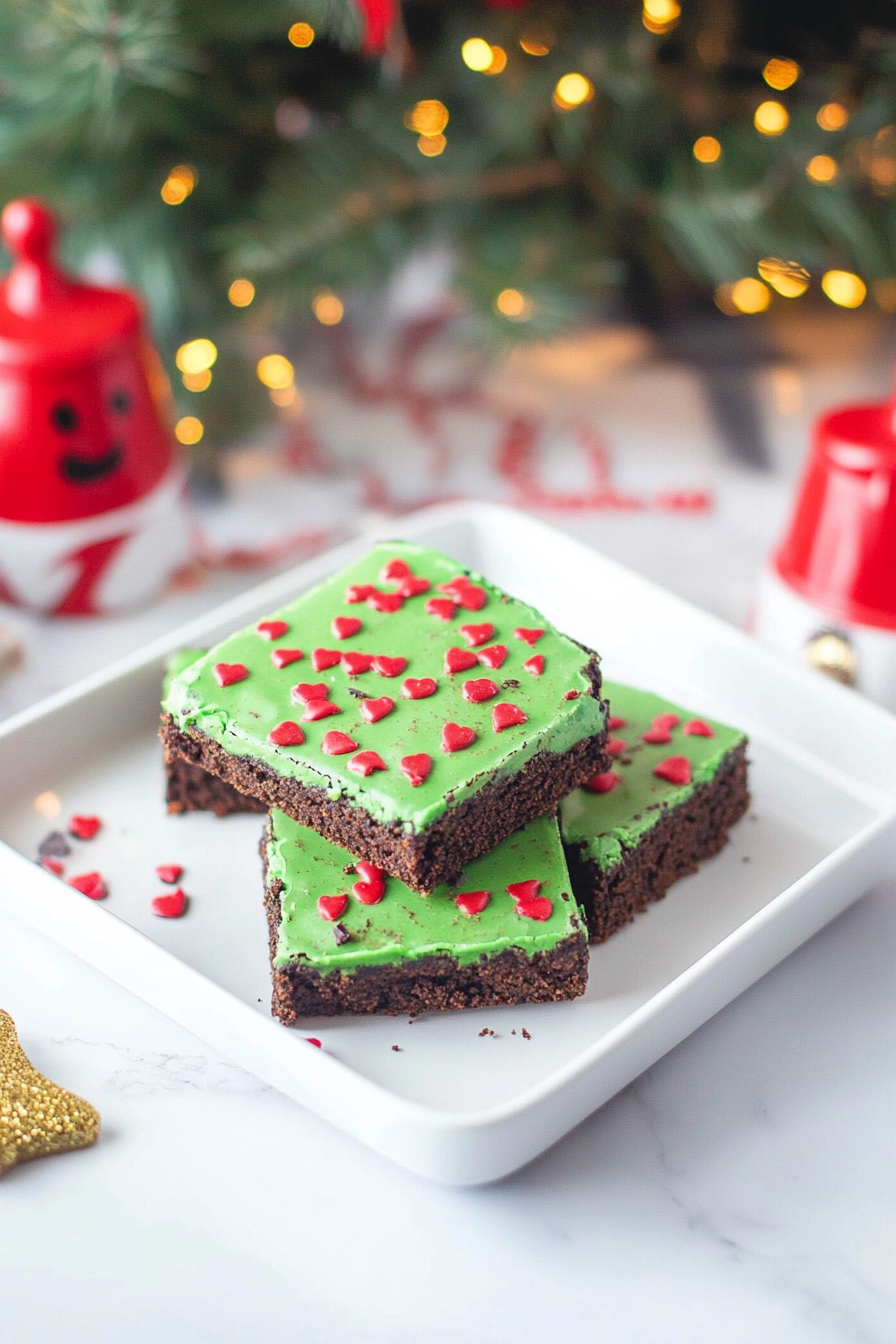
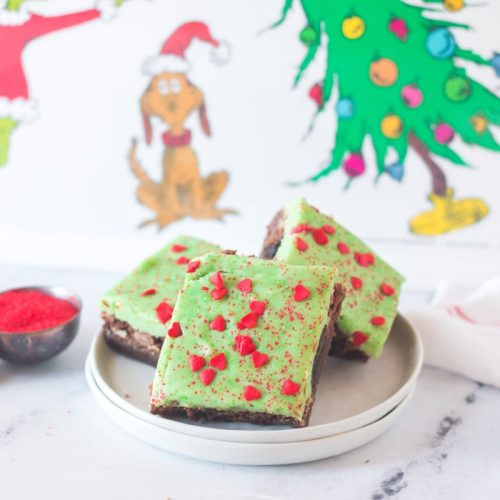
Grinch Brownies
You know those recipes that just *feel* like home? The ones you can whip up without even looking at the instructions because you’ve made them so many times? Well, these Grinch Brownies are exactly that for me, especially around the holidays. They’re not just brownies; they’re a little slice of festive cheer, packed with that deep chocolatey goodness I absolutely adore. I remember the first time I made them, it was purely by accident. I had a ton of zucchini from my garden that was threatening to take over the kitchen, and I was craving something sweet. I’d seen a few zucchini brownie recipes, but nothing with that pop of color and fun. So, I got creative, and let me tell you, it was a game-changer! My kids went absolutely bonkers for them. They’re so fudgy and delicious, you’d never guess there’s a secret veggie hiding inside. Honestly, they’re better than those fancy store-bought brownies, and way more fun. If you’re a fan of classic chocolate brownies, but you’re looking for something with a bit more personality and a surprising, moist texture, you are going to adore these Grinch Brownies.
What are Grinch Brownies?
So, what exactly *are* Grinch Brownies? Think of them as your classic, deeply satisfying fudgy chocolate brownies, but with a delightful twist that brings a little bit of Whoville magic to your kitchen. The “Grinch” part comes from the vibrant, almost shocking green swirls we mix into the chocolate batter. This isn’t just food coloring for the sake of it; it’s a creamy, slightly tangy filling that cuts through the richness of the chocolate in the most delightful way. It’s essentially a cream cheese-based swirl, infused with a touch of green and maybe a hint of lime or lemon for brightness, though you can certainly keep it purely vanilla. It gives the brownies a beautiful, marbled effect, reminiscent of the Grinch’s fuzzy green coat, and adds an extra layer of flavor that makes them utterly irresistible. It’s a fun, festive upgrade that feels special enough for a holiday party but is easy enough for a casual afternoon treat. They’re the perfect way to bring a smile to anyone’s face, especially those who are a bit of a grump (or just really love chocolate!).
Why you’ll love this recipe?
There are so many reasons why I keep coming back to this Grinch Brownie recipe, and I just know you’ll fall in love with them too. First off, the flavor is just out of this world. We’re talking rich, dark chocolate that’s intensely fudgy, with a slightly chewy edge that’s just perfection. Then you get those bright, creamy green swirls – they aren’t just for looks, oh no. They add this wonderful tanginess and a subtle sweetness that beautifully balances the deep chocolate. It’s like a party in your mouth! And don’t even get me started on the texture. Because we’re using a secret ingredient (more on that later!), these brownies are unbelievably moist and tender. They don’t dry out easily, which is a lifesaver for me when I’m baking ahead for parties or school events.
Speaking of parties, they are a total showstopper! The vibrant green swirls against the dark chocolate are so eye-catching. They’re a guaranteed hit with kids and adults alike. Plus, they’re surprisingly simple to make. You don’t need any fancy equipment or complicated techniques. It’s mostly just mixing bowls and a spatula, and you’ll be well on your way to brownie bliss. I also love that they’re quite budget-friendly. The ingredients are all pantry staples for me, with the exception of maybe a little food coloring, which you can often find on sale during the holidays. And if you’re looking for a way to sneak some extra goodness into your baking, well, these Grinch Brownies have a little secret that makes them even more amazing and surprisingly healthy-ish!
How do I make Grinch Brownies?
Quick Overview
Making these Grinch Brownies is a straightforward process that’s really more about assembly than anything else. You’ll start by preparing your pan and preheating your oven. Then, you’ll mix up a luscious, fudgy chocolate batter – the secret ingredient here is key for that incredible moistness! While that’s coming together, you’ll whip up a simple, vibrant green cream cheese swirl. The magic really happens when you layer the chocolate batter and the green swirl into the pan, creating beautiful marbled patterns. A quick bake, a patient cool-down, and a drizzle of more green or a simple dusting, and you’ve got festive, delicious Grinch Brownies ready to be devoured. It’s incredibly satisfying to see those swirls develop!
Ingredients
For the Main Batter:
1 cup (2 sticks) unsalted butter, melted: This is the base for our fudgy texture. Make sure it’s good quality butter; it really does make a difference in the final flavor. Don’t use margarine here – it just won’t be the same!
2 cups granulated sugar: For that perfect sweetness and texture. It balances the bitterness of the cocoa.
4 large eggs: They bind everything together and contribute to the rich, dense texture. Room temperature eggs incorporate best.
1 teaspoon vanilla extract: A classic for a reason, it enhances all the other flavors.
1 cup all-purpose flour: Just enough to give structure without making them cakey.
3/4 cup unsweetened cocoa powder: Use a good quality Dutch-processed cocoa for a deeper, richer chocolate flavor. This is where the main chocolatey punch comes from!
1/2 teaspoon baking powder: Just a touch to give them a slight lift, but we’re aiming for fudgy, not cakey.
1/2 teaspoon salt: Balances the sweetness and enhances the chocolate flavor.
1 cup finely grated zucchini, squeezed dry: Yes, zucchini! This is our secret weapon for ultimate moisture and tenderness. You won’t taste it, I promise, but you’ll feel the difference. Squeeze out as much water as you can after grating!
For the Green Swirl:
8 ounces cream cheese, softened: This gives our swirl that lovely creamy tang. Make sure it’s fully softened so it mixes smoothly.
1/2 cup powdered sugar: For sweetness and a smooth consistency.
1 teaspoon vanilla extract: To complement the cream cheese flavor.
Green food coloring: Gel food coloring works best for a vibrant, concentrated color. Start with a few drops and add more until you achieve your desired “Grinch” green.
Optional: A tiny squeeze of lemon juice or lime juice: This adds a subtle brightness that’s really nice against the chocolate, but it’s totally optional.
For the Optional Glaze:
1 cup powdered sugar: To make a simple glaze.
2-3 tablespoons milk or heavy cream: For thinning the glaze to your desired consistency.
Green food coloring (optional): For drizzling over the top.
Step-by-Step Instructions
Step 1: Preheat & Prep Pan
First things first, get your oven fired up to 350°F (175°C). I always like to give my oven a good 10-15 minutes to reach temperature, so it’s nice and stable. Now, grab a 9×13 inch baking pan. I find lining it with parchment paper (leaving some overhang on the sides) makes lifting the brownies out so much easier later. It’s a little trick that saves a lot of frustration when you’re trying to cut neat squares. You can also lightly grease and flour the pan if you don’t have parchment. Whatever you do, make sure it’s well-prepped so your beautiful brownies don’t stick!
Step 2: Mix Dry Ingredients
In a medium bowl, whisk together your flour, cocoa powder, baking powder, and salt. Whisking is important here to break up any lumps in the cocoa powder and distribute the leavening evenly. You want a uniform mixture so you don’t end up with pockets of flour or baking powder. This simple step ensures your brownies have a consistent texture throughout. It’s one of those little things that makes a big difference in the final bake. Set this bowl aside; we’ll be bringing it into play shortly.
Step 3: Mix Wet Ingredients
In a large mixing bowl, combine the melted butter and granulated sugar. Give it a good whisk until it’s smooth and well combined. Then, one at a time, add the eggs, beating well after each addition. You want to make sure each egg is fully incorporated before adding the next. Stir in the vanilla extract. The mixture should look glossy and rich. This is the foundation of our decadent brownie batter, so take your time here to get it nice and emulsified.
Step 4: Combine
Now, it’s time to bring the wet and dry ingredients together. Gradually add the dry ingredient mixture to the wet ingredients. Mix on low speed (or by hand with a spatula) until *just* combined. Overmixing is the enemy of tender brownies! You want to stop as soon as you no longer see streaks of flour. A few small lumps are okay. Now, gently fold in the grated, squeezed zucchini. Do this with a spatula, just until it’s evenly distributed. It will seem like a lot of zucchini, but trust me, it bakes down and makes these brownies incredibly moist and tender. You won’t detect its flavor, only its wonderful texture!
Step 5: Prepare Filling
In a separate bowl, beat the softened cream cheese until it’s smooth and creamy. This is easiest with an electric mixer, but a whisk and some elbow grease will do. Add the powdered sugar and vanilla extract, and beat again until everything is well combined and smooth. If you’re using it, add a tiny squeeze of lemon or lime juice now for that extra zing. Finally, add your green food coloring, a drop at a time, until you achieve a bright, festive green color. You’re looking for a vibrant hue that will really pop against the dark chocolate. The consistency should be like a thick frosting.
Step 6: Layer & Swirl
Pour about two-thirds of the chocolate brownie batter into your prepared pan and spread it evenly. Dollop spoonfuls of the green cream cheese mixture over the chocolate batter. Then, spoon the remaining chocolate batter over the cream cheese dollops. Now for the fun part: using a knife or a skewer, gently swirl the green mixture into the chocolate batter. Don’t over-swirl! You want distinct ribbons of green, not a muddy brown. Make figure-eights or simple drag strokes through the batter to create a marbled effect. This is where the “Grinch” magic really happens!
Step 7: Bake
Place the pan in your preheated oven. Bake for about 25-35 minutes. The exact time will depend on your oven and how fudgy you like your brownies. You’ll know they’re ready when the edges look set, and a toothpick inserted into the center comes out with moist crumbs attached, not wet batter. If the toothpick comes out completely clean, they might be a little overbaked and could be drier than we want. I usually check mine around the 25-minute mark. Remember, they’ll continue to cook slightly as they cool in the pan.
Step 8: Cool & Glaze
This is arguably the hardest part: letting them cool! Once they’re out of the oven, let them cool completely in the pan on a wire rack. Seriously, don’t rush this. Trying to cut warm brownies is a recipe for disaster – they’ll be gooey and fall apart. Once completely cool, you can lift them out using the parchment paper overhang. If you want to add a glaze, whisk together the powdered sugar and milk/cream until smooth. Add green food coloring if desired. Drizzle this over the cooled brownies. Let the glaze set for about 15-20 minutes before slicing.
Step 9: Slice & Serve
Once the brownies are fully cooled (and the glaze, if using, has set), it’s time to slice them. For the neatest cuts, use a large, sharp knife, wiping it clean between each cut. I love serving these Grinch Brownies slightly chilled or at room temperature. They’re fantastic on their own, but you can also serve them with a scoop of vanilla ice cream or a dollop of whipped cream for an extra special treat. They look so festive on a dessert platter, especially during the holiday season!
What to Serve It With
These Grinch Brownies are pretty much a standalone star, but they can certainly play well with others! For a special holiday breakfast or brunch, I love serving a smaller, precisely cut square alongside a fluffy stack of pancakes or waffles. A dusting of powdered sugar over the whole platter, along with a few fresh berries, makes it look extra elegant. And of course, a good cup of coffee or a festive mimosa is always a welcome pairing. As a dessert, they’re phenomenal on their own, but if you want to go all out, a scoop of vanilla bean ice cream is classic for a reason. The warm brownie with cold ice cream is just divine. You could also pair them with a raspberry coulis for a pop of color and tartness. For those cozy snack moments, these are perfect with a tall glass of cold milk – it’s a childhood favorite that never gets old! My family also loves having them with hot chocolate during movie nights; the richness of the brownie complements the creamy hot chocolate beautifully. They’re so versatile, they truly fit any occasion!
Top Tips for Perfecting Your Grinch Brownies
I’ve made these Grinch Brownies more times than I can count, and over the years, I’ve picked up a few tricks that really make them shine. First, when it comes to the zucchini, squeezing out as much moisture as possible is absolutely crucial. I like to grate it, then wrap it in a clean kitchen towel or paper towels and wring it out vigorously. This prevents your brownies from becoming too wet and dense, ensuring that perfect fudgy texture. Don’t skip this step!
On mixing, remember the golden rule: do not overmix the batter once you add the flour. Mix until just combined. Overmixing develops the gluten in the flour, which can lead to tough, cakey brownies. We’re aiming for fudgy and tender, so gentle folding is key. A few lumps are perfectly fine!
For that beautiful swirl, I find it helps to dollop the cream cheese mixture randomly over the chocolate batter before swirling. Then, use a thin knife or a skewer and make quick, decisive movements. Think figure-eights or sweeping motions. Avoid over-swirling, which can make the colors blend too much and lose their definition. You want those distinct ribbons of green!
If you’re feeling adventurous with ingredient swaps, I’ve tested using half all-purpose flour and half whole wheat flour with great success. It adds a slightly nuttier flavor and a bit more fiber. You can also experiment with different extracts – a touch of almond extract in the chocolate batter can be lovely. For the swirl, while I love cream cheese, a thick Greek yogurt mixed with a touch of cornstarch can also work as a slightly lighter alternative, though the tang will be different.
When it comes to baking, every oven is different. Start checking for doneness around the 25-minute mark. The toothpick test is your best friend here. If it comes out with moist crumbs, they’re done! If it comes out clean, they’re likely overbaked. Also, remember they will continue to set as they cool in the pan. For the glaze, consistency is key. If it’s too thick, add milk a teaspoon at a time until it drizzles nicely. If it’s too thin, add a bit more powdered sugar. And a tip for application: let the brownies cool completely before glazing. Warm brownies will melt the glaze right off!
Finally, for glaze variations, don’t be afraid to get creative! A simple dusting of powdered sugar is elegant. You could also mix in some cocoa powder with the powdered sugar and milk for a chocolate glaze. Or, for an extra festive touch, add some festive sprinkles after drizzling the glaze before it sets.
Storing and Reheating Tips
One of the best things about these Grinch Brownies is how well they store. Because of the secret zucchini ingredient, they stay incredibly moist and delicious for days. For room temperature storage, keep them in an airtight container at a cool room temperature for up to 3 days. If your kitchen is particularly warm, it’s safer to refrigerate them. They’ll maintain their quality and freshness this way.
If you’re planning to keep them longer, the refrigerator is your best friend. Store them in an airtight container, separating layers with parchment paper if you’re stacking them, for up to a week. They actually tend to get even fudgier after a day or two in the fridge, which I personally love. Just let them come to room temperature for about 15-20 minutes before serving if you prefer them less chilled. Sometimes I even pop a chilled brownie in the microwave for just 10-15 seconds to take the edge off the cold, making them wonderfully gooey again.
Freezing is also an excellent option if you want to make these ahead for the holidays or just have some on hand for a spontaneous craving. You can freeze the whole pan of cooled, unglazed brownies, or cut them into individual portions. Wrap each portion tightly in plastic wrap, then place them in a freezer-safe bag or container. They’ll keep well in the freezer for up to 2-3 months. To thaw, simply unwrap them and let them come to room temperature, or thaw them overnight in the refrigerator. If you’ve already glazed them, freezing is still possible, but the glaze might soften slightly upon thawing. It’s often best to glaze them *after* thawing if you plan to freeze.
Regarding glaze timing, if you plan to store your brownies at room temperature or in the refrigerator, it’s best to add the glaze only when you’re ready to serve or within a day or two of baking. If you’re freezing them, I highly recommend glazing *after* thawing. This prevents the glaze from becoming sticky or smearing during the freezing and thawing process. For a simple dusting of powdered sugar, you can do that just before serving, which works well regardless of storage method.
Frequently Asked Questions
Final Thoughts
There you have it – my beloved Grinch Brownies! I really hope you give these a try. They’re more than just a treat; they’re a little bit of fun, a whole lot of deliciousness, and a testament to how simple ingredients can create something truly special. The moist, fudgy chocolate base combined with that bright, tangy green swirl is just a match made in heaven. They’re perfect for holiday gatherings, bake sales, or honestly, just for making a regular Tuesday feel a little more festive. They disappear faster than you can say “Merry Grinchmas!” in my house, and I’m sure they will in yours too. If you love a good chocolate brownie but are looking for a unique, visually stunning twist, these are for you. They’re a guaranteed crowd-pleaser and a recipe you’ll find yourself returning to again and again. So grab your apron, maybe a bit of green food coloring, and get ready to bake some magic!
If you make these Grinch Brownies, I would absolutely love to hear about it! Please leave a comment below and let me know how they turned out, or share your own favorite tips and variations. And if you’re looking for more festive baking inspiration, be sure to check out my recipes for Spiced Eggnog Cookies and my Classic Gingerbread Loaf. Happy baking, everyone!
Festive Brownies How to Make Grinch Treats
Ingredients
Main Ingredients
- 1 cup brown sugar
- 1 cup granulated sugar
- 2 tsp vanilla extract
- 0.5 tsp salt
- 2 large eggs
- 2 large egg yolks
- 8 oz semi-sweet chocolate chips melted
- 0.5 cup butter
- 0.5 cup vegetable oil
- 1.25 cups all-purpose flour
- 0.25 cup cocoa powder
- 12 pieces Mint Oreos
- 12 oz white chocolate chips
- 0.75 cup heavy cream
- drops green food coloring
- cup red and heart-shaped sprinkles
Instructions
Preparation Steps
- Preheat oven to 350°F and line a 9x13 inch baking dish with parchment paper.
- In a large bowl, combine granulated sugar, brown sugar, vanilla extract, salt, eggs, and egg yolks until smooth.
- Melt butter and semi-sweet chocolate chips in a double boiler, then whisk until fully combined.
- Whisk in the vegetable oil to the melted chocolate mixture and then pour this into the sugar mixture. Stir until fully incorporated.
- Gently fold the flour and cocoa powder into the batter until just combined.
- Pour brownie batter into the prepared baking pan, then place the Mint Oreos evenly on top and gently press down so they are embedded in the batter.
- Bake for 35 minutes or until a toothpick inserted comes out clean. Allow brownies to cool.
- For the ganache, place white chocolate chips in a heat-safe bowl. Heat heavy cream over medium heat until simmering but not boiling.
- Pour the hot cream over the chocolate and let sit for 3 minutes. Stir until smooth and creamy.
- Add green food coloring a few drops at a time until desired Grinch green color is reached.
- Pour the ganache over the cooled brownies and spread evenly with a knife.
- Sprinkle red and heart-shaped sprinkles over the ganache to decorate each brownie piece.
- Let brownies sit for at least 1 hour to allow ganache to set before slicing and serving.