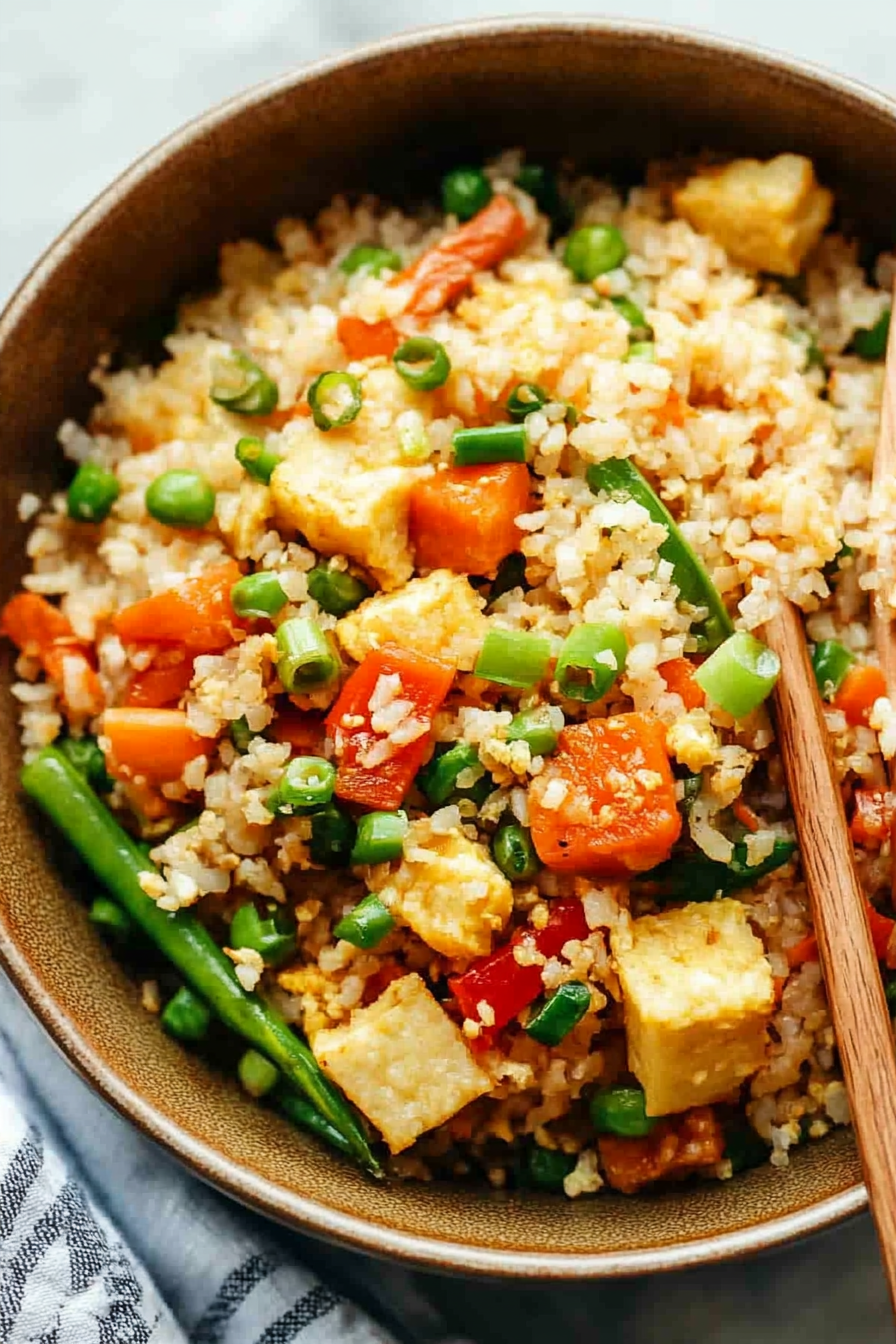
cauliflower fried rice
Oh, you know those nights, right? The ones where the clock is ticking, the fridge looks a little… bare, and the thought of cooking anything complicated makes you want to just order pizza. Yeah, I’ve been there more times than I can count. But then, there’s this gem, this absolute lifesaver that has become my secret weapon: my cauliflower fried rice. It sounds a bit fancy, maybe even a little intimidating, but trust me, it’s genuinely one of the easiest and most satisfying meals I whip up. It’s like a healthy hug in a bowl, and honestly, it’s my answer to the “what’s for dinner?” question about 80% of the time. Forget those takeout versions that leave you feeling heavy; this is bright, fresh, and bursting with flavor, and the best part? It feels like you’ve barely lifted a finger. It’s the kind of dish that makes you feel like a kitchen wizard, even if you’re just starting out.
What is Cauliflower Fried Rice?
So, what exactly *is* cauliflower fried rice? At its heart, it’s a brilliant, low-carb twist on the classic fried rice you know and love. Instead of using actual rice, we’re swapping it out for finely riced cauliflower. Think of it as tiny, fluffy florets that mimic the texture of rice when cooked. It’s essentially a blank canvas, soaking up all those delicious savory flavors from the soy sauce, garlic, ginger, and whatever other goodies you decide to throw in. The “fried rice” part comes from the cooking method – quickly stir-frying everything in a hot pan or wok with a touch of oil, just like traditional fried rice. It’s designed to be super versatile, so you can pack it with whatever vegetables you have on hand or even add some protein. It’s not trying to *be* rice; it’s embracing what cauliflower does best – being delicious and incredibly adaptable!
Why you’ll love this recipe?
Honestly, I could probably write a novel about why I adore this cauliflower fried rice recipe, but I’ll try to keep it concise for you! First off, the flavor. Oh, the flavor! It’s this incredible savory, slightly umami symphony that just hits all the right notes. The garlic and ginger get beautifully fragrant, and when you add in your favorite soy sauce or tamari, it’s just pure comfort. Then there’s the simplicity. I’m not kidding when I say this is a weeknight warrior. You can have it on the table in under 30 minutes, and that includes chopping time if you’re quick. For those nights when cooking feels like a marathon, this is a sprint to deliciousness. And let’s talk about cost-efficiency. Cauliflower is usually pretty affordable, and you likely have most of the other ingredients already in your pantry. It’s a budget-friendly meal that doesn’t skimp on taste. The versatility is another huge win. I love that I can toss in leftover broccoli, peas, carrots, bell peppers, or even some edamame. It’s the perfect way to use up those odds and ends in the crisper drawer. What I love most about this is how it satisfies that craving for something hearty and flavorful without feeling heavy or greasy. It’s proof that healthy eating can be incredibly exciting and delicious. It’s a far cry from the sometimes bland health food recipes out there; this one actually tastes like a treat!
How do I make cauliflower fried rice?
Quick Overview
The magic of this cauliflower fried rice is its speed and ease. We’ll start by ricing our cauliflower, then quickly sautéing some aromatics and veggies, followed by adding the cauliflower “rice” and tossing it all with a savory sauce. It’s a fast, high-heat stir-fry process that locks in flavor and keeps everything bright and fresh. It’s so simple, you’ll wonder why you ever bothered with takeout!
Ingredients
For the Cauliflower “Rice”: For the Cauliflower “Rice”: For the Cauliflower “Rice
1 large head of cauliflower (about 2 lbs)
*Chef’s Tip: Look for fresh, firm cauliflower. If you’re short on time, many grocery stores now sell pre-riced cauliflower, which is a total game-changer!
For the Stir-Fry Base:
2 tablespoons neutral cooking oil (like vegetable, canola, or avocado oil)
2-3 cloves garlic, minced
1 tablespoon fresh ginger, grated or finely minced
1 small onion or 2-3 shallots, finely chopped
1 cup mixed frozen vegetables (peas, carrots, corn are great, or use fresh if you have them!)
*Personal Note: I often add leftover cooked chicken, shrimp, or even some tofu to this for extra protein. Just make sure it’s cooked before adding it in.*
For the Sauce:
3 tablespoons soy sauce (or tamari for gluten-free)
1 tablespoon sesame oil
1 teaspoon rice vinegar
Optional: a pinch of red pepper flakes for a little heat
Step-by-Step Instructions
Step 1: Preheat & Prep Pan
Get a large skillet or wok nice and hot over medium-high heat. Add your cooking oil. You want it to shimmer just a bit before you add anything else. This high heat is key to getting that slightly toasted, satisfying texture.
Step 2: Mix Dry Ingredients
While the pan heats up, grab your cauliflower florets. You can pulse them in a food processor until they resemble rice (be careful not to over-process into a mush!). Alternatively, you can use a box grater. The goal is small, rice-like pieces. Make sure to discard any thick stems.
Step 3: Mix Wet Ingredients
In a small bowl, whisk together the soy sauce (or tamari), sesame oil, and rice vinegar. If you like a little kick, stir in those red pepper flakes here. This is your flavor bomb!
Step 4: Combine
Once the oil is hot, add your chopped onion or shallots and sauté for about 1-2 minutes until they start to soften. Then, add the minced garlic and grated ginger and cook for another 30 seconds until fragrant. Be careful not to burn them! Toss in your frozen vegetables and cook for 2-3 minutes until they’re tender-crisp.
Step 5: Prepare Filling
Add the riced cauliflower to the pan with the vegetables. Stir everything together. Cook for about 5-7 minutes, stirring occasionally, until the cauliflower is tender but not mushy. You want it to have a slight bite to it. This is where you’d add any pre-cooked protein you’re using.
Step 6: Layer & Swirl
Pour the prepared sauce over the cauliflower and vegetables. Toss everything well to coat evenly. Continue to cook for another 2-3 minutes, allowing the sauce to thicken slightly and coat all the “rice.”
Step 7: Bake
This recipe doesn’t require baking, it’s a quick stovetop creation!
Step 8: Cool & Glaze
Remove the cauliflower fried rice from the heat. It’s best served immediately. You can garnish with some chopped green onions or sesame seeds if you like!
Step 9: Slice & Serve
Serve hot! This is delicious on its own, or as a fantastic side dish. It’s incredibly satisfying.
What to Serve It With
This cauliflower fried rice is so versatile, it can really go with almost anything! For a light and healthy breakfast, I sometimes serve a small portion alongside some scrambled eggs or a perfectly poached egg. The savory notes are a nice contrast to the richness of the egg. For a more substantial brunch, it’s a fantastic base to top with grilled salmon or some crispy fried tofu. It feels elegant but is so easy to put together. As a dessert? Well, not really a dessert in the sweet sense, but as a satisfying late-night snack? Absolutely! It’s perfect when you’re craving something savory and filling but don’t want to break out a whole baking project. It’s also an excellent accompaniment to all sorts of main dishes. Think of it as your go-to healthy side. It’s brilliant with grilled chicken or steak, and if you’re making any kind of Asian-inspired dish, it’s the perfect partner. My family loves it when I serve it with some simple baked teriyaki chicken skewers. It really rounds out the meal beautifully.
Top Tips for Perfecting Your Cauliflower Fried Rice
I’ve made this cauliflower fried rice more times than I can count, and I’ve definitely learned a few tricks along the way that make it even better. When it comes to prepping your cauliflower, the key is to get it into nice, even pieces that resemble grains of rice. If you’re using a food processor, pulse it in batches and avoid overdoing it, or you’ll end up with cauliflower mush, which isn’t quite the same texture. I’ve made that mistake, so you don’t have to! Grating it works well too, just make sure your grater has small holes for the best results. Another biggie is not overcrowding the pan. If you try to cook too much cauliflower at once, it will steam instead of fry, and you’ll lose that lovely, slightly toasted texture. If you have a huge head of cauliflower, it’s better to cook it in two batches. For the mixing, while you want everything well combined, avoid over-stirring once the sauce is added. You want to gently toss it to coat, not vigorously mash it. This helps maintain the structure of the cauliflower “rice.” I’ve experimented a lot with the sauce proportions, and I’ve found that the 3:1:1 ratio of soy sauce to sesame oil to rice vinegar is pretty spot on for a good balance of salty, nutty, and tangy. But feel free to adjust it to your liking! If you like it saltier, add a touch more soy sauce. Prefer it tangier? A little extra rice vinegar. For baking tips, well, this isn’t a baked dish, but for stovetop cooking, using medium-high heat is crucial. You want that quick sear. And don’t be afraid to taste and adjust seasonings as you go. Sometimes a little extra ginger or garlic can elevate the whole dish. If you want to get fancy with the swirl, you can always add a little bit of extra soy sauce just to a small portion of the rice and swirl it in at the end for visual appeal, although that’s purely aesthetic.
Storing and Reheating Tips
This cauliflower fried rice is fantastic for meal prep, which is a huge win for me. If you’ve got leftovers (which is rare in my house, but it happens!), you can store them easily. At room temperature, it’s best to let it cool down completely before covering it. It should be consumed within about 2 hours if left out. For refrigerator storage, scoop the cooled cauliflower fried rice into an airtight container. It will keep well in the fridge for about 3 to 4 days. The quality stays pretty good, though it might get a little softer with time, which is normal for cooked vegetables. If you want to freeze it, that’s absolutely doable! Let it cool completely, then transfer it to a freezer-safe container or a heavy-duty freezer bag. Remove as much air as possible to prevent freezer burn. It should last in the freezer for up to 2 to 3 months. When you’re ready to reheat, the best method is usually on the stovetop. Place the refrigerated or thawed cauliflower fried rice in a skillet over medium heat, adding a tiny splash of water or broth if it seems dry, and stir until heated through. This helps revive that slightly crisp texture. If you’re in a pinch, the microwave works too, but it might be a bit softer. Just cover it loosely and heat in 30-second intervals, stirring in between, until warm.
Frequently Asked Questions
Final Thoughts
So there you have it – my tried-and-true, absolutely delicious cauliflower fried rice. It’s the recipe I turn to when I need something quick, healthy, and packed with flavor. It’s proof that you don’t need complex steps or exotic ingredients to make a truly satisfying meal. It’s the perfect way to sneak in more veggies without anyone even noticing, and the savory, comforting taste makes it a winner for everyone. I really hope you give this one a try, especially on one of those busy weeknights when you just need a win in the kitchen. I’d love to hear how it turns out for you and what delicious additions you might have made! Don’t be shy about leaving a comment below, rating the recipe, or sharing your own family’s favorite twists. Happy cooking, and may your kitchen always smell as wonderful as this!

Easy Cauliflower Rice Tofu Stir-Fry
Ingredients
Main Ingredients
- 15 ounces extra firm tofu pressed and cubed
- 1 tablespoon olive oil
- 1 tablespoon soy sauce
- 1 tablespoon cornstarch
- 1 medium head of cauliflower cut into florets
- 2 cloves garlic minced
- 1 tablespoon fresh ginger grated
- 3 cups frozen peas and carrots or any mixed veggies
- 1 teaspoon Sriracha sauce adjust for spice
- 1 teaspoon sesame oil
- 3 large eggs beaten
- 2 tablespoons green onions chopped for topping
Instructions
Preparation Steps
- Preheat oven to 450°F. Toss tofu with olive oil, soy sauce, and cornstarch. Spread on a parchment-lined baking sheet and bake for 20-30 minutes, stirring halfway, until crispy.
- Pulse cauliflower florets in a food processor until rice-like in texture.
- Heat a splash of olive oil in a large skillet over medium heat. Add garlic, ginger, peas, and carrots. When sizzling, add cauliflower, soy sauce, and Sriracha, sauté just until cauliflower begins to soften, about 1-2 minutes.
- Create a well in the pan center. Add sesame oil and beaten eggs. Gently scramble eggs in the well until cooked, then stir into the cauliflower mixture.
- Fold in the baked tofu. Serve topped with green onions and extra Sriracha if desired.