7-Layer Magic Bars
There are some recipes that just stick with you, aren’t there? The ones that, the moment you think of them, bring a smile to your face and maybe even a little pang of hunger. For me, one of those absolute lifesavers is these 7-Layer Magic Bars. They’re honestly one of the easiest, most crowd-pleasing desserts I know how to whip up, and I swear, they disappear faster than anything else I put on the table. I first stumbled upon a version of this years ago, and it quickly became my secret weapon for potlucks, impromptu get-togethers, or those moments when a serious sweet craving hits after dinner and I don’t want to deal with anything complicated. If you’ve ever made something like a classic brownie or a simple cookie bar, these are right in that same ballpark of effortless deliciousness, but somehow, they feel extra special.
What are 7-layer magic bars?
So, what exactly *are* these 7-Layer Magic Bars? The name pretty much tells the story, doesn’t it? Think of it as a symphony of textures and flavors all layered together in one perfect bite. It starts with a buttery, crumbly graham cracker crust. Then, on top of that, we pile on Sweetened Condensed Milk, followed by a generous scattering of chocolate chips, sometimes nuts, sometimes coconut, and then a final drizzle of more condensed milk to bind it all together and create that magical, gooey, slightly caramelized finish. It’s essentially a no-bake, no-fuss dessert that delivers a huge punch of flavor. It’s not overly fussy, and that’s a huge part of its charm. It’s more of an assembly job than a true baking project, which is why it’s so fantastic when you’re short on time but still want something truly spectacular.
Why you’ll love this recipe?
Why do I love these 7 layer Magic bars?flavor. It’s this incredible balance of sweet, rich, and slightly nutty (if you add nuts!). The chocolate melts into gooey puddles, the coconut adds a subtle tropical hint, and that graham cracker base? Pure buttery bliss. It’s the kind of dessert that hits all the right notes. Then there’s the simplicity. This is what makes it a true lifesaver. You don’t need any fancy techniques or hours in the kitchen. It’s mostly just measuring and layering. I’ve made these on weeknights when the kids have unexpected school events and I need a quick treat, and it’s always a huge hit. Plus, they’re incredibly cost-efficient. The ingredients are all pretty standard pantry staples, so you can make a whole pan for a fraction of the cost of a storeversatility! While I have my favorite combination, you can absolutely play around with the add-ins. I’ve seen them made with butterscotch chips, White Chocolate, different nuts, or even a sprinkle of sea salt on top. It’s a recipe that truly adapts to your preferences. For me, what I love most about this recipe is its reliability. I know it’s going to turn out perfectly every single time, and that peace of mind when you’re hosting or bringing a dish somewhere is priceless. It reminds me a bit of a classic blondie, but with a delightful crunch and chewiness that’s all its own.
How to Make 7-Layer Magic Bars
Quick Overview
This recipe is wonderfully straightforward. We’ll start by pressing a simple Graham Cracker crust into the pan, then generously sprinkle on our layers of chocolate, nuts, and coconut. The magic really happens when the sweetened condensed milk is poured over everything, baking into a gooey, caramelized delight. It’s a no-fuss assembly that results in pure dessert perfection, ready in under an hour from start to finish!
Ingredients
For the Main Batter:
2 cups Graham Cracker crumbs (about 14-16 full sheets)
1/2 cup unsalted butter, melted
1/4 cup granulated sugar
1/4 teaspoon salt
For the Filling:
2 cups semi-sweet chocolate chips (you can mix in some milk chocolate too!)
1 cup shredded sweetened coconut (or unsweetened, if you prefer)
1 cup chopped pecans or walnuts (optional, but highly recommended for that extra crunch!)
1 can (14 ounces) sweetened condensed milk
Step-by-Step Instructions
Step 1: Preheat & Prep Pan
First things first, let’s get our oven ready and our pan prepared. Preheat your oven to 350°F (175°C). This is a pretty standard baking temperature, and it works perfectly for getting these bars cooked through without burning. Grab an 8×8 or 9×9 inch baking pan. I like to line mine with parchment paper, leaving a little overhang on the sides. This is a trick I learned years ago that makes lifting the bars right out of the pan so much easier – no more struggling to cut them cleanly inside the pan! Just grease the pan lightly, then place the parchment paper in, pressing it down into the corners.
Step 2: Mix Dry Ingredients
In a medium bowl, we’re going to combine our dry ingredients for the crust. You’ll need your graham cracker crumbs. If you don’t have them pre-made, just pop a sleeve or two of graham crackers into a food processor and give them a whirl until they’re fine crumbs. Add the granulated sugar and the salt to the crumbs. The sugar adds a little sweetness to the crust itself, and the salt helps to balance out all the sweetness in the layers to come. Give it all a good stir with a fork or a whisk to make sure everything is evenly distributed.
Step 3: Mix Wet Ingredients
Now for the moistening agent for our crust! Pour the melted butter over the dry graham cracker mixture. This is where the magic starts to happen and those crumbs transform into a cohesive base. You want to mix this with a fork until all the crumbs are moistened and the mixture looks like wet sand. It should hold together when you squeeze a little bit in your hand. If it seems a bit too dry and crumbly, you can add another tablespoon of melted butter, but usually, this amount is just right.
Step 4: Combine
This step is all about getting that crust into the pan. Dump the moistened graham cracker mixture into your prepared baking pan. Use the bottom of a glass or a measuring cup to firmly press the crumbs evenly across the bottom of the pan. You really want to pack it down well so you don’t have a crumbly crust when you slice into the bars later. Make sure it’s a nice, even layer, all the way to the edges.
Step 5: Prepare Filling
This is where the “filling” actually comes in, though it’s more of a layering of deliciousness. Before you start assembling the next layers, make sure your sweetened condensed milk is easily pourable. Sometimes it can be a bit thick straight from the can. Now, grab your chocolate chips, your shredded coconut, and your chopped nuts (if you’re using them). I like to sprinkle these evenly over the graham cracker crust. It doesn’t have to be perfectly distributed right now, as the condensed milk will help them settle. I usually do a layer of chocolate chips, then the nuts, and then the coconut, but you can mix and match as you like!
Step 6: Layer & Swirl
This is the truly magical part! Take your can of sweetened condensed milk and slowly, evenly pour it all over the top of the ingredients in the pan. Try to get it into all the nooks and crannies. It’s going to look like it’s drowning everything, and that’s exactly what you want. The condensed milk is what holds everything together and caramelizes beautifully in the oven. You don’t need to swirl or mix at this stage; the oven will do all the work, creating those lovely pockets of gooey goodness. Just ensure it covers everything as best as you can.
Step 7: Bake
Now, carefully place your pan into the preheated oven. You’ll want to bake these for about 25-30 minutes. The key here is to watch for the edges to be golden brown and bubbly, and the center should be set. The condensed milk will have thickened and caramelized. It’s important not to overbake them, as they can become too hard and dry. They’ll continue to set up as they cool. If you’re unsure, you can gently insert a toothpick near the center; it should come out mostly clean, perhaps with a few moist crumbs attached.
Step 8: Cool & Glaze
This is perhaps the hardest part: waiting! Once they’re out of the oven, resist the urge to cut into them immediately. Let them cool completely in the pan on a wire rack. This usually takes at least an hour, maybe even two. The cooling process is crucial for them to firm up properly, making them easy to cut and enjoy. Once they’re fully cooled, you can lift the entire slab out of the pan using the parchment paper overhang. At this point, you can add a glaze if you like, but these bars are usually perfect as is! If you wanted to add a decorative drizzle of melted chocolate or a simple powdered sugar glaze, now would be the time, but I often find they don’t need it.
Step 9: Slice & Serve
Once completely cooled and set, it’s time for the grand finale! Use a sharp knife to slice the bars into whatever size squares you prefer. I usually cut mine into about 16-20 squares, making them perfect for sharing. You can also cut them into thinner rectangles for a more elegant presentation. They look so beautiful with all those distinct layers peeking out. Serve them at room temperature for the best texture and flavor.
What to Serve It With
These 7-Layer Magic Bars are so wonderfully versatile, they fit in just about anywhere you need a touch of sweetness! For breakfast, they’re surprisingly delightful alongside a steaming mug of coffee. Imagine a cozy morning, a little bit of sunshine, and one of these bars – pure bliss. They offer a little bit of indulgence without being overly heavy. If you’re hosting brunch, these bars are an absolute lifesaver. They look so appealing on a brunch spread, adding a pop of color and sweetness. Serve them alongside fruit platters, quiches, and other brunch favorites. A mimosa or a sparkling cider pairs beautifully. As a simple dessert, they’re always a winner after any meal. They’re the perfect size for a sweet finish without being too overwhelming, especially after a hearty dinner. For cozy snacks, these are unbeatable. Whether it’s an afternoon pick-me-up or a late-night treat, they hit the spot. I love serving them with a cold glass of milk, or even a warm cup of tea on a chilly evening. My family has a tradition of having these after movie nights; it’s become our little ritual.
Top Tips for Perfecting Your 7-Layer Magic Bars
Over the years, I’ve picked up a few tricks that make these 7-Layer Magic Bars even more spectacular. When it comes to the graham cracker crust, my biggest tip is to make sure you pack it down really well. A loose crust will just crumble apart when you try to cut the bars, and nobody wants that! Use the bottom of a glass or a measuring cup and really give it some pressure. For mixing the crust ingredients, I always aim for a texture that resembles wet sand – it should hold its shape when you squeeze it. If it feels too dry, don’t be afraid to add a little more melted butter, just a tablespoon at a time. When it comes to the layers, I’ve found that a good distribution of the chocolate chips, coconut, and nuts is key. While the condensed milk will spread, starting with an even layer of each ingredient ensures that every bite has a bit of everything. Don’t skip the nuts if you like them; the crunch they add is phenomenal and really elevates the texture. My personal favorite combo is semi-sweet chocolate chips and pecans. Now, for the condensed milk, make sure it’s not super cold, as it can be harder to pour evenly. If it’s a bit thick, just give the can a gentle shake or warm it slightly (but don’t boil it!). Pour it slowly and deliberately, trying to cover all the toppings. Some people like to create swirls, but I find that the bake itself creates a beautiful, naturally marbled effect. Baking time is crucial. You want those edges to be golden brown and bubbly, and the center to look set. If they look too pale, they might be underbaked and could be too gooey. If they start to look too dark, your oven might be running hot, so you can loosely tent them with foil. I’ve learned from experience that it’s better to slightly underbake than overbake, as they continue to cook as they cool. And the cooling! Oh, the cooling is the hardest part, but it’s so important. Letting them cool completely ensures they firm up nicely, making them easy to slice and preventing them from falling apart. I’ve rushed this step more times than I care to admit, and it always ends in a delicious mess, but a mess nonetheless! If you’re feeling adventurous with ingredient swaps, I’ve tried using different chocolate chips (like butterscotch or white chocolate) with great success. I’ve also found that adding a pinch of cinnamon to the graham cracker crust adds a wonderful warmth. Don’t be afraid to experiment; these bars are pretty forgiving!
Storing and Reheating Tips
One of the things I love most about these 7-Layer Magic Bars is how well they store. They’re pretty resilient! For short-term storage, if you have any leftovers (which is rare in my house!), you can keep them at room temperature. Just make sure they’re covered tightly with plastic wrap or stored in an airtight container. They’ll stay fresh and delicious for about 2-3 days at room temperature, especially if your kitchen isn’t too warm. If you know you won’t finish them within a few days, or if it’s a particularly warm climate, refrigerator storage is your best bet. Pop them into an airtight container and they’ll be good in the fridge for up to a week. They actually firm up a bit more in the fridge, which can make them easier to slice. If you want to get ahead or have a big batch, these bars freeze beautifully! Let them cool completely, then wrap them very well in plastic wrap, followed by a layer of aluminum foil or place them in a freezer-safe container. They can be frozen for up to 3 months. When you’re ready to enjoy them from frozen, just thaw them overnight in the refrigerator. I usually recommend adding the glaze (if you choose to use one) *after* they have fully thawed, or just before serving. If you plan on reheating them, they’re best served at room temperature. If they’ve been refrigerated, you can gently warm them in a low oven (around 250°F or 120°C) for about 5-10 minutes until they’re just warmed through. Be careful not to overheat them, as they can become too soft or even melt.
Frequently Asked Questions
Final Thoughts
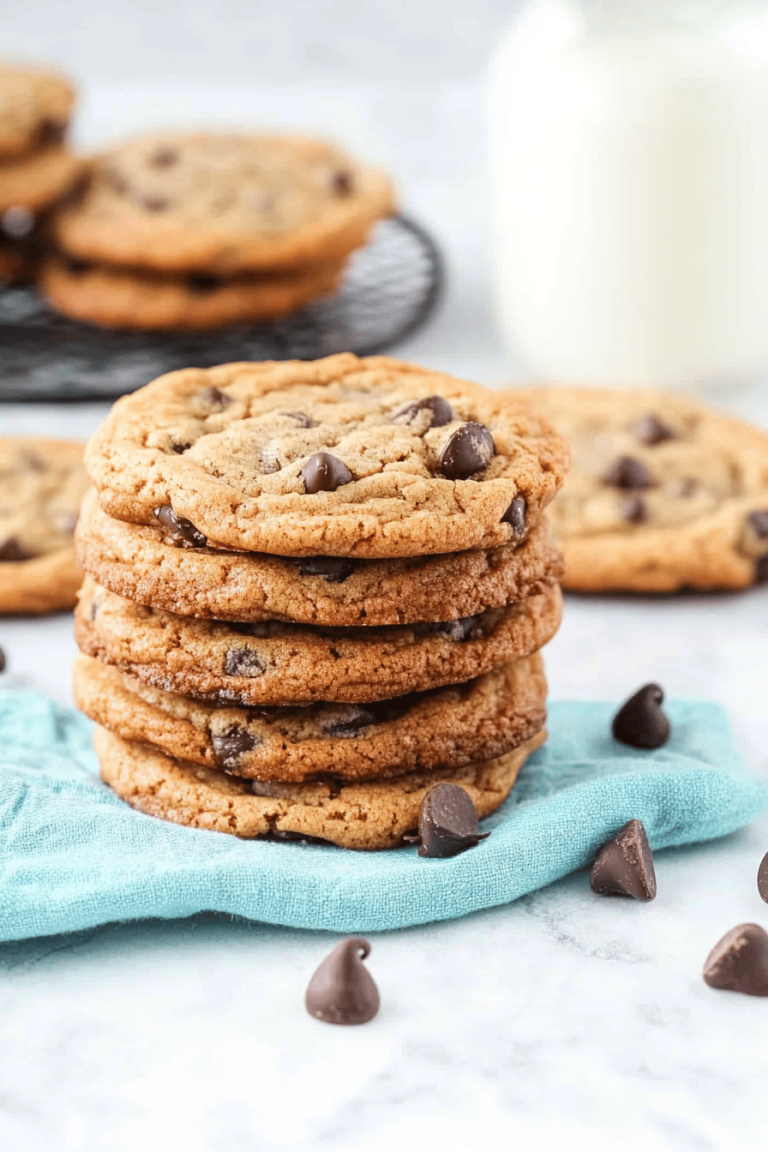
So there you have it – my absolute favorite 7-Layer Magic Bars! They’re more than just a dessert; they’re a little slice of happiness that’s ridiculously easy to make. The blend of textures and that irresistible sweet, gooey, chocolatey flavor is just something special. They’re perfect for those moments when you want to impress without the fuss, or just need a little something sweet to brighten your day. If you love these, you might also enjoy my recipe for No-Bake Energy Bites or my Chewy Chocolate Chip Cookies – they’re also big on flavor and easy on the baker! I truly can’t wait to hear how your 7-Layer Magic Bars turn out. Please leave a comment below and let me know your favorite variations, or if you have any special tips you’d like to share. Happy baking, everyone!
7-Layer Magic Bars
Ingredients
Main Ingredients
- 1.5 cups graham cracker crumbs
- 0.5 cup butter melted
- 1 cup semi-sweet chocolate chips
- 0.5 cup butterscotch chips
- 1 cup sweetened shredded coconut
- 1 cup chopped pecans
Instructions
Preparation Steps
- Preheat oven to 350 degrees F (175 degrees C). Grease and flour a 9x13 inch baking pan.
- In a medium bowl, combine graham cracker crumbs and melted butter. Press mixture evenly into the bottom of the prepared pan.
- Sprinkle chocolate chips, butterscotch chips, shredded coconut, and chopped pecans evenly over the graham cracker crust.
- Bake for 25 to 30 minutes, or until golden brown and bubbly.
- Let cool completely before cutting into bars.