
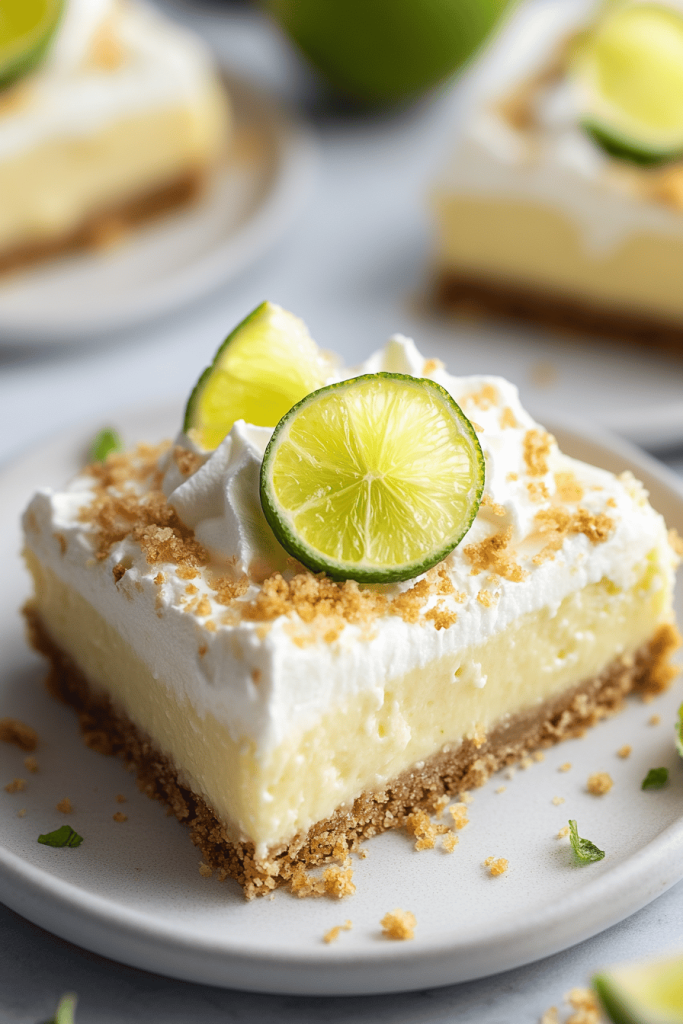
Tangy Key Lime Pie Bars: Sunshine in Every Bite
These Key Lime Pie Bars capture the essence of summer with their bright, tangy flavor and creamy smooth texture. Each bite is a perfect blend of sweet and tart, making them utterly irresistible! These are super easy to make and are guaranteed to be a crowd-pleaser, a truly delectable dessert.
I remember the first time I tasted Key Lime Pie. I was on vacation in the Florida Keys with my family, and the balmy air was thick with the scent of salt and sunshine. We stopped at a little roadside diner, and the waitress, a woman with a smile as bright as the Florida sun, recommended their famous key lime pie. One bite, and I was hooked! The vibrant, citrusy flavor was like a burst of sunshine on my tongue, and the creamy texture was just heavenly. Years later, I decided to recreate that blissful experience at home, and these Key Lime Pie Bars are the result of that delicious quest.
Why You’ll Love This Recipe
Let’s be honest, sometimes we crave a dessert that’s both decadent and easy to make. These Key Lime Pie Bars tick both boxes beautifully. They’re not only bursting with that iconic key lime flavor, but they also require minimal effort. Forget fussy pastry crusts! We’re using a simple graham cracker base that comes together in minutes. Think of it as a shortcut to pure dessert bliss.
Plus, they’re surprisingly budget-friendly. Key limes, while slightly pricier than regular limes, still won’t break the bank. And the remaining ingredients – graham crackers, butter, Sweetened Condensed Milk – are pantry staples for many. You can whip up a batch of these bars without needing to make a special trip to the store for exotic or expensive ingredients. I also love that they are easy to transport. Take them to picnics, potlucks, or simply enjoy them at home! Each bar cuts perfectly, making them ideal for sharing…or not, if you’re feeling selfish! Seriously, these are sunshine on a plate, and a definite win for any occasion.
Finally, I also find these Key Lime Pie Bars very comforting. There is something very satisfying about biting into the crumbly graham cracker crust and the tangy filling. You will feel like you are in the Florida Keys, enjoying some island breeze!
Essential Ingredients & Quality Tips
Let’s dive into the key players in this recipe, and how to ensure you’re using the best ingredients for the most vibrant, flavorful results:
- Key Limes: These are the stars of the show, and their unique flavor is what sets these bars apart. Key limes are smaller, more aromatic, and have a more intense tartness than regular limes. If you can find them, definitely use them! If not, regular limes will work in a pinch, but you might want to add a touch of lime zest to boost the flavor. Look for key limes that are firm and heavy for their size, indicating they’re full of juice.
- Graham Crackers: The crust is the foundation of our pie bars, so choose a brand you love. Honey graham crackers offer a classic sweetness that complements the key lime filling perfectly. For a slightly different twist, try cinnamon graham crackers. Make sure to grind the graham crackers finely for a smooth, even crust. I use a food processor, but you can also put them in a zip-top bag and crush them with a rolling pin.
- Sweetened Condensed Milk: This ingredient adds sweetness and creaminess to the filling. Make sure you’re using sweetened condensed milk, not evaporated milk, which is unsweetened and won’t provide the necessary richness.
- Butter: Unsalted butter is the best option, as it allows you to control the amount of salt in the recipe. Melt the butter completely for easy mixing with the graham cracker crumbs.
- Eggs: Eggs provide structure and richness to the filling. Use large eggs for consistent results.
A little tip: if your key limes are a bit hard, roll them firmly on the counter a few times before juicing. This will help release more juice. Also, don’t be afraid to taste the filling as you go and adjust the sweetness or tartness to your liking! A pinch of salt can also help balance the flavors.

Step-by-Step Cooking Instructions
Ready to get baking? These Key Lime Pie Bars are surprisingly easy to make. They require no complicated techniques, making them a perfect dessert for beginner bakers. Total time is around 45 minutes, including prep and baking. Difficulty: Easy!
Step 1: Preparation Phase
First, preheat your oven to 350°F (175°C). While the oven is heating, grease and line an 8×8 inch Baking Pan with parchment paper, leaving an overhang for easy removal. This is a crucial step to ensure your bars come out cleanly. Next, melt the butter in the microwave or in a saucepan over low heat. In a medium bowl, combine the graham cracker crumbs and melted butter. Press the mixture firmly and evenly into the prepared baking pan. Bake the crust for 8-10 minutes, or until lightly golden brown. Let it cool slightly while you prepare the filling.
Step 2: Building Flavors
Now comes the fun part: creating that signature key lime flavor! In a large bowl, whisk together the Sweetened Condensed Milk, key lime juice, and eggs until smooth and well combined. Make sure there are no lumps. Taste the mixture and adjust the sweetness or tartness as needed. If you prefer a tangier flavor, add a bit more key lime juice. If it’s too tart, add a tablespoon or two of powdered sugar. Remember, taste is subjective, so don’t be afraid to experiment! A pinch of salt can also enhance the flavors and balance the sweetness.
Step 3: Main Cooking Process
Pour the Key Lime filling over the slightly cooled graham cracker crust. Spread it evenly to ensure each bar has the perfect ratio of crust to filling. Bake for 20-25 minutes, or until the filling is set but still slightly jiggly in the center. The edges should be lightly golden. Keep a close eye on the bars to prevent the crust from burning. If the crust starts to brown too quickly, tent the pan with foil.
Step 4: Final Assembly
Remove the baking pan from the oven and let the Key Lime Pie Bars cool completely at room temperature. This is crucial for allowing the filling to set properly. Once cooled, transfer the bars to the refrigerator and chill for at least 2 hours, or preferably overnight. This will help them firm up and develop their flavor even further.
Step 5: Finishing Touches
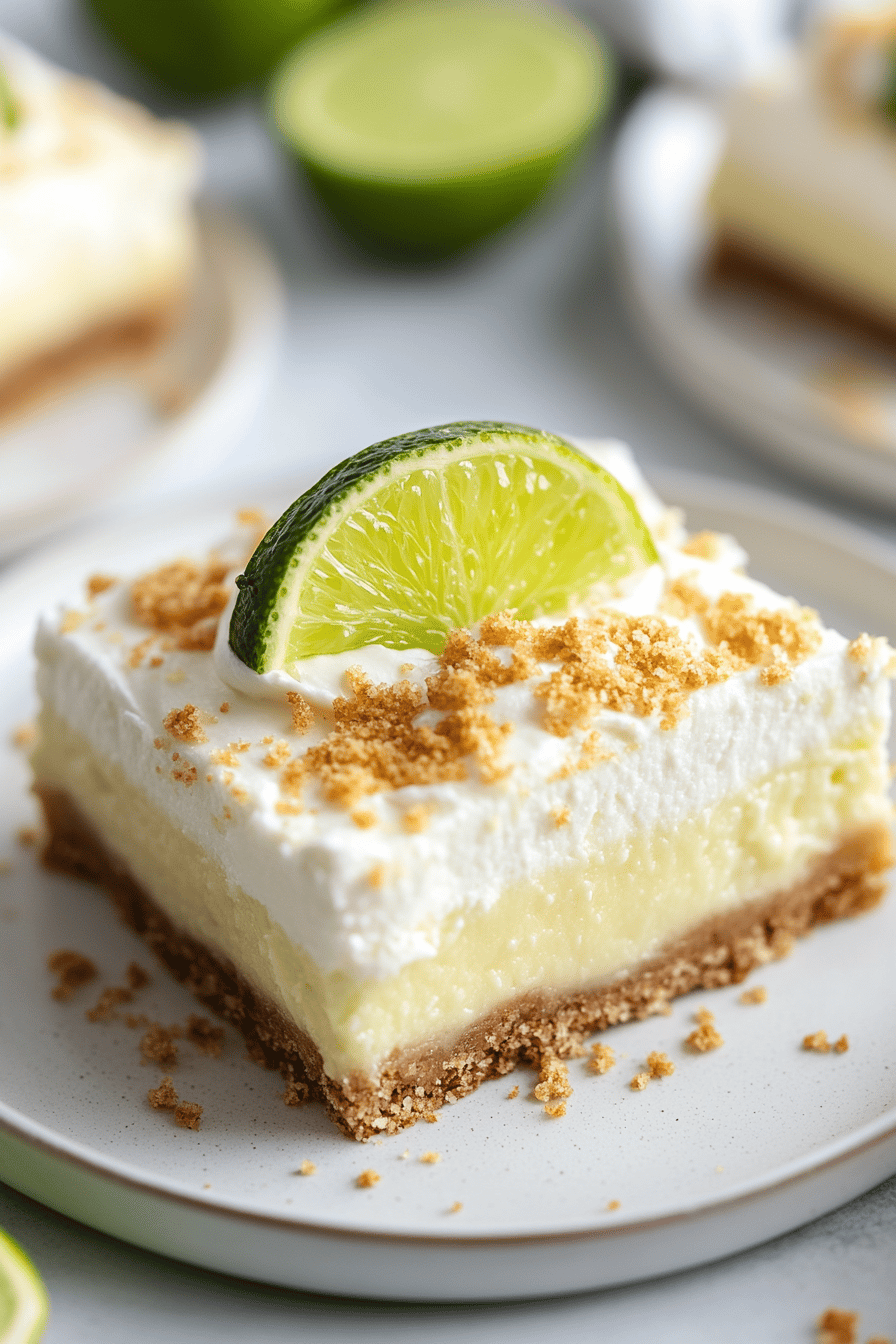
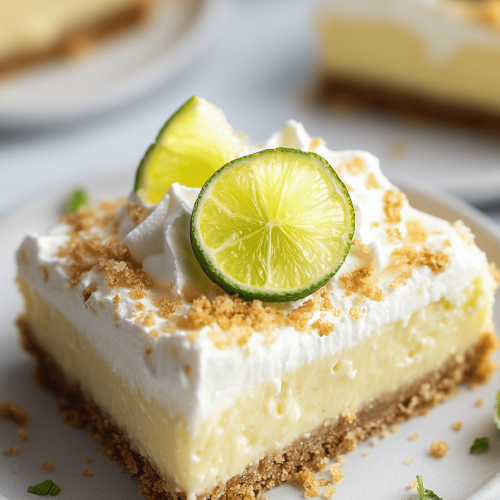
Before serving, lift the bars out of the pan using the parchment paper overhang. Cut them into squares or rectangles, depending on your preference. To prevent sticking, run a knife under hot water and wipe it clean between each cut. Garnish with whipped cream or a sprinkle of lime zest for a pop of color and flavor. These bars are best served cold, straight from the refrigerator. They are perfect for a hot summer day or any time you need a taste of sunshine!
Expert Storage & Leftover Tips
These Key Lime Pie Bars are even better the next day, as the flavors have had time to meld together. To store them, keep them in an airtight container in the refrigerator for up to 5 days. To prevent them from drying out, you can place a piece of parchment paper on top of the bars before sealing the container. If you want to extend their shelf life, you can freeze them. Cut the bars into individual portions, wrap each portion tightly in plastic wrap, and then place them in a freezer-safe bag or container. They can be frozen for up to 2 months. To thaw, transfer the bars to the refrigerator overnight.
Avoid refreezing, as this will affect the texture. Also, note that the crust may become slightly softer after freezing and thawing. If you have any leftover graham cracker crust, you can store it in an airtight container at room temperature for up to a week. You can use it to make more Key Lime Pie Bars or other desserts, such as cheesecakes or trifles.
Creative Variations & Dietary Adaptations
Want to put your own spin on these Key Lime Pie Bars? Here are a few creative variations and dietary adaptations to try:
- Gluten-Free: Use gluten-free graham crackers for the crust. You can find gluten-free graham crackers at most grocery stores or online.
- Vegan: Substitute the graham crackers with a gluten-free vegan cookie. Use a vegan sweetened condensed milk (available at most health food stores) and a flax egg (1 tablespoon of ground flaxseed mixed with 3 tablespoons of water) in place of the eggs.
- Chocolate Crust: Instead of graham crackers, use chocolate cookie crumbs for a richer, more decadent crust.
- Coconut Crust: Add shredded coconut to the graham cracker crust for a tropical twist. Toast the coconut before adding it to the crust for a nuttier flavor.
- Lime and Coconut: Incorporate coconut milk into the filling for an enhanced tropical flavor.
- Raspberry Swirl: Before baking, swirl a spoonful of raspberry jam or puree into the key lime filling for a beautiful and delicious addition.
No matter which variation you choose, these Key Lime Pie Bars are sure to be a hit!
Perfect Serving Suggestions & Pairings
These Key Lime Pie Bars are perfect for any occasion, from casual gatherings to elegant dinner parties. They’re especially refreshing on a hot summer day. Serve them chilled, straight from the refrigerator, for the best flavor and texture. For a simple yet elegant presentation, dust the bars with powdered sugar or garnish them with a sprig of mint.
As for pairings, these bars go wonderfully with a variety of beverages. A classic choice is a glass of iced tea or lemonade. For something a bit more sophisticated, try pairing them with a crisp white wine, such as Sauvignon Blanc or Pinot Grigio. A light-bodied beer, such as a wheat beer or a pilsner, also complements the tangy flavor of the key lime. If you’re feeling adventurous, try pairing them with a Key Lime Martini or a Margarita. For a non-alcoholic option, a sparkling water with a squeeze of lime is a refreshing choice.
Consider serving these bars as part of a dessert buffet, alongside other sweet treats such as chocolate brownies, fruit tarts, and cookies. They also make a delightful ending to a light summer meal, such as grilled fish or a salad. The portion size can be adjusted to fit the occasion. For a casual gathering, cut the bars into smaller squares. For a more formal event, cut them into larger rectangles and serve them with a dollop of whipped cream or a scoop of vanilla Ice Cream.
Frequently Asked Questions
Final Thoughts & Recipe Success Tips
These Key Lime Pie Bars are a guaranteed crowd-pleaser, offering a delightful blend of tangy and sweet flavors in every bite. Remember to use high-quality ingredients, especially fresh key limes, for the best results. Don’t be afraid to adjust the sweetness or tartness to your liking, and always allow the bars to cool completely before chilling for optimal texture. Now it’s your turn! Give this recipe a try and let me know what you think in the comments below. Share your own variations or tips for success – I’d love to hear them!
I hope you enjoy making and devouring these sunshine-filled Key Lime Pie Bars as much as I do! They’re the perfect treat to brighten your day and transport you to a tropical paradise, even if just for a few moments. If you found this recipe helpful, please give it a rating and share it with your friends and family. Happy baking!
Key Lime Pie Bars
Ingredients
Crust Ingredients
- 1.5 cups graham cracker crumbs
- 0.5 cup sugar
- 0.5 cup melted butter
Filling Ingredients
- 1 cup key lime juice
- 1 cup sugar
- 4 large eggs
- 0.5 cup condensed milk
Instructions
Preparation Steps
- Preheat oven to 350°F (175°C). Combine graham cracker crumbs, sugar, and melted butter. Press into a greased 8x8 inch baking pan.
- In a separate bowl, whisk together key lime juice, sugar, eggs, and condensed milk until smooth.
- Pour the filling over the crust.
- Bake for 25-30 minutes, or until set. Let cool completely before cutting into bars.