Royal Icing Recipe
Oh, you guys, I am SO excited to share this with you today! This Royal Icing Recipe is honestly a lifesaver in my kitchen, especially around the holidays or when I’ve got a big cake decorating project on the go. It’s the kind of recipe that just *works*, every single time. You know how some icing recipes can be finicky? This one? Not so much. It’s so reliable, so perfect for getting those intricate designs or just a beautiful, smooth finish on cookies. I’ve tried a million variations over the years, and this specific combination of ingredients and steps is the one that’s earned a permanent spot in my recipe binder. It’s like the little black dress of icings – always elegant, always appropriate, and surprisingly simple to get just right. Forget those complicated buttercream recipes that take forever; this is your secret weapon for beautiful baked goods without the fuss!
What is royal icing?
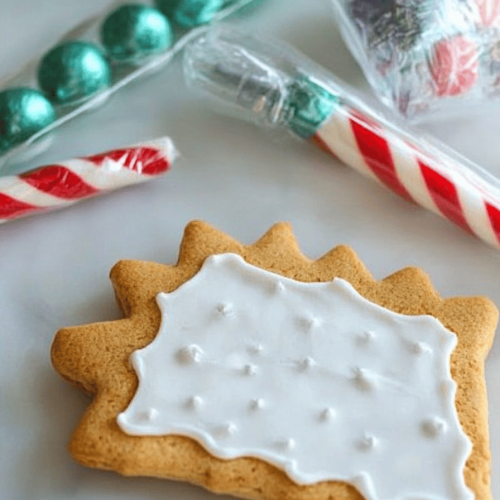
So, what exactly *is* Royal Icing? Think of it as the superhero of decorative icings. It’s a stiff, smooth, and incredibly versatile icing that dries hard, making it absolutely perfect for detailed piping work, creating intricate edible decorations, or just giving your cookies that classic, glossy finish. It’s made primarily from powdered sugar, egg whites (or a meringue powder substitute, which is a game-changer for food safety and shelf life!), and a touch of liquid like lemon juice or water to get it to the right consistency. The “royal” in its name comes from the fact that it was traditionally used for decorating elaborate cakes for royalty. It’s essentially a sugar paste that, once dry, acts like edible cement, holding everything in place and allowing for incredibly precise designs. It’s not meant to be eaten in huge globs like buttercream, but rather appreciated for its ability to transform a simple cookie or cake into a work of art.
Why you’ll love this recipe?
Where do I start?Royal Icing Recipe. is a complete game-changer for so many reasons. First and foremost, the flavor. While it’s primarily sugar, the touch of lemon juice (or vanilla, if you prefer!) adds a subtle brightness that cuts through the sweetness just perfectly. It’s not cloying or one-dimensional. Then there’s the simplicity. I know “simple” and “icing” don’t always go hand-in-hand, but I promise you, this recipe is incredibly straightforward. You just whip a few things together, and boom – you’ve got perfect icing. Plus, it’s super cost-effective! Powdered sugar and meringue powder are pantry staples for most bakers, making this an incredibly budget-friendly way to elevate your treats. What I truly adore about this recipe, though, is its versatility. You can thin it down for flood icing to get a smooth, even coating on sugar cookies, or keep it thicker for beautiful piping details, borders, or even to create delicate royal icing flowers. It dries to a beautiful, glossy finish that looks so professional. It’s also incredibly stable; once dry, your decorations will stay put, which is a lifesaver when you’re transporting cookies or stacking cakes. Compared to a fussy buttercream that might melt or smudge, this royal icing is rock-solid and reliable. It’s also fantastic because you can color it with gel food coloring to achieve vibrant, true-to-life shades without watering down your icing.
How to Make Royal Icing
Quick Overview
This recipe is all about achieving the perfect consistency for decorating. You’ll simply combine your dry ingredients with your liquid and whisk until you get a smooth, glossy, and pipeable icing. The magic happens when you adjust the liquid amount to achieve different consistencies for flooding versus piping. It truly is that easy! You’ll be decorating like a pro in no time.
Ingredients
For the Main Batter:
4 cups (about 500g) powdered sugar, sifted: Sifting is non-negotiable here! It ensures no lumps and a super smooth icing. I always use a fine-mesh sieve. You can find powdered sugar in pretty much any grocery store.
3 tablespoons meringue powder: This is key for stability and food safety. You can find it in the baking aisle of most larger supermarkets or online. Don’t skip this if you want your icing to dry hard and last!
1/4 cup (60ml) lukewarm water: Just regular tap water is fine. The warmth helps dissolve the meringue powder.
1/2 teaspoon cream of tartar (optional, but recommended): This helps stabilize the meringue powder and gives the icing a brighter white color.
1 teaspoon vanilla extract or lemon juice: Vanilla is classic, but a little lemon juice adds a lovely subtle tang that I really love for contrast. You can also use almond extract for a different flavor profile.
Step-by-Step Instructions
Step 1: Prepare Your Workspace
Make sure your mixing bowl and whisk attachments are squeaky clean and completely dry. Any grease or water residue can affect the final consistency of your icing. Have your sifted powdered sugar and all other ingredients measured out and ready to go. This recipe comes together quickly!
Step 2: Combine Dry Ingredients
In your clean mixing bowl, whisk together the sifted powdered sugar, meringue powder, and cream of tartar (if using). Whisking these dry ingredients together first helps distribute the meringue powder evenly, ensuring a consistent icing.
Step 3: Add Wet Ingredients
Pour the lukewarm water, vanilla extract (or lemon juice) into the bowl with the dry ingredients. Make sure the water isn’t too hot, as it can start to cook the meringue powder prematurely. Lukewarm is perfect.
Step 4: Mix the Icing
Using an electric mixer (stand mixer with a whisk attachment is ideal, but a hand mixer works too), start mixing on low speed. Gradually increase the speed to medium-high. Mix for about 5-7 minutes, until the icing is thick, glossy, and smooth, with stiff peaks. It should hold its shape and not drip off the whisk.
Step 5: Achieve Desired Consistency
This is where the magic happens! For piping consistency, the icing should be thick, almost like toothpaste. If it’s too thick, add water, just a tiny drop at a time (seriously, like 1/4 teaspoon), and mix again until it reaches the desired stiffness. For flooding consistency, you’ll want to thin it out. Add more water, a few drops at a time, until the icing falls off the whisk in a thick ribbon that slowly melts back into the rest of the icing. This usually takes a few extra tablespoons of water. You can also use a mixture of powdered sugar and water to adjust consistency.
Step 6: Color and Flavor (Optional)
If you want colored icing, now is the time to add your gel food coloring. Gel colors are best as they don’t add extra liquid. Start with a tiny bit and add more until you achieve your desired shade. You can also add other flavorings at this stage, like a touch of almond or peppermint extract. Just be careful not to add too much liquid.
Step 7: Store and Use
Cover the bowl tightly with a damp cloth or plastic wrap pressed directly onto the surface of the icing to prevent a crust from forming. If you’re not using it immediately, transfer it to an airtight container and keep it at room temperature. If it crusts over, you can usually whisk it back to smoothness.
Step 8: Decorate!
Transfer your icing to piping bags fitted with your favorite tips or use a scribe tool for flooding. Let your creativity flow!
Step 9: Let it Dry
Allow your decorated cookies or cakes to dry completely. This can take anywhere from a few hours to overnight, depending on humidity and the thickness of the icing. Once dry, they’ll be ready to display or package!
What to Serve It With
Royal icing is primarily a decorating medium, so it’s not usually served “with” something in the traditional sense. Instead, it *enhances* what it’s on! But if we’re talking about the baked goods it adorns, oh boy, the possibilities are endless!
For Breakfast: Imagine delicate, brightly colored royal icing designs on simple Shortbread Cookies or sugar cookies shaped like suns or flowers. They add a touch of whimsy to a morning treat, perfect alongside a steaming mug of coffee or a refreshing glass of orange juice. They’re light enough not to feel heavy first thing in the morning.
For Brunch: This is where royal icing truly shines. Think beautifully decorated cookies that double as edible art for your brunch table – perhaps themed for a baby shower or a special occasion. They look incredible arranged on a tiered platter with pastries and fruit. Pair them with mimosas or sparkling cider for an elegant touch.
As Dessert: This is probably the most common use! Elaborately decorated Sugar Cookies, intricate cake toppers, or delicate royal icing lace details on a tiered cake. They add that “wow” factor that guests will remember. Serve them after dinner with a rich dessert wine or a perfectly brewed espresso.
For Cozy Snacks: Even for a simple afternoon tea or a cozy night in, a few well-iced cookies can make any moment feel special. I love making little batches of themed cookies – maybe little pumpkins for fall or snowflakes for winter – to enjoy with a cup of hot cocoa. They’re a little burst of joy!
Top Tips for Perfecting Your Royal Icing
I’ve definitely learned a few things over the years of making this royal icing recipe, and I’m happy to share them with you! These little tricks have saved me so much frustration and have consistently produced beautiful results.
Consistency is Key: This is hands down the most important tip. Have extra powdered sugar and water on hand to adjust consistency. If your icing is too runny for piping, add powdered sugar a tablespoon at a time. If it’s too stiff and won’t flow for flooding, add water a *tiny* drop at a time. It’s a delicate balance, and it’s better to add too little than too much. I always have small squeeze bottles of water and a little bowl of powdered sugar nearby when I’m decorating.
Sift, Sift, Sift: I cannot stress this enough. Sifting your powdered sugar is crucial for a smooth, lump-free icing. If you don’t sift, you’ll end up with little bits of sugar in your icing, which can clog your piping tips and create an uneven finish. A fine-mesh sieve is your best friend here. Same goes for the meringue powder, if you notice any clumps.
Cleanliness Matters: Make sure your mixing bowl, whisk, and any utensils are spotlessly clean and dry. Even a tiny bit of grease or moisture can prevent your icing from reaching its full potential and drying properly. It’s like baking a cake – you want a clean slate!
Don’t Overmix the Initial Stage: While you want to mix until stiff peaks form, don’t go crazy with the mixer speed right at the beginning when adding the liquid. Start low and slow to incorporate everything without splashing. Once it starts to come together, then you can ramp up the speed to get it nice and glossy.
Use Gel Food Coloring: If you plan on coloring your icing, opt for gel food coloring. Liquid food coloring adds too much moisture, which will thin out your icing and ruin the consistency. Gel colors are concentrated and you need very little to achieve vibrant shades, so they won’t affect the texture. Always add coloring gradually until you get the shade you desire.
Preventing Crusts: Royal icing crusts over incredibly quickly once exposed to air. Always keep your bowl covered with a damp cloth or plastic wrap pressed directly onto the surface of the icing. If you’re taking a break, even for 5-10 minutes, cover it up! If a crust does form, you can usually scrape it off and whisk the icing underneath to revive it.
Working in Batches: If you’re coloring your icing, it’s often easier to mix a larger batch of white icing and then divide it into smaller bowls to color. This way, you can ensure all your colors are the same base consistency before you start decorating.
Practice Makes Perfect: Don’t get discouraged if your first attempt at piping isn’t magazine-worthy. Piping takes practice! Start with simple lines and dots, and gradually work your way up to more intricate designs. The beauty of this royal icing recipe is that it’s forgiving, so you can scrape it off and try again if needed.
Storage is Key for Longevity: Once your decorated items are completely dry, store them in airtight containers at room temperature. Avoid the refrigerator if possible, as condensation can ruin the delicate icing. If you need to stack decorated cookies, place parchment paper or wax paper between layers to prevent sticking.
Storing and Reheating Tips
Proper storage is crucial for keeping your decorated treats looking and tasting their best. Since royal icing dries hard, it’s quite stable, but there are still some best practices.
Room Temperature Storage: This is your best bet for most decorated cookies. Once the royal icing is *completely* dry (and I mean completely – this can take several hours or even overnight depending on humidity and icing thickness), store them in an airtight container. You can place parchment paper or wax paper between layers of cookies to prevent them from sticking together and smudging the icing. They should stay fresh for at least 2 weeks this way. Don’t store them in direct sunlight or humid areas, as this can affect the icing.
Refrigerator Storage: I generally advise against refrigerating royal icing decorated items. The moisture in the refrigerator can cause condensation to form on the icing, making it sticky or even causing it to weep. If you absolutely must refrigerate them for a short period, ensure they are in a completely airtight container and let them come to room temperature *before* opening the container to minimize condensation. However, for best results, stick to room temperature storage.
Freezer Instructions: You can freeze decorated cookies, but there are a few caveats. Make sure the icing is *fully* dry. Wrap the cookies individually in plastic wrap, then place them in a freezer-safe airtight container or bag. They can typically be frozen for up to 2-3 months. When thawing, it’s crucial to let them come to room temperature *inside* their freezer container. Do not unwrap them until they are fully defrosted and no condensation has formed. This slow thawing process helps prevent moisture damage to the icing.
Glaze Timing Advice: If you’re making a batch of royal icing and not using it immediately, the best way to store it is in an airtight container with plastic wrap pressed directly onto the surface to prevent a crust from forming. You can keep it at room temperature for a day or two. If it does form a crust, you can usually scrape it off and whisk the icing underneath to revive it. If you need to store it for longer, you can refrigerate it, but be sure to bring it back to room temperature and whisk it vigorously before using. If you’ve already decorated something and it’s drying, and you need to store the *un-iced* cookies, that’s a different story – let them dry fully first, then store airtight.
Frequently Asked Questions
Final Thoughts
There you have it – my absolute go-to royal icing recipe! I really hope you give this a try. It’s one of those recipes that just makes you feel confident in the kitchen, knowing you can create something beautiful. Whether you’re decorating for a special occasion, just want to add a little flair to your cookies, or are even tackling your first intricate cake design, this royal icing recipe is your reliable partner. It’s simple, effective, and the results are always so satisfying. I’ve had so many moments where I needed a beautiful finish quickly, and this recipe has never let me down. It’s a staple that truly elevates any baked good it touches. If you loved this recipe and are looking for more decorating inspiration, you might also enjoy my tutorial on creating delicate sugar cookies or my tips for mastering fondant techniques. Happy decorating, and I can’t wait to hear how your creations turn out!
Royal Icing Recipe
Ingredients
Main Ingredients
- 3 cups powdered sugar
- 0.5 cup warm water
- 3 tablespoons meringue powder
- 0.5 teaspoon vanilla extract optional
Instructions
Preparation Steps
- In a large bowl, whisk together the powdered sugar and meringue powder until well combined.
- Gradually add the warm water and vanilla extract (if using) to the dry ingredients.
- Beat with an electric mixer on low speed until just combined, then increase speed to medium-high and beat for 5-7 minutes, or until the icing is stiff and glossy.
- If the icing is too thick, add more warm water, a teaspoon at a time. If it's too thin, add more powdered sugar, a tablespoon at a time.
- Cover the bowl tightly with plastic wrap, pressing the wrap directly onto the surface of the icing to prevent a crust from forming.
- Color the icing with food coloring if desired, and use immediately for decorating.