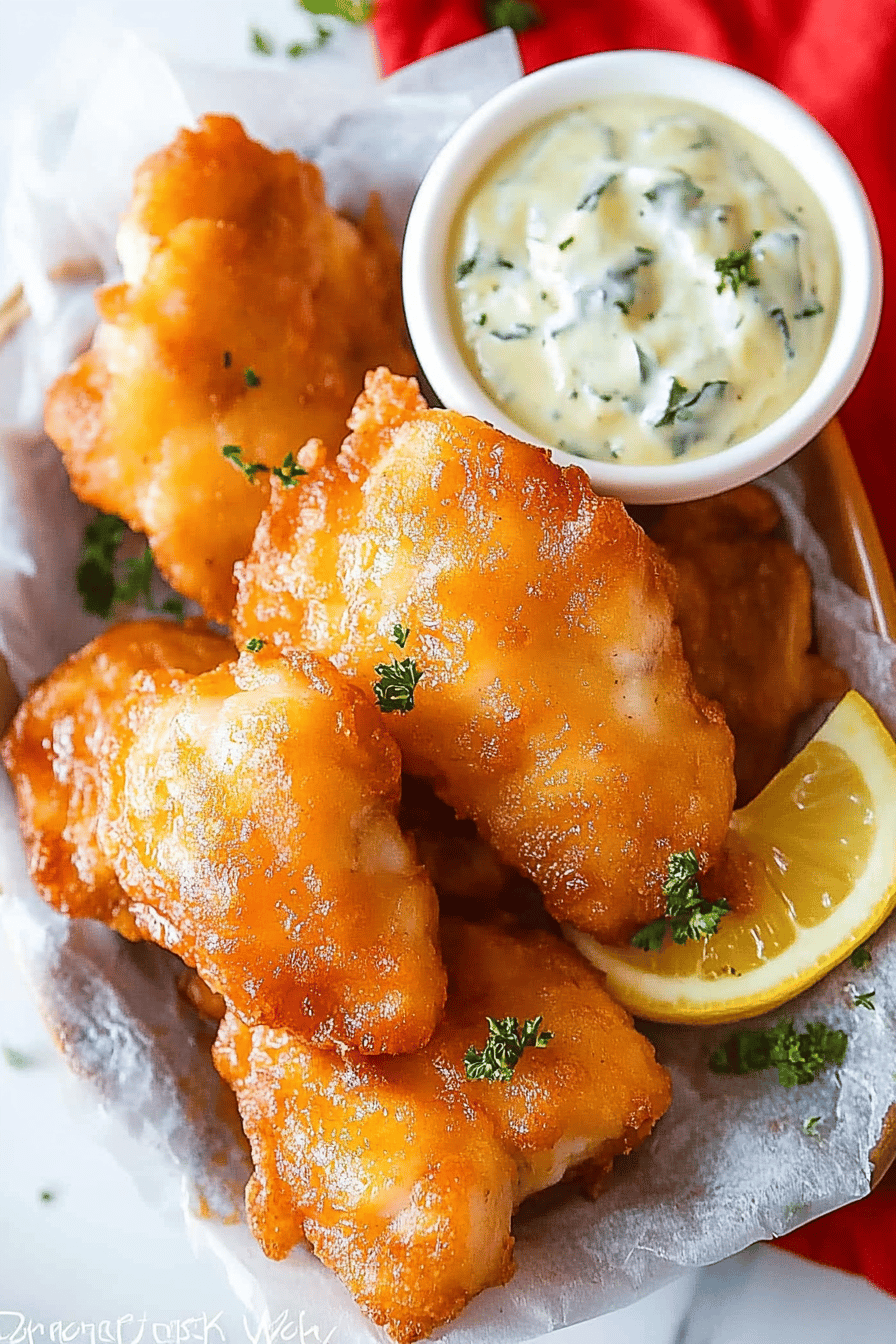
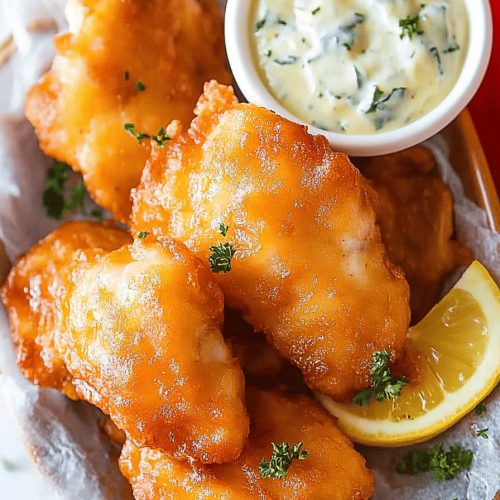
Beer-Battered Onion Rings
Oh, these beer-battered onion rings. If there’s one thing that instantly transports me back to childhood summer evenings, it’s the smell of onions frying. But not just any onion rings, mind you. I’m talking about the kind that are impossibly crisp, golden brown, and have that perfect crunch that makes you close your eyes in bliss. Forget those soggy, sad versions you sometimes get at casual diners. This recipe? This is the real deal, the one that will make you a hero in your own kitchen. It’s honestly as good as any fancy restaurant, and dare I say, even better because you know exactly what went into it. It’s the ultimate comfort food, the perfect snack for game day, and honestly, a lifesaver when you’re craving something utterly delicious but don’t want to spend hours in the kitchen. These beer-battered onion rings are my secret weapon for guaranteed smiles, and I’m so excited to share them with you!
What are beer-battered onion rings?
So, what exactly are these glorious rings of joy? At their heart, they’re simply onions, sliced into rings, dipped in a batter, and then fried to golden perfection. But the “beer-battered” part is where the magic truly happens. The beer in the batter is key – it creates this incredible lightness and crispiness that you just can’t get with milk or water alone. The carbonation in the beer makes the batter puff up beautifully when it hits the hot oil, giving you that signature shatteringly crisp coating. Think of it as a super-delicious, airy cloak for sweet, tender onion. It’s a classic for a reason, and once you try them made this way, you’ll understand why they’ve been a crowd-pleaser for ages. It’s comfort food at its absolute finest, and surprisingly simple to achieve at home.
Why you’ll love this recipe?
Honestly, there are so many reasons why I keep coming back to this recipe for my beer-battered onion rings. First and foremost, the flavor is just out of this world. That initial crunch gives way to the sweet, slightly pungent onion, and the savory batter is just the perfect complement. It’s got this subtle malty undertone from the beer that adds a depth of flavor you won’t find elsewhere. And the texture? Oh, the texture! It’s the holy grail of fried foods – impossibly crispy, never greasy. What I love most about this particular recipe is how surprisingly simple it is to get restaurant-quality results. You don’t need a deep fryer, and the ingredients are all things you probably already have in your pantry. Plus, these are so budget-friendly to make! A few onions, some flour, a beer – that’s it! They’re also incredibly versatile. Serve them as a side, a snack, or even the star of your appetizer spread. They’re a million times better than store-bought, and you’ll feel like a total culinary rockstar when you pull them out of the pan. My family devours these, and they’re always asking for more!
How do you make beer-battered onion rings?
Quick Overview
Making these incredible beer-battered onion rings is all about a few key steps: preparing your onions just right, creating a light and airy batter, and frying them to a perfect golden crisp. The beauty of this method is that it’s straightforward, forgiving, and yields spectacular results. You’ll be amazed at how quickly you can go from raw ingredients to a plate piled high with these irresistible treats. It’s really about a few simple techniques that make all the difference. Don’t be intimidated by frying; with a few tips, it’s totally manageable and incredibly rewarding.
Ingredients
For the Main Batter:
You’ll need about 1 ½ cups of all-purpose flour. Make sure it’s plain all-purpose; no need for self-rising here. I always sift my flour for the batter; it just seems to make it a little lighter and helps prevent lumps. A good pinch of salt, about ½ teaspoon, is crucial for bringing out all the flavors. And don’t forget your leavening: 1 teaspoon of baking powder. This little guy is responsible for so much of that airy crispness. Now for the star of the show: 1 ½ cups of cold beer. I love using a lager or an ale – something with a good, crisp flavor. The colder it is, the better it is for frying, as it helps create that amazing crisp coating. Make sure it’s a beer you’d actually enjoy drinking; that flavor subtly comes through!
For the Filling:
The star of this show is, of course, the onion! I usually use 2 large yellow onions. They have a lovely sweetness when cooked. You want to slice them about ¼ inch thick. The trick is to separate the rings gently. Sometimes the inner rings can be a bit small, but don’t worry about that. You want them thick enough to hold their shape, but not so thick that they don’t cook through. Some people like to soak their onion rings in ice water for about 30 minutes to make them extra crisp and remove some of their bite, which is a fantastic tip if you have the time! I find it makes a noticeable difference, especially if I’m making a big batch.
For the Glaze:
While not strictly for the batter, a simple dipping sauce takes these to the next level. My go-to is a zesty aioli. You just need about ½ cup of good quality mayonnaise, a clove of garlic minced very finely (or even a tiny pinch of garlic powder if you’re in a pinch), a squeeze of fresh lemon juice, and a dash of hot sauce if you like a little kick. Whisk it all together until smooth. You can also just serve them with ketchup or your favorite ranch dressing – they’re delicious no matter what!
Step-by-Step Instructions
Step 1: Preheat & Prep Pan
First things first, get your oil ready for frying. You’ll need about 2-3 inches of neutral oil, like vegetable, canola, or peanut oil, in a heavy-bottomed pot or Dutch oven. Heat the oil over medium-high heat until it reaches about 350-365°F (175-185°C). A good way to check if it’s ready is to drop a tiny bit of batter in; it should sizzle immediately and float to the top. While the oil heats up, make sure your onion rings are separated and ready to go. If you’re soaking them, drain them well and pat them very dry with paper towels. Excess moisture is the enemy of crispiness!
Step 2: Mix Dry Ingredients
In a medium mixing bowl, whisk together the sifted all-purpose flour, baking powder, and salt. Give it a good stir to make sure everything is evenly distributed. This is where you’re building the foundation for that perfect crust. It might seem simple, but making sure your dry ingredients are well combined before adding the wet is key to a smooth batter without lumps.
Step 3: Mix Wet Ingredients
Pour the ice-cold beer into a separate bowl. The colder, the better! This is crucial for creating that light, crisp batter when it hits the hot oil. I usually just grab a beer right out of the fridge and pour it in. No fancy techniques needed here, just cold beer!
Step 4: Combine
Now, gently pour the wet ingredients (the cold beer) into the dry ingredients. Whisk everything together *just* until it’s combined. A few small lumps are totally fine – in fact, they’re good! Overmixing will develop the gluten in the flour, which can make your batter tough and lead to less crispy onion rings. You want a consistency that’s thick enough to coat the onions well, but not so thick that it’s doughy. Think of the consistency of pancake batter, maybe just a tad thicker. It should be pourable but cling to a spoon.
Step 5: Prepare Filling
If you haven’t already, slice your onions into rings, about ¼ inch thick. Gently separate them into individual rings. If any are too small, don’t worry, just set them aside. For the best results, I find it helpful to pat the onion rings dry with paper towels after separating them. This helps the batter adhere better and prevents the oil from sputtering too much.
Step 6: Layer & Swirl
This step is where you’ll coat your onion rings. Dip each onion ring into the beer batter, making sure it’s fully coated. Let any excess batter drip off for a second or two. You can use tongs or your fingers for this – whatever feels most comfortable for you. I often find using my hands is the easiest way to get an even coating.
Step 7: Bake
Carefully place the battered onion rings into the hot oil, being careful not to overcrowd the pot. You’ll want to fry them in batches. Too many at once will lower the oil temperature, resulting in greasy, soggy rings. Fry for about 2-4 minutes per side, or until they are a beautiful golden brown and crispy. Use a slotted spoon or spider strainer to gently turn them over halfway through. They cook pretty quickly, so keep an eye on them!
Step 8: Cool & Glaze
Once they’re perfectly golden and crispy, lift the onion rings out of the oil with your slotted spoon and place them on a wire rack set over a baking sheet. This is my trick for keeping them crispy – don’t put them directly on paper towels, as they’ll steam and lose their crunch. Let them drain and cool slightly. While they’re still warm, now is the perfect time to drizzle or dip them into your prepared aioli or your favorite sauce. That warm onion, crispy coating, and cool, creamy sauce – it’s pure bliss!
Step 9: Slice & Serve
Serve these beer-battered onion rings immediately while they’re hot and at their crispiest. They are truly best right out of the fryer. Arrange them on a platter and watch them disappear! They make an absolutely fantastic appetizer, a side dish for burgers or sandwiches, or just a satisfying snack any time you need a little something special. Enjoy every glorious, crunchy bite!
What to Serve It With
These beer-battered onion rings are so versatile, they’re practically a meal in themselves! For a classic breakfast, imagine these alongside a hearty stack of pancakes or some crispy bacon. They add a savory, satisfying crunch that’s just perfect to cut through the sweetness of breakfast. For a more elegant brunch spread, serve them as a side to your favorite quiche or a savory frittata. They add a touch of indulgence and are always a talking point. As a dessert? Well, maybe not a traditional dessert, but for a *sweet* craving, these fit the bill! They’re so satisfying, they can totally hit that spot. And for those ultimate cozy snack moments, especially during a movie night or a big game, these are the undisputed champions. Pair them with a cold beer, of course, and maybe some Loaded Potato skins or chicken wings for the ultimate comfort food feast. My family loves them piled high next to juicy burgers, and they disappear in minutes!
Top Tips for Perfecting Your Beer-Battered Onion Rings
I’ve made more onion rings than I can count over the years, and I’ve picked up a few tricks that I think really elevate them. For the onions themselves, slicing them evenly is key. A mandoline slicer can be a lifesaver here if you have one, ensuring consistent thickness for even cooking. If you’re soaking them, don’t skip that step – it really makes a difference in both texture and sweetness. When it comes to mixing the batter, please, please, please, don’t overmix! A few lumps are your friend. Overmixing develops gluten, which leads to tough, doughy rings instead of light, crispy ones. Aim for that pancake-batter consistency. For the beer, always use it COLD. Seriously, I sometimes even pop my beer in the freezer for 15-20 minutes before I start mixing. The colder the beer, the better the batter will crisp up. When you’re frying, don’t overcrowd the pot. This is probably the biggest mistake people make. Lowering the oil temperature is the fastest way to get greasy rings. Fry in batches, let them cook to a beautiful golden brown, and drain them on a wire rack, not paper towels, to keep that crispiness intact. I learned this one the hard way! For ingredient swaps, if you’re out of baking powder, you can use a teaspoon of baking soda plus 2 teaspoons of cream of tartar, but baking powder is definitely easier and more reliable. If you don’t drink beer, a sparkling water or club soda can also work, but the flavor won’t be quite the same – the beer adds a subtle, lovely depth. Trust me on this one, it’s worth trying with the beer!
Storing and Reheating Tips
Okay, so the Absolute Best way to enjoy these beer-battered onion rings is fresh out of the fryer. They are truly a magical experience at that moment. But if you happen to have any leftovers (which is rare in my house!), storing them properly is key to salvaging some of that crispiness. If you need to store them at room temperature, keep them on a wire rack loosely covered for an hour or two. Beyond that, their crispness will start to fade significantly. For refrigerator storage, place them in a single layer on a baking sheet and pop them in the fridge until they’re completely cool. Then, transfer them to an airtight container with a paper towel at the bottom to absorb any moisture. They’ll last about 2-3 days in the fridge, but honestly, the texture won’t be quite the same as when they were fresh. For freezer instructions, you’ll want to freeze them in a single layer on a baking sheet until solid, then transfer them to a freezer-safe bag or container. They can last up to 2-3 months. When it comes to reheating, the oven is your best friend. Skip the microwave at all costs! Preheat your oven to 375°F (190°C). Spread the cooled rings on a baking sheet and bake for about 8-10 minutes, or until heated through and re-crisped. The exact time will depend on how many you’re reheating and how cold they are. For freezer-reheated rings, you might need a bit longer, around 12-15 minutes. The key is to get them hot enough to regain some of that initial crunch.
Frequently Asked Questions
Final Thoughts
There you have it – the secret to truly incredible, crispy beer-battered onion rings right in your own kitchen! I really hope you give this recipe a try. It’s one of those dishes that brings so much joy, and it’s surprisingly achievable for even beginner cooks. The satisfaction of pulling a batch of perfectly golden, crunchy rings from the fryer is just unmatched. They’re more than just a side dish; they’re an experience! If you love this recipe, you might also enjoy my Crispy Fried Chicken or my Homemade Mozzarella Sticks – they’re all about that perfect crunch. So go ahead, grab some onions, a cold beer, and get frying! I can’t wait to hear how yours turn out. Don’t forget to share your pictures and let me know your favorite dipping sauce in the comments below. Happy frying!
Beer-Battered Onion Rings
Ingredients
Main Ingredients
- 2 large onions sliced into 0.25-inch thick rings
- 1.5 cups all-purpose flour
- 1 teaspoon baking powder
- 0.5 teaspoon salt
- 0.25 teaspoon black pepper
- 12 oz beer lager or pilsner, chilled
- 4 cups vegetable oil for frying
Instructions
Preparation Steps
- Separate the onion rings and set aside.
- In a medium bowl, whisk together the flour, baking powder, salt, and pepper.2 large onions
- Gradually whisk in the chilled beer until a smooth, thick batter forms. It should be the consistency of pancake batter.2 large onions
- Heat the vegetable oil in a large, deep skillet or Dutch oven over medium-high heat to 375°F (190°C).2 large onions
- Dip each onion ring into the batter, ensuring it is fully coated. Let excess batter drip off.2 large onions
- Carefully place the battered onion rings into the hot oil, working in batches to avoid overcrowding the pan. Fry for 2-3 minutes per side, until golden brown and crispy.
- Remove the onion rings from the oil with a slotted spoon and drain on paper towels.
- Season immediately with additional salt and pepper if desired. Serve hot.