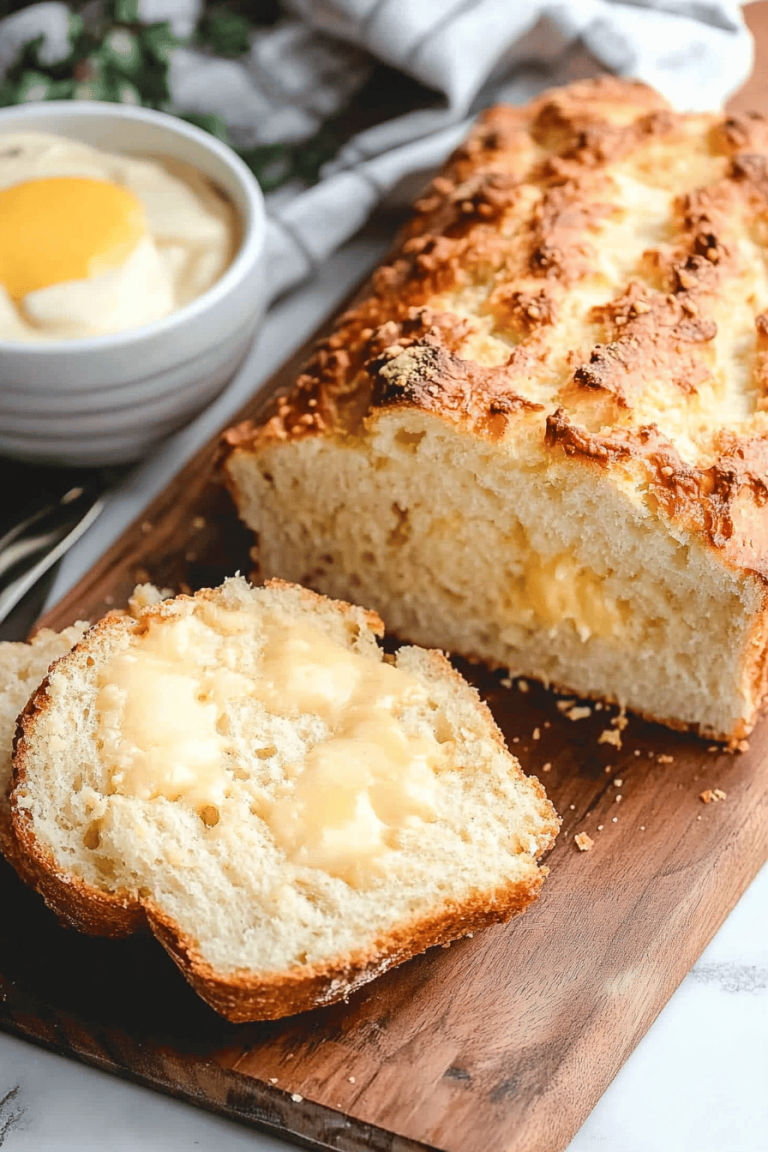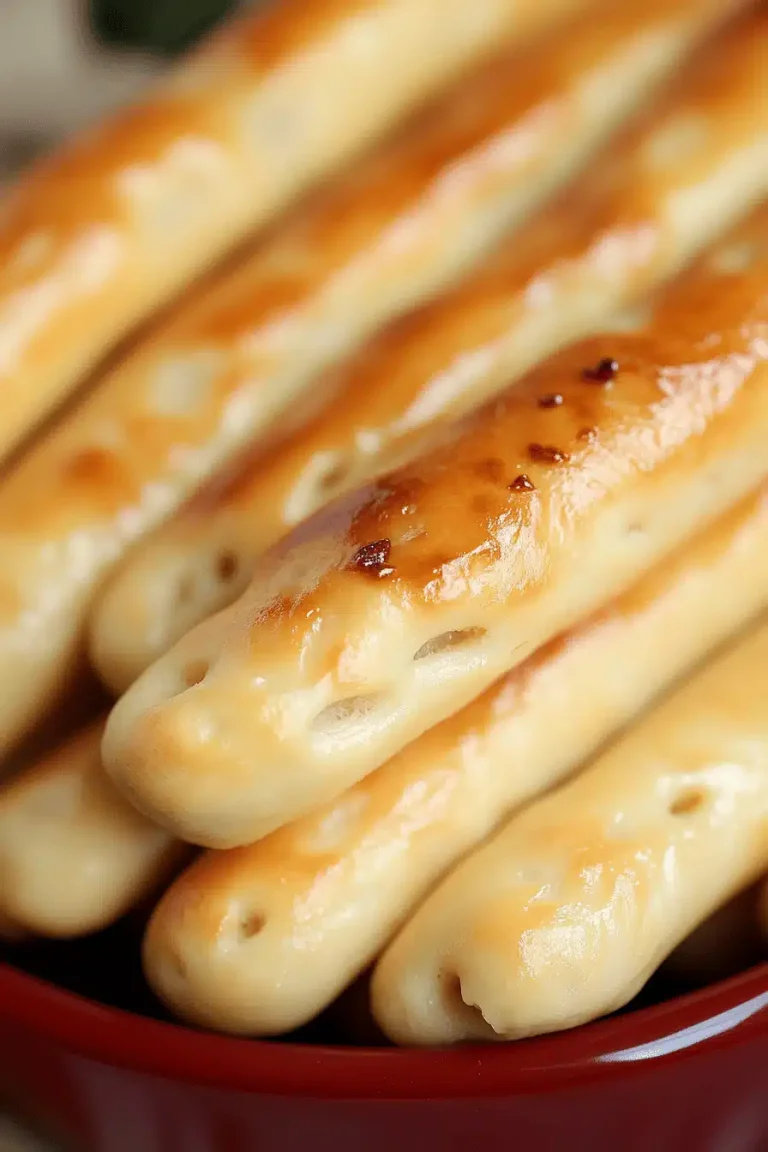
Angel Biscuits
There are some recipes that just feel like a hug, aren’t there? The kind that smell like childhood Sundays and taste like pure comfort. For me, that’s these Angel Biscuits. Honestly, calling them “biscuits” feels a little understated. They’re more like little clouds of buttery, slightly sweet goodness that melt in your mouth. I first stumbled upon a version of this recipe years ago when I was desperate for something impressive to bring to a potluck, but also something I wouldn’t mess up under pressure. You know those moments? You want to wow people, but your brain is just… not cooperating. These were a lifesaver. They’re so tender, so light, and that whisper of sweetness makes them stand out from your everyday biscuit. If you’ve ever tried a really good Cinnamon Roll and wished it was… well, easier to make and less of a commitment, then these angel biscuits are probably what you’re dreaming of. They’re surprisingly simple, but they taste like they came from a fancy bakery. Get ready to fall in love!
What are angel biscuits?
So, what exactly are these magical little things we’re calling Angel Biscuits? Think of them as the happy medium between a fluffy biscuit and a tender scone, but with their own unique charm. They’re not overly sweet like a dessert, but they have just enough sugar to make them special. The name “angel biscuit” perfectly captures their ethereal texture – they’re unbelievably light and airy, almost as if they were blessed by an angel. The “magic” really comes from a combination of ingredients and a gentle hand during mixing. They’re essentially a quick bread, meaning you don’t need yeast, which is a huge win for busy weeknights. The “angel” part is also because they are so incredibly forgiving; even if you’re new to baking, you’ll find these surprisingly easy to master. They’re your go-to for when you want something incredibly satisfying without all the fuss.
Why you’ll love this recipe?
There are so many reasons why this angel biscuit recipe has earned a permanent spot in my recipe box, and I just know you’re going to feel the same way. First off, let’s talk about that flavor. The subtle sweetness is just enough to make them irresistible, and when they’re warm from the oven, with that buttery aroma filling your kitchen? Pure heaven. They’re not cloying or overly rich, just perfectly balanced. And the texture! Oh, the texture is divine. They are so incredibly tender and flaky, they practically dissolve on your tongue. It’s the kind of biscuit that makes you close your eyes with the first bite. Beyond the taste, the simplicity of this recipe is a huge draw. I’ve made these countless times, and they genuinely never fail. You don’t need any fancy equipment, and the ingredients are all pantry staples. Seriously, it’s my secret weapon when I need a quick, impressive treat. And speaking of treats, the versatility of these angel biscuits is another reason they’re so fantastic. They’re not just for breakfast or brunch; they make an amazing accompaniment to a light lunch, a perfect afternoon pick-me-up, or even a simple dessert with a dollop of whipped cream. I also love that they’re incredibly cost-effective. You can whip up a batch of these beauties for pennies, making them a budget-friendly way to enjoy something truly delicious. If you’re a fan of my fluffy Buttermilk Pancakes or my easy cinnamon swirl bread, I have a feeling these angel biscuits are going to be your new favorite. They offer a similar comforting vibe but in a delightful, bite-sized package.
How do I make angel biscuits?
Quick Overview
Making these angel biscuits is a breeze! You’ll simply whisk together your dry ingredients, then gently combine them with your wet ingredients. Don’t overmix! A few gentle folds are all you need for that perfect tender crumb. Then, you’ll shape them, bake them until golden, and finish them off with a simple, sweet glaze. It’s straightforward, takes minimal time, and the results are truly spectacular. Trust me, you’ll be amazed at how something so simple can taste so incredibly good.
Ingredients
For the Main Batter:
2 cups all-purpose flour, plus more for dusting. I always use King Arthur’s unbleached all-purpose flour for consistent results. It just has a good protein content that works beautifully here.
2 teaspoons baking powder. Make sure it’s fresh! Old baking powder is the culprit behind flat, sad baked goods. Test it by dropping a pinch into hot water – it should fizz vigorously.
1/2 teaspoon baking soda. This helps with browning and adds a little extra lift. Don’t skip it!
1/2 teaspoon salt. This isn’t just for flavor; it balances the sweetness and enhances all the other flavors.
1/4 cup granulated sugar. This is where that subtle sweetness comes from. You can adjust it slightly, but I find this amount perfect.
1/2 cup (1 stick) unsalted butter, very cold and cut into small cubes. Cold butter is key for flaky biscuits! It creates steam pockets as it bakes, resulting in those lovely layers. I like to pop my cubed butter in the freezer for about 15 minutes before I start mixing.
For the Wet Ingredients:
3/4 cup milk, buttermilk, or heavy cream. Honestly, I’ve tried them all, and while whole milk works great, buttermilk gives these angel biscuits an incredible tenderness and a slight tang that I adore. If you don’t have buttermilk, you can make a quick substitute: pour 3/4 cup milk into a measuring cup and stir in 3/4 tablespoon of lemon juice or white vinegar. Let it sit for 5-10 minutes until it looks slightly curdled. Heavy cream makes them extra rich and decadent, almost like a dessert!
For the Glaze:
1/2 cup powdered sugar, sifted. Sifting is important to avoid lumps in your glaze.
1-2 tablespoons milk or cream. Start with 1 tablespoon and add more as needed to reach your desired drizzling consistency.
1/4 teaspoon vanilla extract (optional, but highly recommended for a little extra flavor!)
A pinch of salt. Just a tiny bit to balance the sweetness.
Step-by-Step Instructions
Step 1: Preheat & Prep Pan
First things first, let’s get your oven fired up and ready to go. Preheat it to a nice, cozy 425 degrees Fahrenheit (220 degrees Celsius). While the oven is heating, grab a baking sheet and line it with parchment paper. This is my little trick to ensure easy cleanup and prevent any sticking. You could also lightly grease your baking sheet if you don’t have parchment, but parchment paper is truly a game-changer for me.
Step 2: Mix Dry Ingredients
In a large mixing bowl, whisk together the flour, baking powder, baking soda, salt, and granulated sugar. Give it a good whisk to make sure everything is evenly distributed. You want all those leavening agents to be perfectly mixed in, so you get an even rise. The texture you’re looking for here is light and airy. If your flour has been sitting for a while, it’s a good idea to give it a quick sift before measuring, just to break up any clumps.
Step 3: Mix Wet Ingredients
In a separate, smaller bowl or a liquid measuring cup, combine your milk (or buttermilk, my personal favorite for this!) and the very cold, cubed unsalted butter. Using your fingertips or a pastry blender, cut the butter into the dry ingredients until the mixture resembles coarse crumbs with some pea-sized pieces of butter still visible. This is where the magic starts! Those little bits of butter are going to melt in the oven and create those glorious flaky layers. Don’t overwork it – you want distinct pieces of butter, not a smooth paste.
Step 4: Combine
Now, pour your wet ingredients into the bowl with the dry ingredients. This is the crucial step where gentleness is key. Use a spatula or a wooden spoon to gently fold the ingredients together until just combined. You’ll still see some dry streaks of flour; that’s perfectly okay! Overmixing is the enemy of tender biscuits. Seriously, stop as soon as everything is *mostly* incorporated. A few gentle folds are all you need to bring it together. The dough will be a little shaggy and might seem a bit sticky, and that’s exactly what you want for incredibly tender angel biscuits.
Step 5: Prepare Filling
While the dough is resting for a moment, let’s get the filling ready if you’re going for a swirled version. For a classic angel biscuit, you might not have a distinct “filling” layer, but if you’re feeling adventurous, you could mix a tablespoon of cinnamon with a tablespoon of sugar for a lovely sweet swirl. Or, for something even simpler, just have some melted butter ready to brush on top before glazing.
Step 6: Layer & Swirl
Turn the shaggy dough out onto a lightly floured surface. Gently pat or roll the dough into a rectangle, about 1/2 inch thick. If you’re adding a cinnamon-sugar swirl, now’s the time to sprinkle it evenly over the dough. Then, gently roll it up like a jelly roll. Pinch the seam to seal. Using a sharp knife, cut the roll into 1-inch thick pieces. If you’re not swirling, you can just gently pat the dough into a rough circle and cut it into wedges, or use a biscuit cutter. For the classic swirled look, place the cut pieces into your prepared baking dish, cut-side up.
Step 7: Bake
Now, pop those beautiful angel biscuits into your preheated oven. Bake for 12-15 minutes, or until they’re puffed up and golden brown on top. The exact baking time can vary depending on your oven, so keep an eye on them. You want that lovely golden color, but don’t let them get too dark. If you’re unsure if they’re done, you can gently insert a toothpick into the center of one; it should come out clean.
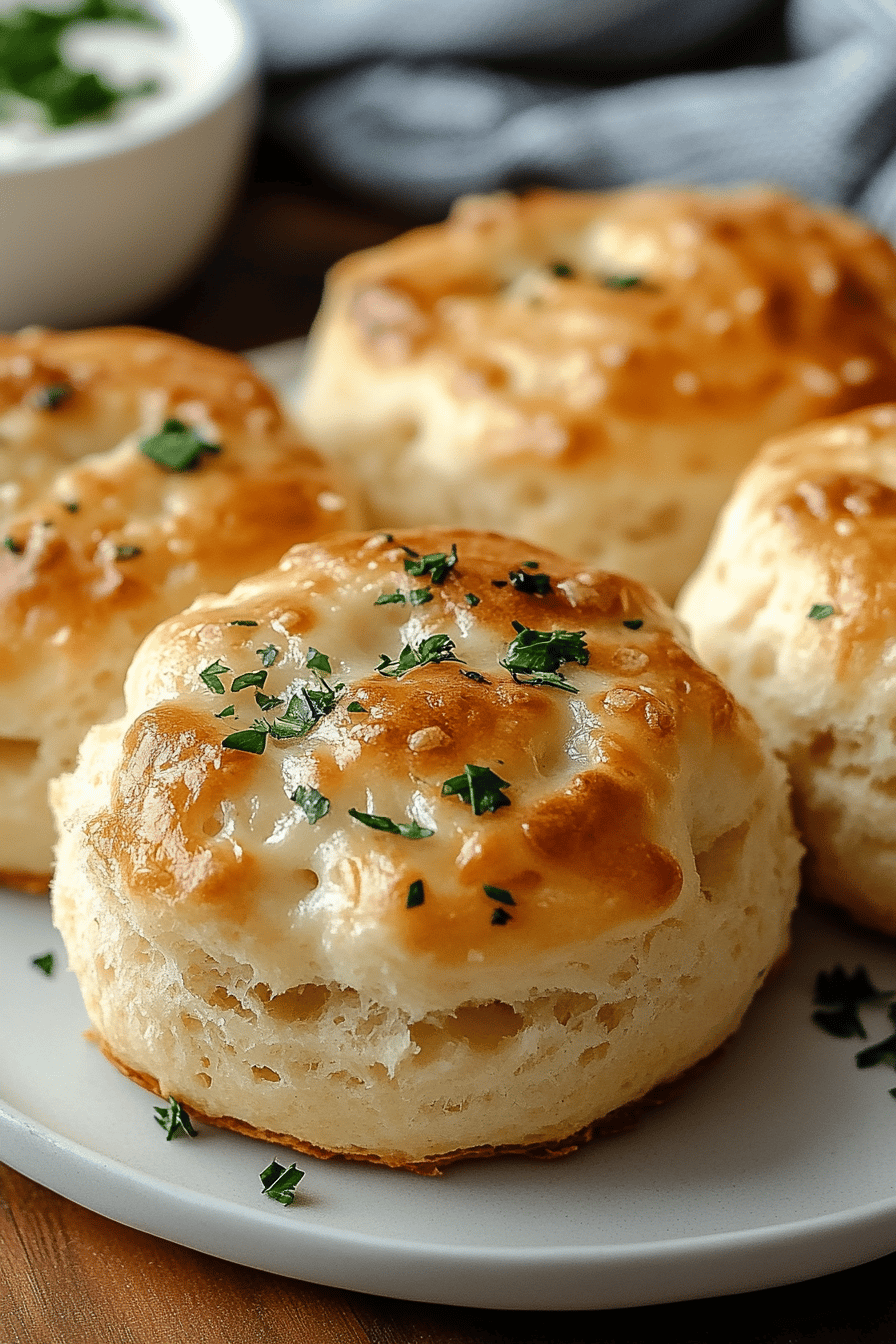
Step 8: Cool & Glaze
Once they’re perfectly baked, remove the angel biscuits from the oven. Let them cool in the baking dish for about 5-10 minutes. While they’re cooling, whisk together the powdered sugar, 1 tablespoon of milk (or cream), vanilla extract (if using), and a pinch of salt in a small bowl. You want a glaze that’s thick enough to coat but thin enough to drizzle. Add more milk, a teaspoon at a time, until you reach your desired consistency. Drizzle the glaze generously over the warm biscuits. The warmth of the biscuits will help the glaze set slightly. If you want a more opaque glaze, use less milk.
Step 9: Slice & Serve
Once the glaze has set a little, they are ready to be devoured! Serve them warm for the Absolute Best experience. If you made swirled angel biscuits, the swirl will be beautifully showcased when you slice into them. If you made them as rounds, they are perfect for breaking apart. They are truly divine on their own, but a little extra smear of butter or a dollop of jam is never a bad idea. Enjoy the little bursts of flavor and the incredible, melt-in-your-mouth texture!
What to Serve It With
These angel biscuits are so wonderfully versatile, they can truly fit into any meal or snack occasion. For a classic Breakfast, they are absolutely divine alongside a steaming mug of coffee or a glass of fresh orange juice. I love serving them warm with a side of scrambled eggs and crispy bacon – it’s such a comforting and satisfying start to the day. They’re a step up from toast, but still so quick and easy to make on a busy morning. For a more elaborate Brunch spread, these angel biscuits add a touch of elegance. Imagine them nestled amongst a platter of fresh fruit, alongside a quiche or some savory sausage links. Their delicate sweetness complements richer dishes beautifully. You can even serve them with a small bowl of clotted cream and jam for a slightly more decadent feel, making your brunch feel extra special. When we have friends over for an afternoon tea or a casual gathering, these are my go-to. As a sweet treat for Dessert, they’re surprisingly delightful. A warm angel biscuit with a scoop of vanilla bean Ice Cream and a drizzle of chocolate sauce? Don’t mind if I do! Or, if you’re looking for a simple, satisfying answer to those late-night cravings, these are perfect. They satisfy that “need something sweet” urge without feeling heavy or overly indulgent. For those moments when you just need a little something to tide you over, these are ideal for Cozy Snacks. Pair them with a warm cup of tea or even a glass of milk, and you’ve got instant comfort food. My kids sometimes ask for them as an after-school treat, and I’m always happy to oblige because they’re so easy and so much better than store-bought cookies.
Top Tips for Perfecting Your Angel Biscuits
Over the years, I’ve learned a few things that really elevate these angel biscuits from good to absolutely spectacular. First, the Zucchini Prep, if you choose to add it (which I sometimes do for extra moisture and a hint of green!), is crucial. Make sure you grate your zucchini finely and then squeeze out as much moisture as possible. I usually wrap it in a clean kitchen towel or cheesecloth and wring it out thoroughly. This prevents your dough from becoming too wet and gummy. For the general dough mixing, Mixing Advice is paramount. I cannot stress enough how important it is *not* to overmix. Fold the wet and dry ingredients until they *just* come together. A shaggy dough is a happy dough! Overmixing develops the gluten too much, leading to tough, rubbery biscuits, and nobody wants that. For that beautiful marbling in a swirled version, Swirl Customization is fun. Don’t overwork the dough when you’re spreading the cinnamon-sugar mixture or rolling it up. A gentle, even sprinkle and a light hand when rolling will give you gorgeous, distinct swirls. You can also play with different flavorings for the swirl – a little cardamom or nutmeg can be a lovely addition. When it comes to Ingredient Swaps, I’ve experimented a bit. If you’re out of regular milk, buttermilk is my favorite substitute for the batter, adding a wonderful tenderness. For the butter, make sure it’s truly cold! If you forget to chill it, you can grate frozen butter into the flour mixture; it works just as well. For the glaze, if you want it a bit thicker, just use less liquid; if you want it thinner, add a tiny bit more milk. It’s very forgiving. Lastly, Baking Tips are always helpful. Ovens can be tricky, so get to know yours. If your oven tends to run hot, you might need to slightly reduce the temperature or baking time. Using the middle rack ensures even baking. If you notice the tops browning too quickly before the inside is cooked, you can loosely tent them with foil. When it comes to the glaze, Glaze Variations are endless. You can add a touch of lemon zest for a citrusy kick, a drop of almond extract for a different nutty flavor, or even a tiny bit of food coloring for a fun festive touch. The key is to start with a basic powdered sugar and liquid base and then experiment to your heart’s content. I’ve found that a slightly thicker glaze is perfect for a more “drizzled” look, while a thinner one will spread more evenly.
Storing and Reheating Tips
Properly storing your delicious angel biscuits is key to enjoying them for a few days, though let’s be honest, they rarely last that long in my house! At Room Temperature, I usually keep them in an airtight container or a zip-top bag, and they’re best enjoyed within 2-3 days. They might lose a little bit of their crispness on the outside after the first day, but they’ll still be wonderfully tender inside. If you’ve glazed them, it’s best to wait until they’ve cooled completely before sealing them up to prevent sogginess. For longer storage, Refrigerator Storage is your best bet. Place them in an airtight container or wrap them tightly in plastic wrap followed by foil. They’ll stay good in the fridge for up to a week, though I’d recommend eating them within 4-5 days for optimal freshness. When you want to enjoy them again, you can gently reheat them in a toaster oven or a regular oven at around 300°F (150°C) for a few minutes until warmed through. This brings back some of that lovely tenderness. If you’re really looking to stock up or have a surplus, Freezer Instructions are fantastic. Let the baked and cooled angel biscuits cool completely. Then, wrap each biscuit individually and tightly in plastic wrap, followed by a layer of aluminum foil or a freezer-safe bag. Properly stored, they can last in the freezer for up to 2-3 months. To thaw, you can either let them thaw overnight in the refrigerator or place them directly into a preheated oven (around 350°F/175°C) for about 10-15 minutes until heated through. For the Glaze Timing Advice, it’s usually best to add the glaze just before serving or storing at room temperature. If you’re freezing them, I recommend freezing them *without* the glaze. Then, you can whip up a fresh batch of glaze when you’re ready to serve them. This ensures the glaze stays fresh and vibrant. If you do glaze them before storing at room temperature or in the fridge, the glaze might become a little sticky or melty over time, which isn’t necessarily a bad thing, but it’s not quite the same as fresh glaze!
Frequently Asked Questions
Final Thoughts
There you have it – my beloved angel biscuits! I truly hope you give these a try because they’re more than just a recipe; they’re a little slice of happiness. The combination of that unbelievably tender texture and the delicate, sweet flavor is just spot-on. They’re perfect for those moments when you need a little something special without a lot of fuss. Whether you’re serving them at a weekend brunch, as a comforting afternoon treat, or just because, they have a way of making any occasion feel a bit brighter. If you enjoyed making these, you might also love my recipe for easy blueberry scones or my fluffy pancakes, which share that same comforting, homemade goodness. Don’t forget to let me know how yours turn out in the comments below! I’m always so curious to hear about your baking adventures and any personal twists you add. Your feedback and photos make my day! Happy baking, and enjoy every single bite!