Crispy Homemade Potato Chips: The Ultimate Guide to Perfect Chips
{“@context”:”https://schema.org”,”@type”:”Recipe”,”name”:”Crispy Homemade Potato Chips”,”author”:{“@type”:”Person”,”name”:”Recipe Expert”},”datePublished”:”2024-02-29″,”description”:”Make perfectly crispy potato chips at home! This recipe uses simple ingredients and techniques to deliver delicious, golden-brown chips every time. A satisfying snack!”,”prepTime”:”PT15M”,”cookTime”:”PT20M”,”totalTime”:”PT35M”,”recipeYield”:”6 servings”,”recipeCategory”:”Snack”,”recipeCuisine”:”American”,”nutrition”:{“@type”:”NutritionInformation”,”calories”:”250 kcal”,”fatContent”:”15g”,”saturatedFatContent”:”2g”,”cholesterolContent”:”0mg”,”sodiumContent”:”150mg”,”carbohydrateContent”:”25g”,”fiberContent”:”2g”,”sugarContent”:”1g”,”proteinContent”:”3g”},”recipeIngredient”:[“2 large russet potatoes”,”2 quarts vegetable oil, for frying”,”Salt, to taste”],”recipeInstructions”:[{“@type”:”HowToStep”,”text”:”Wash and thinly slice the potatoes using a mandoline or a sharp knife. Aim for slices about 1/16 inch thick.”},{“@type”:”HowToStep”,”text”:”Place the potato slices in a bowl of cold water for at least 30 minutes to remove excess starch. This helps them crisp up better.”},{“@type”:”HowToStep”,”text”:”Drain the potatoes and pat them completely dry with paper towels. Moisture will cause the oil to splatter and prevent crisping.”},{“@type”:”HowToStep”,”text”:”Heat the vegetable oil in a large, heavy-bottomed pot or deep fryer to 350°F (175°C).”},{“@type”:”HowToStep”,”text”:”Carefully add the potato slices to the hot oil in small batches, being careful not to overcrowd the pot. Overcrowding will lower the oil temperature and result in soggy chips.”},{“@type”:”HowToStep”,”text”:”Fry the potato slices for 3-5 minutes, or until they are golden brown and crispy, flipping occasionally to ensure even cooking.”},{“@type”:”HowToStep”,”text”:”Remove the chips from the oil with a slotted spoon and place them on a wire rack lined with paper towels to drain excess oil.”},{“@type”:”HowToStep”,”text”:”Immediately sprinkle the chips with salt to taste. Let cool slightly before serving. Enjoy!”}]}
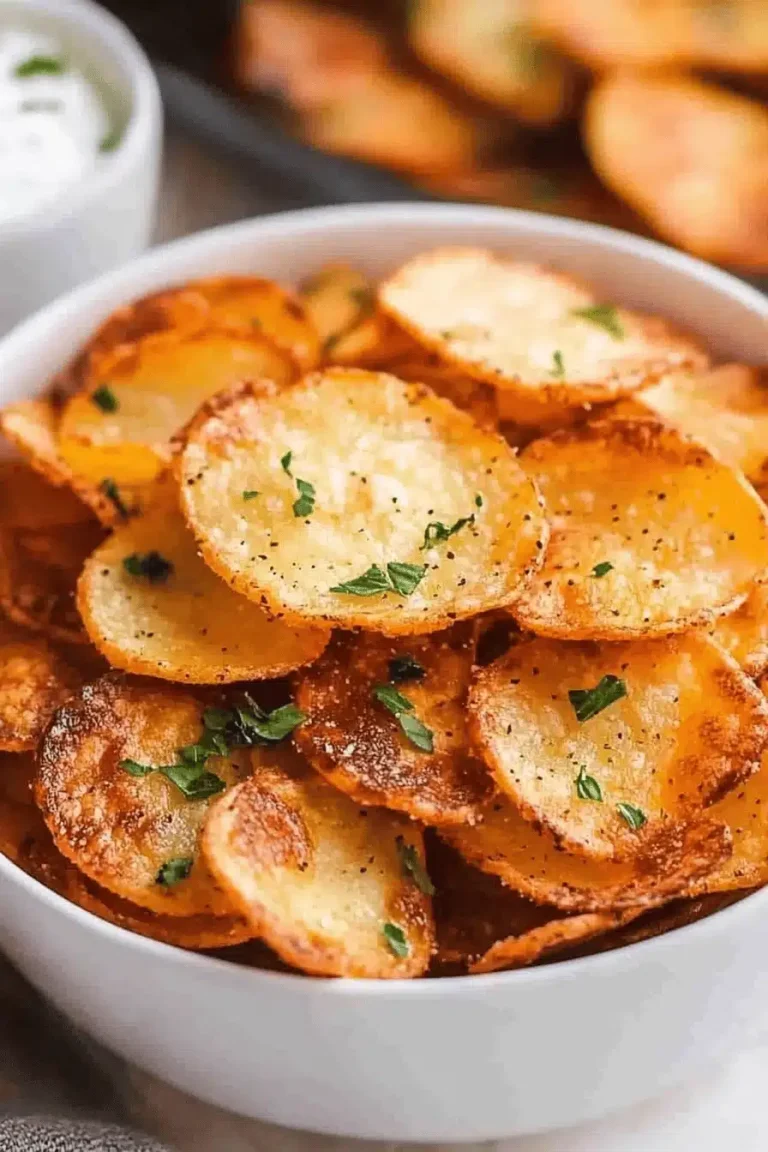
Crispy Homemade Potato Chips: The Ultimate Guide to Perfect Chips
Few snacks are as universally loved as potato chips. Their satisfying crunch and salty flavor make them irresistible. While store-bought chips are convenient, nothing compares to the taste and texture of homemade potato chips. This recipe provides a detailed guide to creating perfectly crispy, golden-brown chips in your own kitchen.
The History and Allure of Potato Chips
The origin of potato chips is often attributed to George Crum, a chef at Moon’s Lake House in Saratoga Springs, New York, in 1853. Legend has it that a demanding customer repeatedly rejected Crum’s FRIED POTATOES for being too thick. In frustration, Crum sliced potatoes paper-thin, fried them until crispy, and heavily salted them. To his surprise, the customer loved them, and “Saratoga Chips” were born. Whether this story is entirely accurate remains debated, but it highlights the appeal of thinly sliced, crispy potatoes.
The flavor profile of potato chips is simple yet addictive: salty, savory, and slightly sweet from the potato itself. The satisfying crunch adds another layer of sensory pleasure. Homemade chips allow you to customize the flavor with different seasonings, oils, and even potato varieties, offering a world of possibilities beyond the standard store-bought options.
Ingredients for Perfect Homemade Chips
The key to great chips lies in the quality of the ingredients and the technique used. Here’s what you’ll need:
- Potatoes: 2 large russet potatoes (about 1 pound), Yukon Gold potatoes also work well
- Oil: 4 cups vegetable oil, canola oil, or peanut oil (for frying)
- Salt: 1-2 teaspoons sea salt or kosher salt (to taste)
- Optional Seasonings: Paprika, garlic powder, onion powder, black pepper, chili powder, or any other spices you enjoy
Step-by-Step Instructions for Crispy Chips
Follow these detailed instructions to achieve chip perfection:
- Prepare the Potatoes: Wash the potatoes thoroughly. Peel them if desired (leaving the skin on adds texture and nutrients, but peel for a more traditional chip).
- Slice the Potatoes: This is crucial! Use a mandoline slicer for perfectly even, thin slices (about 1/16 inch thick). If you don’t have a mandoline, use a very sharp knife and aim for consistent thinness. Uneven slices will cook unevenly.
- Rinse the Potatoes: Place the potato slices in a large bowl of cold water. Rinse them several times until the water runs clear. This removes excess starch, which helps the chips become crispier.
- Dry the Potatoes: Drain the potato slices and spread them out in a single layer on clean kitchen towels or paper towels. Pat them thoroughly dry. The drier the potatoes, the crispier the chips.
- Heat the Oil: Pour the oil into a large, heavy-bottomed pot or deep fryer. Heat the oil over medium-high heat to 350°F (175°C). Use a deep-fry thermometer to monitor the temperature.
- Fry the Potatoes: Carefully add the potato slices to the hot oil in small batches. Overcrowding the pot will lower the oil temperature and result in soggy chips. Fry for 2-3 minutes per batch, or until the chips are golden brown and crispy. Stir occasionally to ensure even cooking.
- Remove and Drain: Use a slotted spoon or wire skimmer to remove the chips from the oil. Place them on a wire rack lined with paper towels to drain excess oil.
- Season and Serve: Immediately sprinkle the hot chips with salt and any desired seasonings. Toss to coat evenly. Serve immediately and enjoy!
Tips and Variations for Perfect Chips
- Potato Variety: Russet potatoes are the classic choice for chips due to their high starch content. Yukon Gold potatoes offer a slightly sweeter flavor and creamier texture. Experiment to find your favorite!
- Oil Temperature: Maintaining the correct oil temperature is essential. If the oil is too hot, the chips will burn quickly. If it’s too cold, they’ll absorb too much oil and become soggy.
- Soaking Time: Soaking the potato slices in cold water for at least 30 minutes (or even up to a few hours) removes even more starch and results in extra-crispy chips.
- Seasoning Variations: Get creative with your seasonings! Try adding smoked paprika, cayenne pepper, rosemary, thyme, or even a sprinkle of parmesan cheese.
- Sweet Potato Chips: Substitute sweet potatoes for regular potatoes for a sweeter, slightly softer chip. Note that sweet potatoes may require slightly longer cooking time.
- Baked Chips: For a healthier alternative, try baking the chips. Toss the thinly sliced and dried potatoes with a tablespoon of olive oil and your favorite seasonings. Spread them in a single layer on a baking sheet and bake at 400°F (200°C) for 15-20 minutes, or until golden brown and crispy, flipping halfway through.
- Air Fryer Chips: Air frying is another great option for healthier chips. Toss the potatoes with oil and seasonings, then air fry at 350°F (175°C) for 12-15 minutes, shaking the basket halfway through.
Troubleshooting Common Chip Problems
- Soggy Chips: This is usually caused by overcrowding the pot, using oil that isn’t hot enough, or not drying the potatoes thoroughly.
- Burnt Chips: The oil is too hot, or the chips are being fried for too long.
- Unevenly Cooked Chips: The potato slices are uneven in thickness. Using a mandoline is highly recommended.
- Chips Not Crispy Enough: Not enough starch was removed. Try soaking the potato slices for a longer period.
Serving Suggestions
Homemade potato chips are delicious on their own as a snack, but they also pair well with various dips and accompaniments. Consider serving them with:
- French onion dip
- Guacamole
- Salsa
- Sour cream and chives
- Homemade aioli
Conclusion
Making homemade potato chips is a rewarding culinary experience. With a little practice and attention to detail, you can create chips that are far superior to anything you can buy in a store. Enjoy the satisfying crunch and delicious flavor of your own homemade creation!